Building your own DXP - Getting started with Drupal and Mautic (workshop) Nick Veenhof Ruth Cheesley @MauticCommunity
Slide 1
Slide 2

Agenda 1. Demo of Mautic & Drupal in action 2. Why personalize? A global market != 1 audience 3. DIY Workshop with Mautic & Drupal 4. In Closing 5. Homework! @MauticCommunity
Slide 3

- Agenda Demo
- Why personalize? @MauticCommunity
Slide 4
- Demo Why personalize?
- Workshop @MauticCommunity
Slide 5
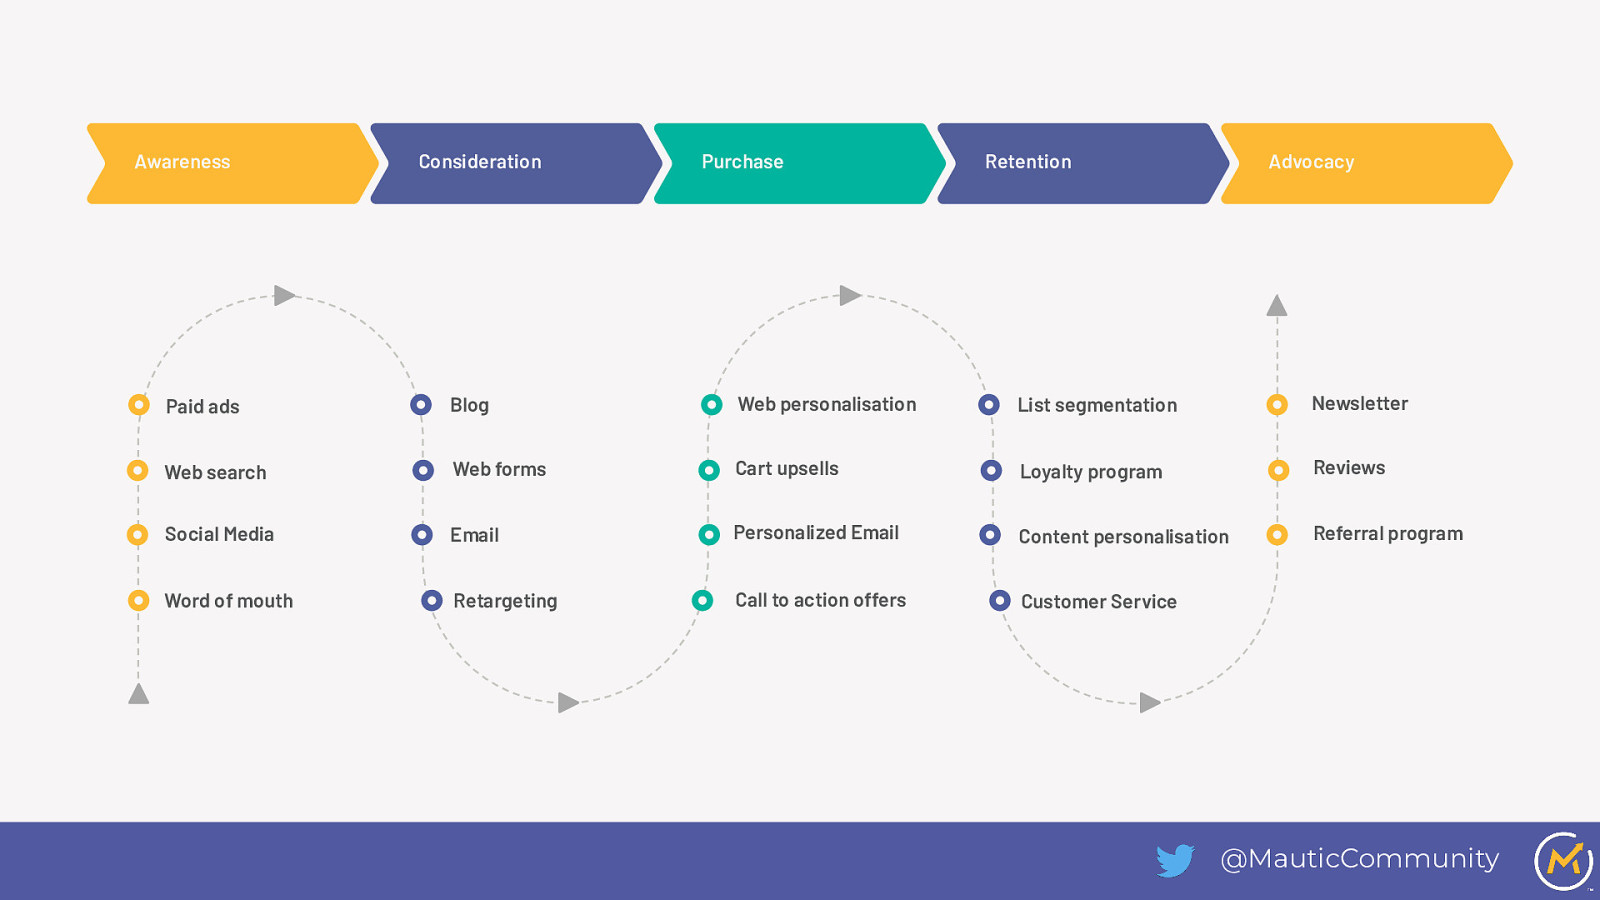
Awareness Consideration Purchase Retention Advocacy Paid ads Blog Web personalisation List segmentation Newsletter Web search Web forms Cart upsells Loyalty program Reviews Social Media Email Personalized Email Content personalisation Referral program Word of mouth Retargeting Call to action offers Customer Service @MauticCommunity
Slide 6

@MauticCommunity
Slide 7

@MauticCommunity
Slide 8

@MauticCommunity
Slide 9

Traditional Email Marketing Is Single Channel Focused ● Tracking email and link engagement ● No knowledge of activities on other channels ● Limited ability to track and nurture the journey of a contact through the buying cycle ● Simplistic personalisation of emails (first name), basic automation features Photo by Brett Jordan on Unsplash
Slide 10
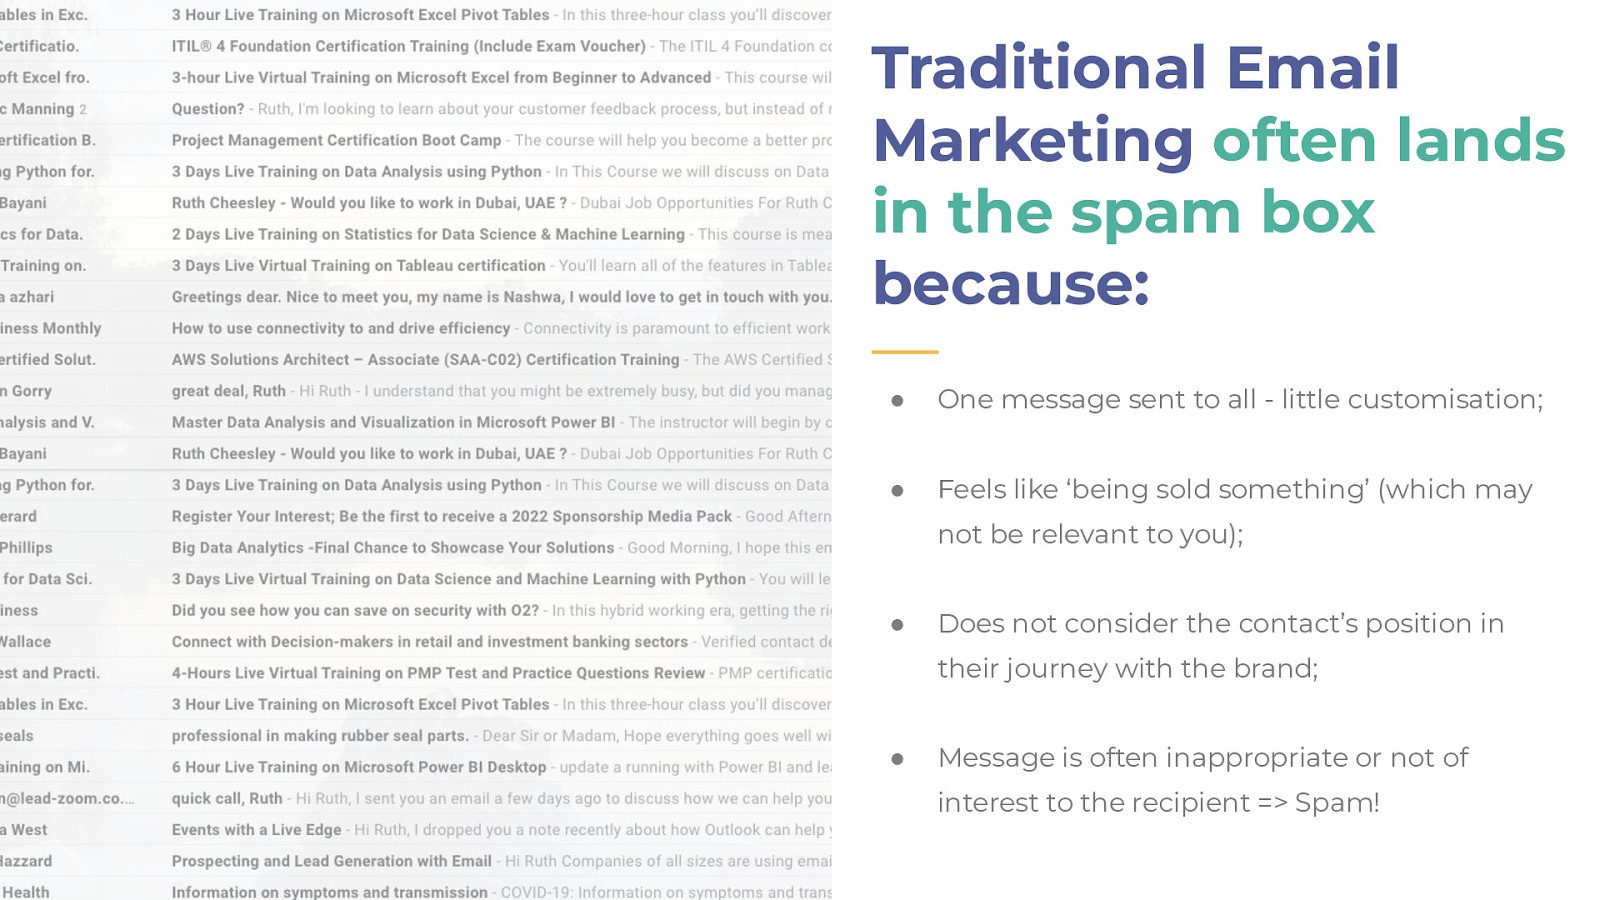
Traditional Email Marketing often lands in the spam box because: ● One message sent to all - little customisation; ● Feels like ‘being sold something’ (which may not be relevant to you); ● Does not consider the contact’s position in their journey with the brand; ● Message is often inappropriate or not of interest to the recipient => Spam!
Slide 11
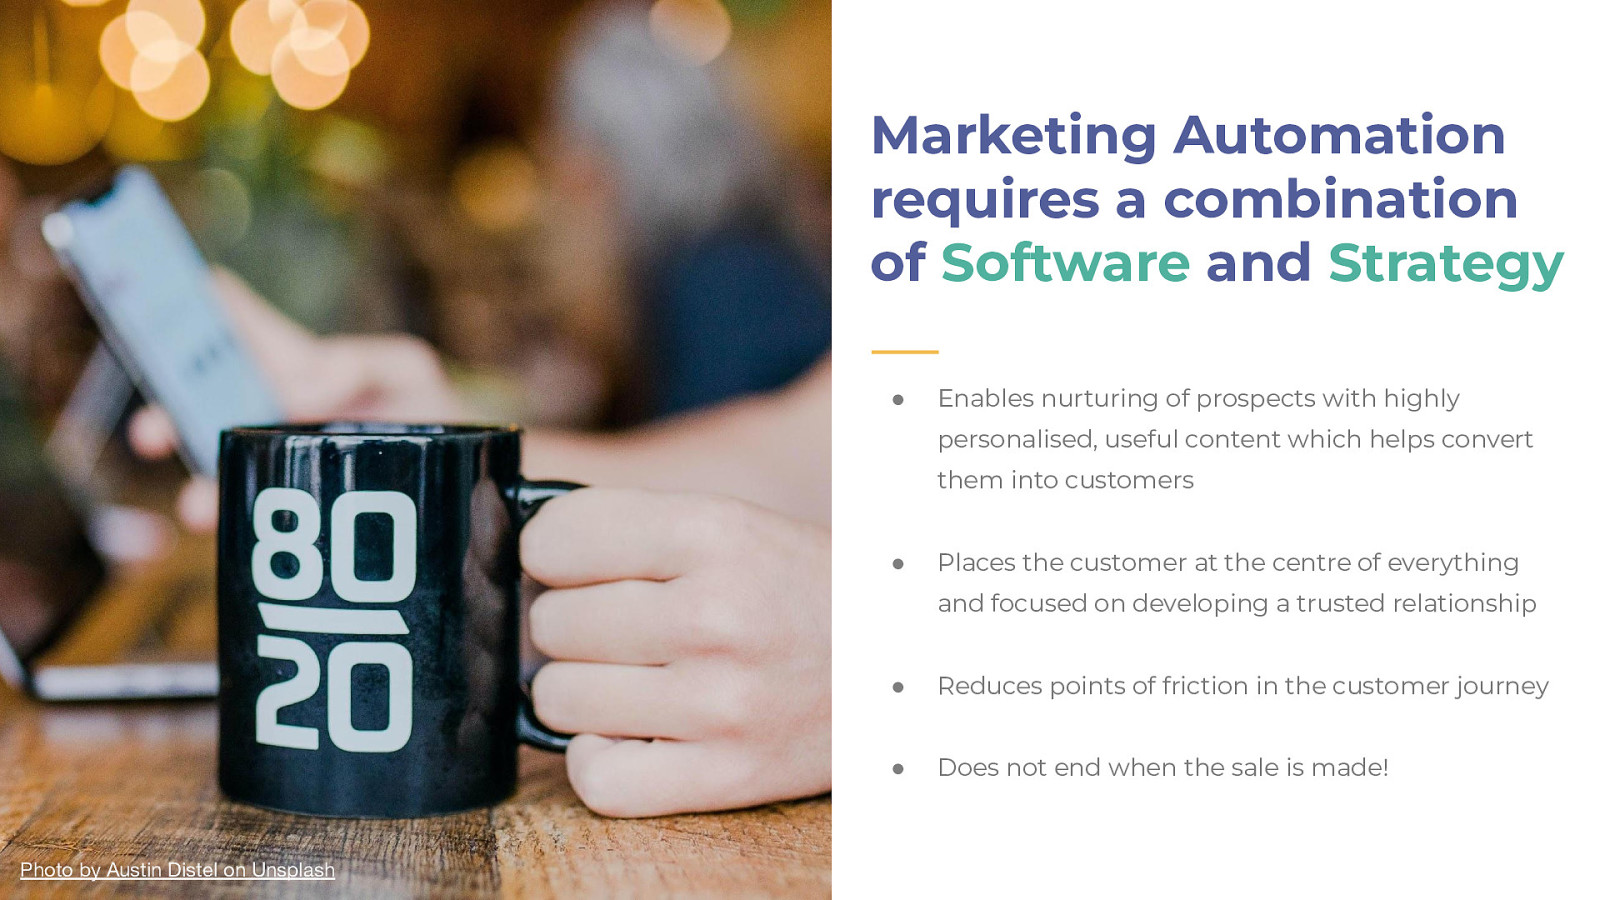
Marketing Automation requires a combination of Software and Strategy ● Enables nurturing of prospects with highly personalised, useful content which helps convert them into customers ● Places the customer at the centre of everything and focused on developing a trusted relationship Photo by Austin Distel on Unsplash ● Reduces points of friction in the customer journey ● Does not end when the sale is made!
Slide 12
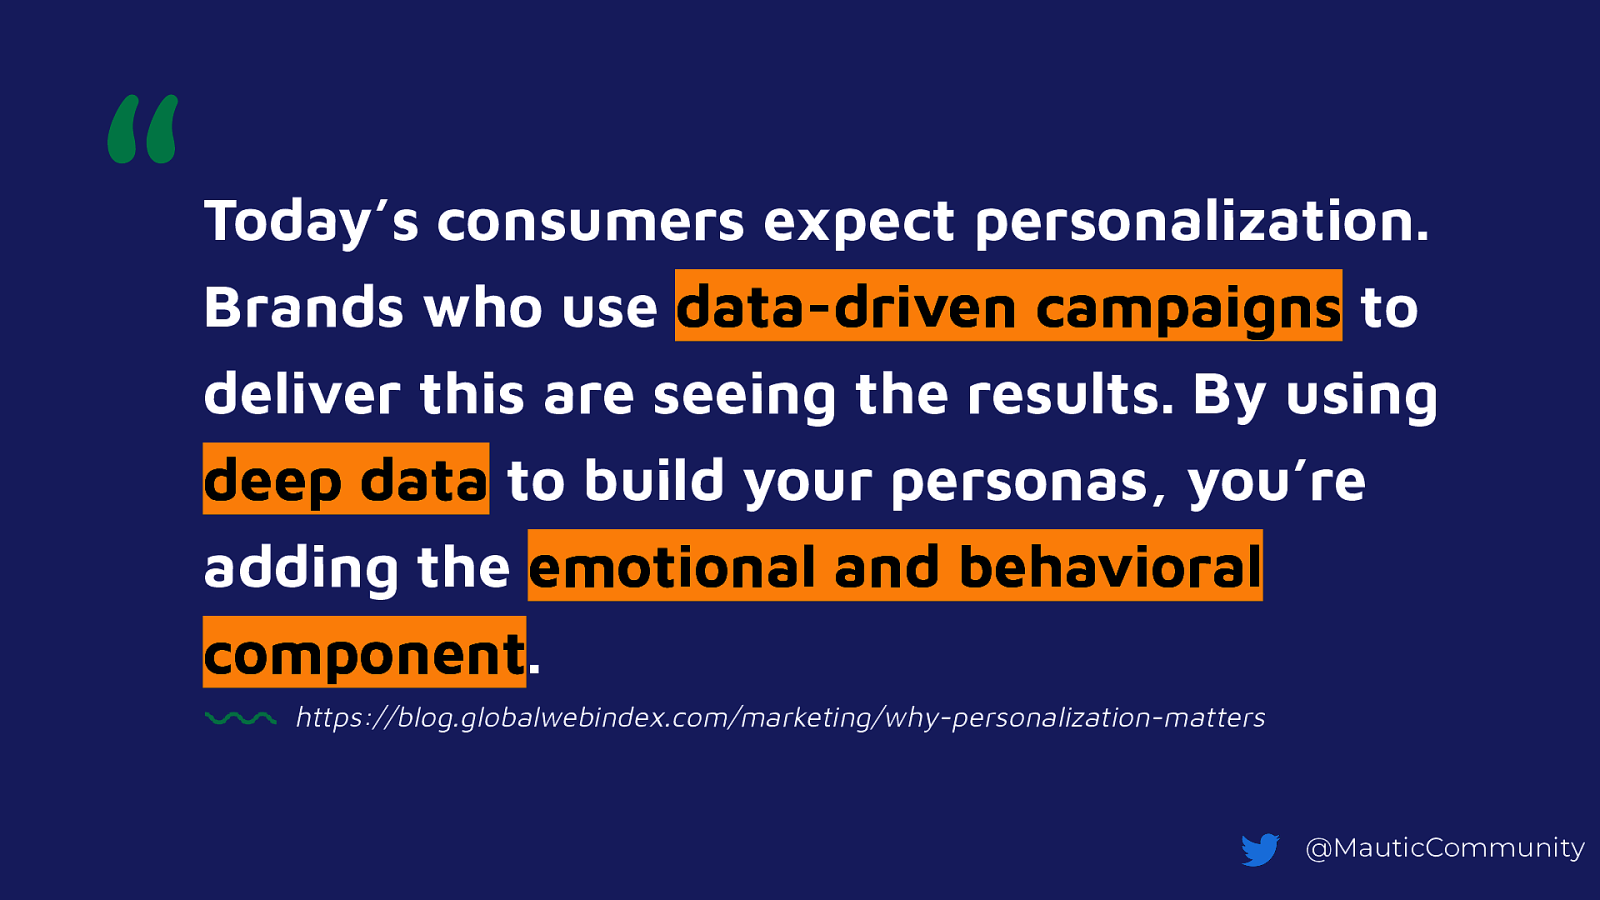
“ Today’s consumers expect personalization. Brands who use data-driven campaigns to deliver this are seeing the results. By using deep data to build your personas, you’re adding the emotional and behavioral component. https://blog.globalwebindex.com/marketing/why-personalization-matters @MauticCommunity
Slide 13
- Why Personalize? Workshop https://mau.tc/build-dxp 4. Closing @MauticCommunity
Slide 14
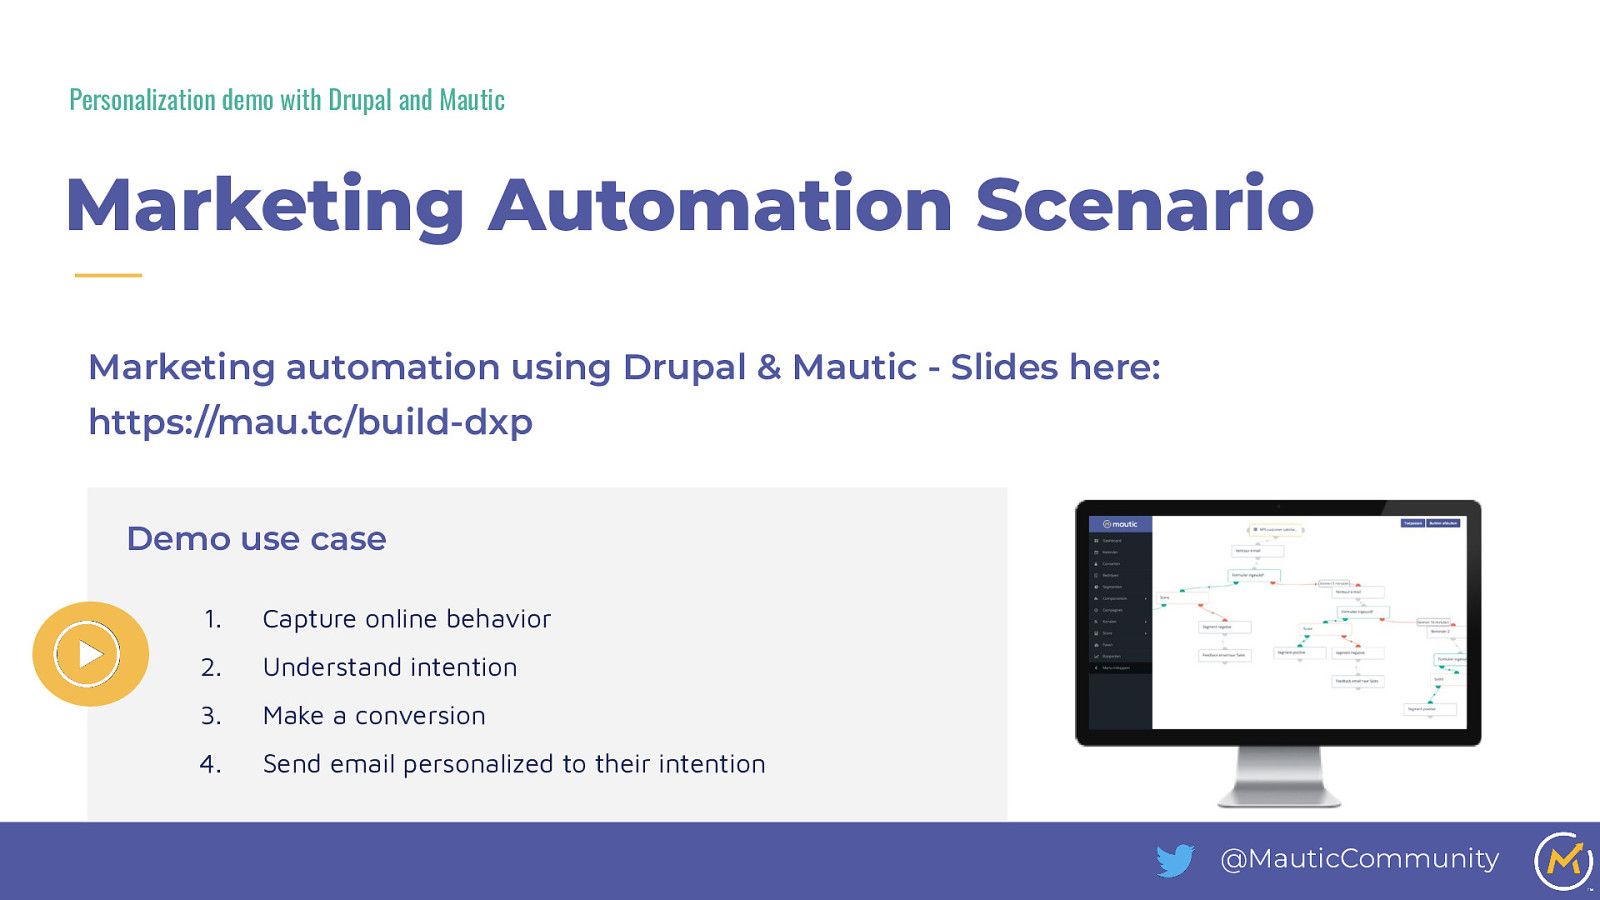
Personalization demo with Drupal and Mautic Marketing Automation Scenario Marketing automation using Drupal & Mautic - Slides here: https://mau.tc/build-dxp Demo use case 1. Capture online behavior 2. Understand intention 3. Make a conversion 4. Send email personalized to their intention @MauticCommunity
Slide 15
Step 1 - Set up Drupal @MauticCommunity
Slide 16
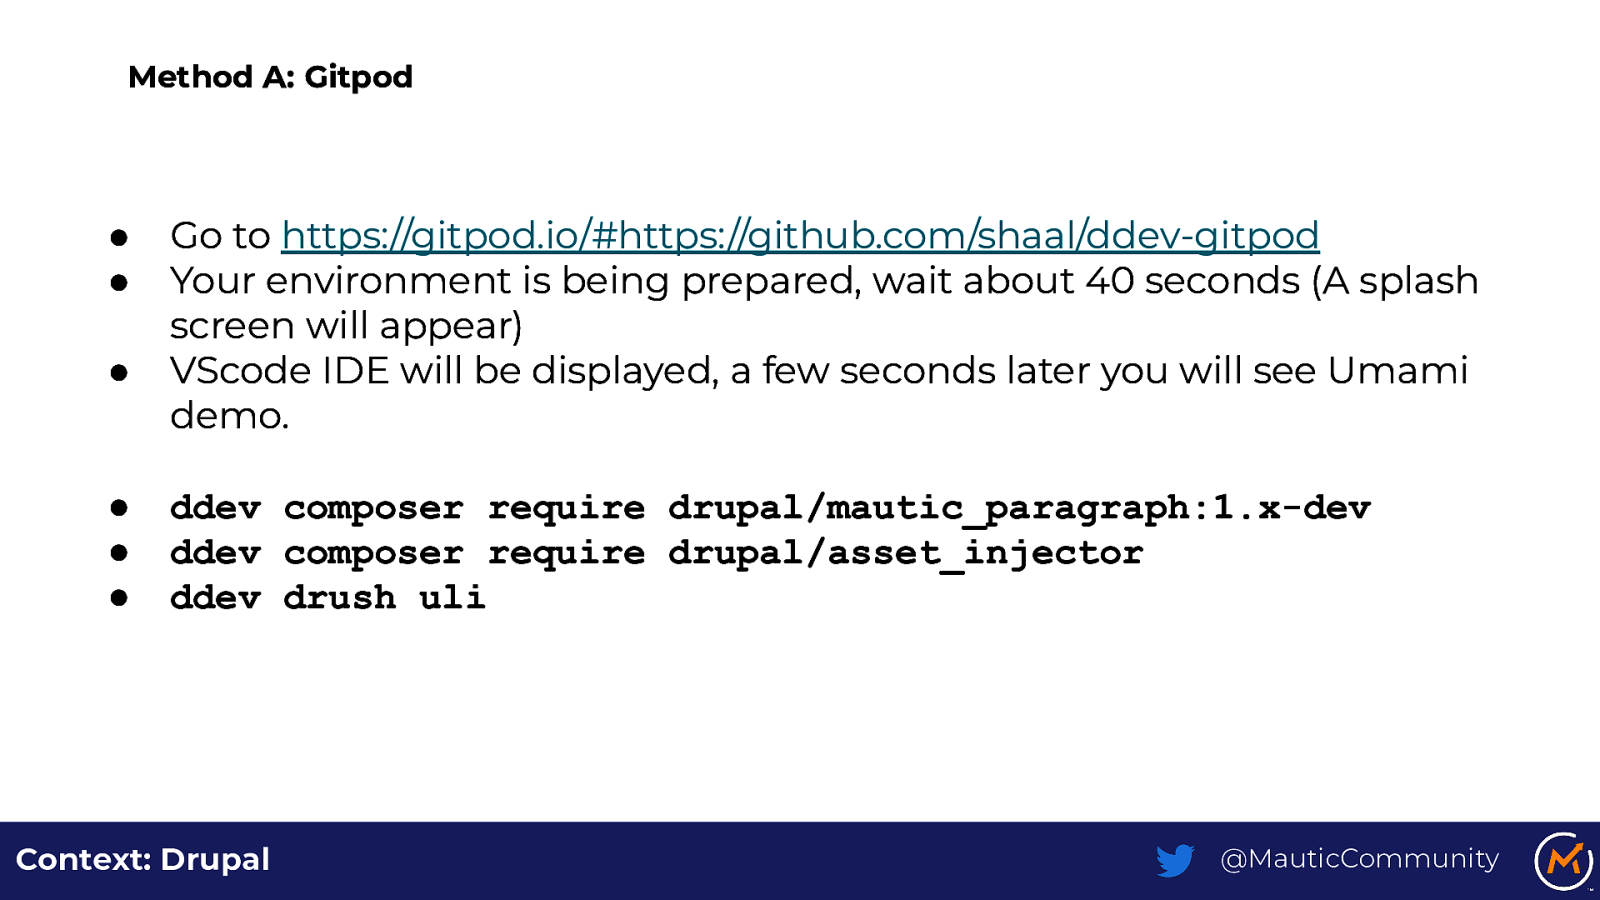
Method A: Gitpod ● ● ● ● ● ● Go to https://gitpod.io/#https://github.com/shaal/ddev-gitpod Your environment is being prepared, wait about 40 seconds (A splash screen will appear) VScode IDE will be displayed, a few seconds later you will see Umami demo. ddev composer require drupal/mautic_paragraph:1.x-dev ddev composer require drupal/asset_injector ddev drush uli Context: Drupal @MauticCommunity
Slide 17
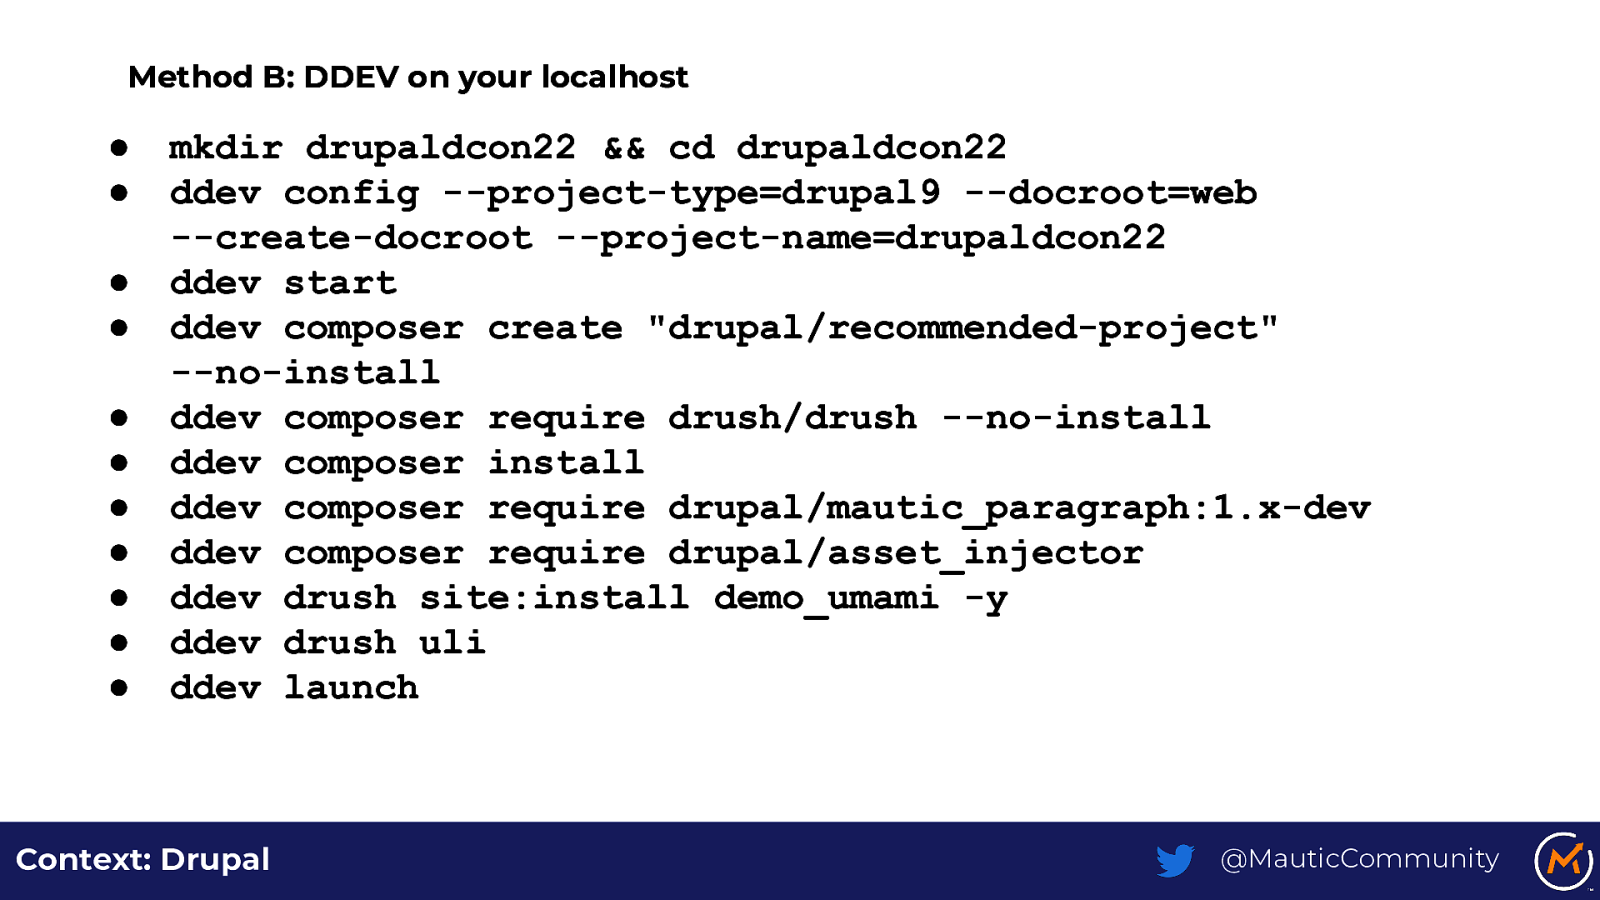
Method B: DDEV on your localhost ● ● ● ● ● ● ● ● ● ● ● mkdir drupaldcon22 && cd drupaldcon22 ddev config —project-type=drupal9 —docroot=web —create-docroot —project-name=drupaldcon22 ddev start ddev composer create “drupal/recommended-project” —no-install ddev composer require drush/drush —no-install ddev composer install ddev composer require drupal/mautic_paragraph:1.x-dev ddev composer require drupal/asset_injector ddev drush site:install demo_umami -y ddev drush uli ddev launch Context: Drupal @MauticCommunity
Slide 18
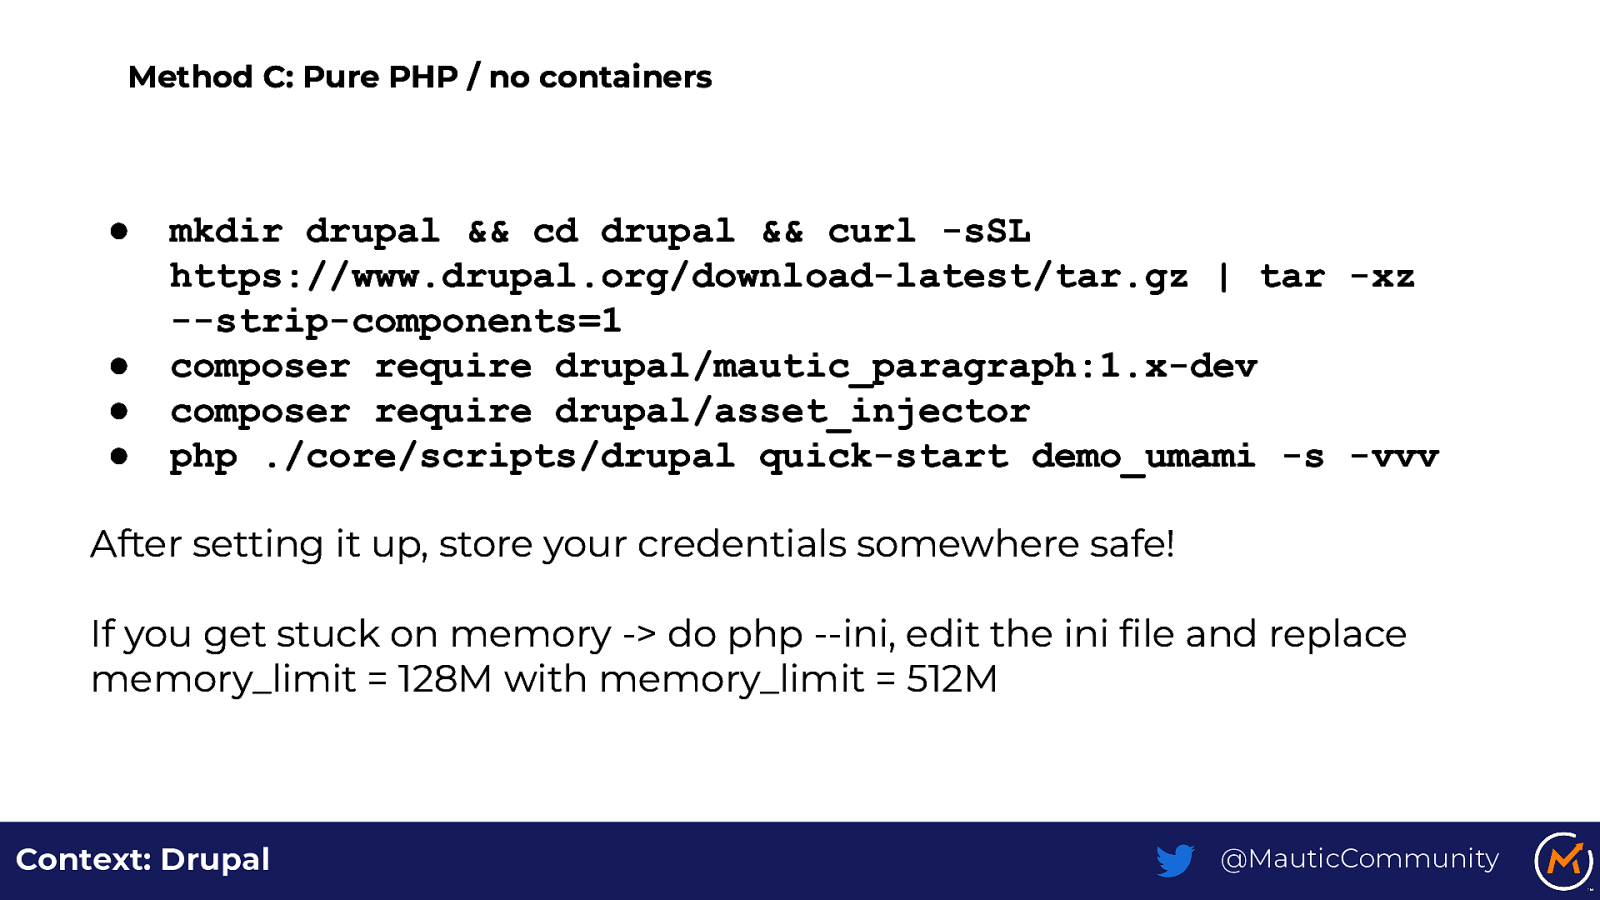
Method C: Pure PHP / no containers ● ● ● ● mkdir drupal && cd drupal && curl -sSL https://www.drupal.org/download-latest/tar.gz | tar -xz —strip-components=1 composer require drupal/mautic_paragraph:1.x-dev composer require drupal/asset_injector php ./core/scripts/drupal quick-start demo_umami -s -vvv After setting it up, store your credentials somewhere safe! If you get stuck on memory -> do php —ini, edit the ini file and replace memory_limit = 128M with memory_limit = 512M Context: Drupal @MauticCommunity
Slide 19
Step 2 - Set up Mautic @MauticCommunity
Slide 20

Method A: Gitpod ● Go to https://gitpod.io/#https://github.com/mautic/mautic/releases/tag/4.2.1 ● Your environment is being prepared, wait about 40 seconds (A splash screen will appear) ● VScode IDE will be displayed, a few seconds later you will see Umami demo. ● run ddev exec bin/console m:a:g ● run ddev exec bin/console cache:clear ● You can now login at the GitPod url using admin/mautic Context: Mautic @MauticCommunity
Slide 21
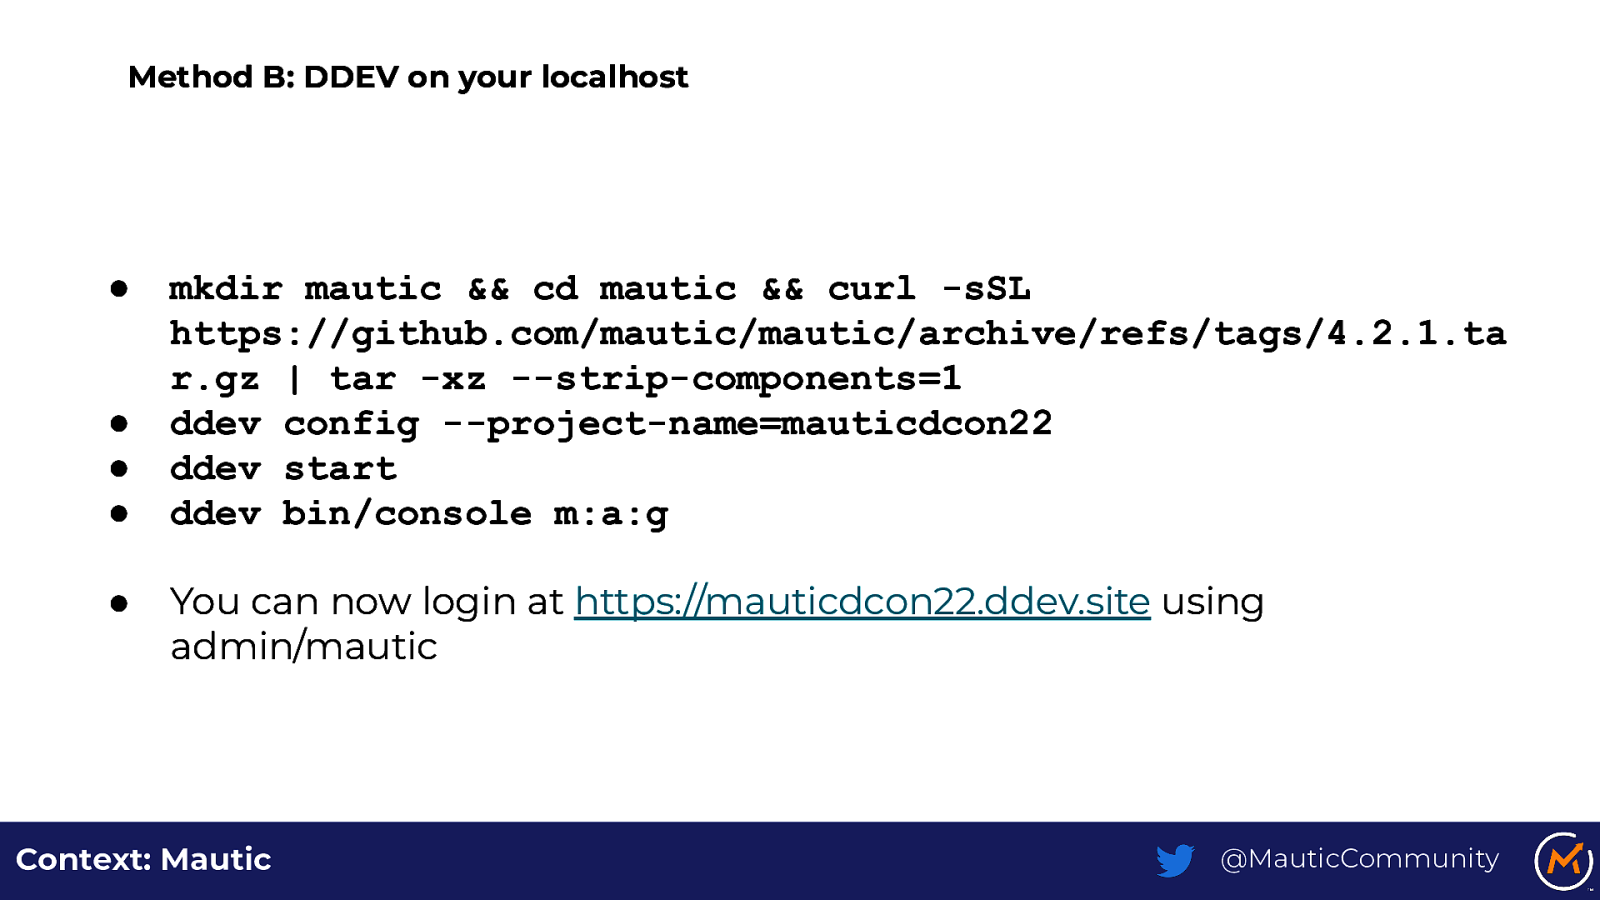
Method B: DDEV on your localhost ● ● ● ● ● mkdir mautic && cd mautic && curl -sSL https://github.com/mautic/mautic/archive/refs/tags/4.2.1.ta r.gz | tar -xz —strip-components=1 ddev config —project-name=mauticdcon22 ddev start ddev bin/console m:a:g You can now login at https://mauticdcon22.ddev.site using admin/mautic Context: Mautic @MauticCommunity
Slide 22
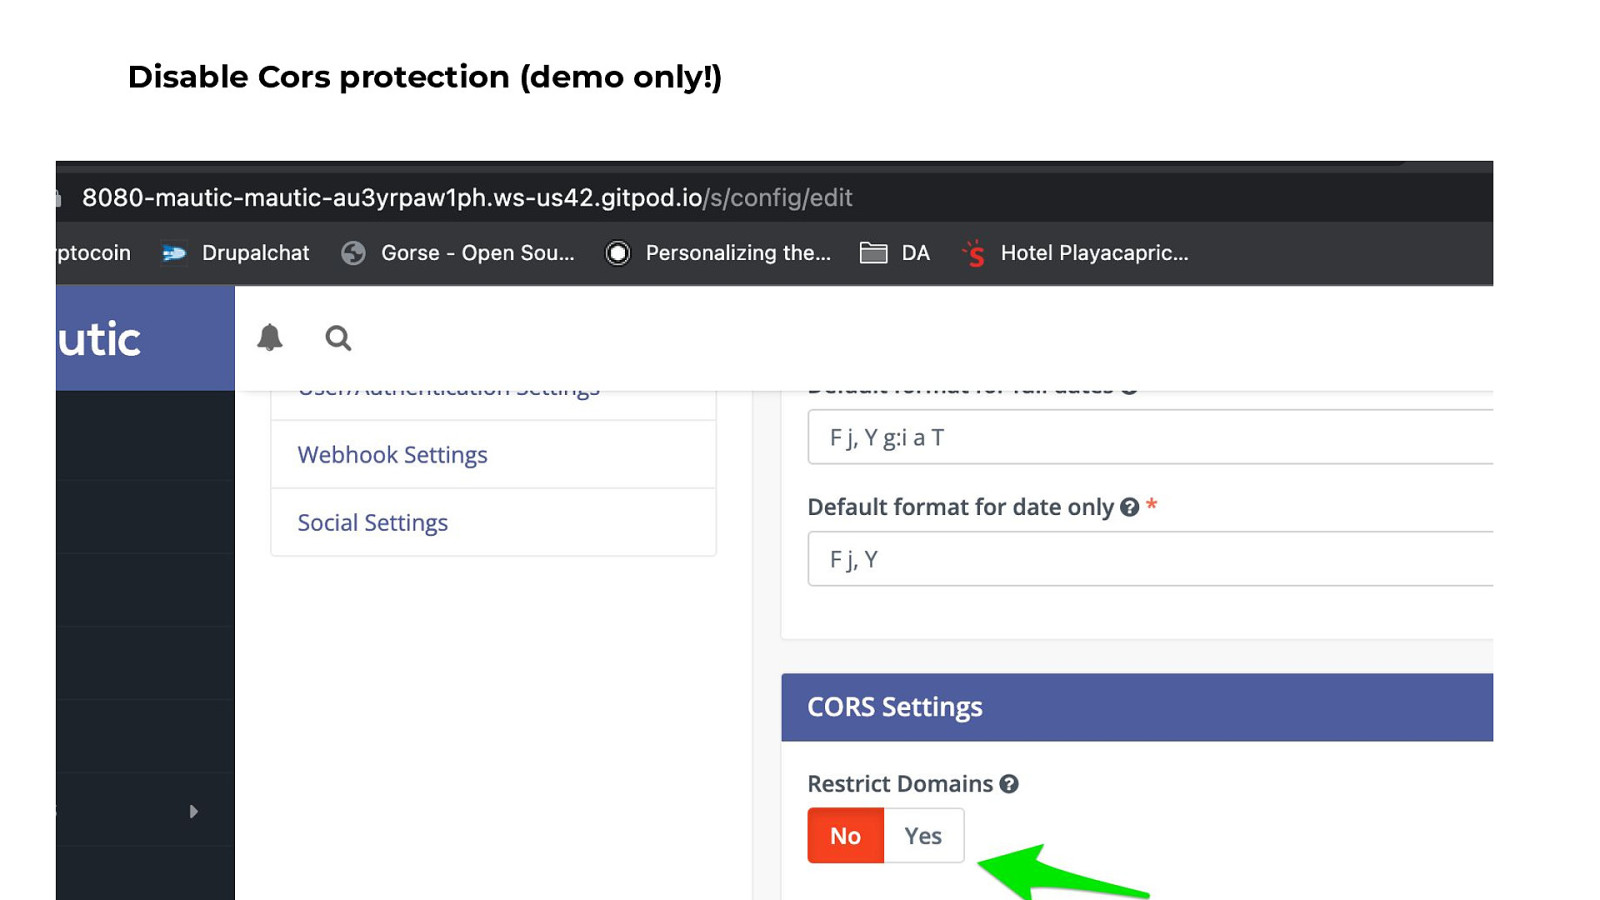
Disable Cors protection (demo only!) ●
Slide 23
Step 3 - Prepare Drupal & install our required modules @MauticCommunity
Slide 24
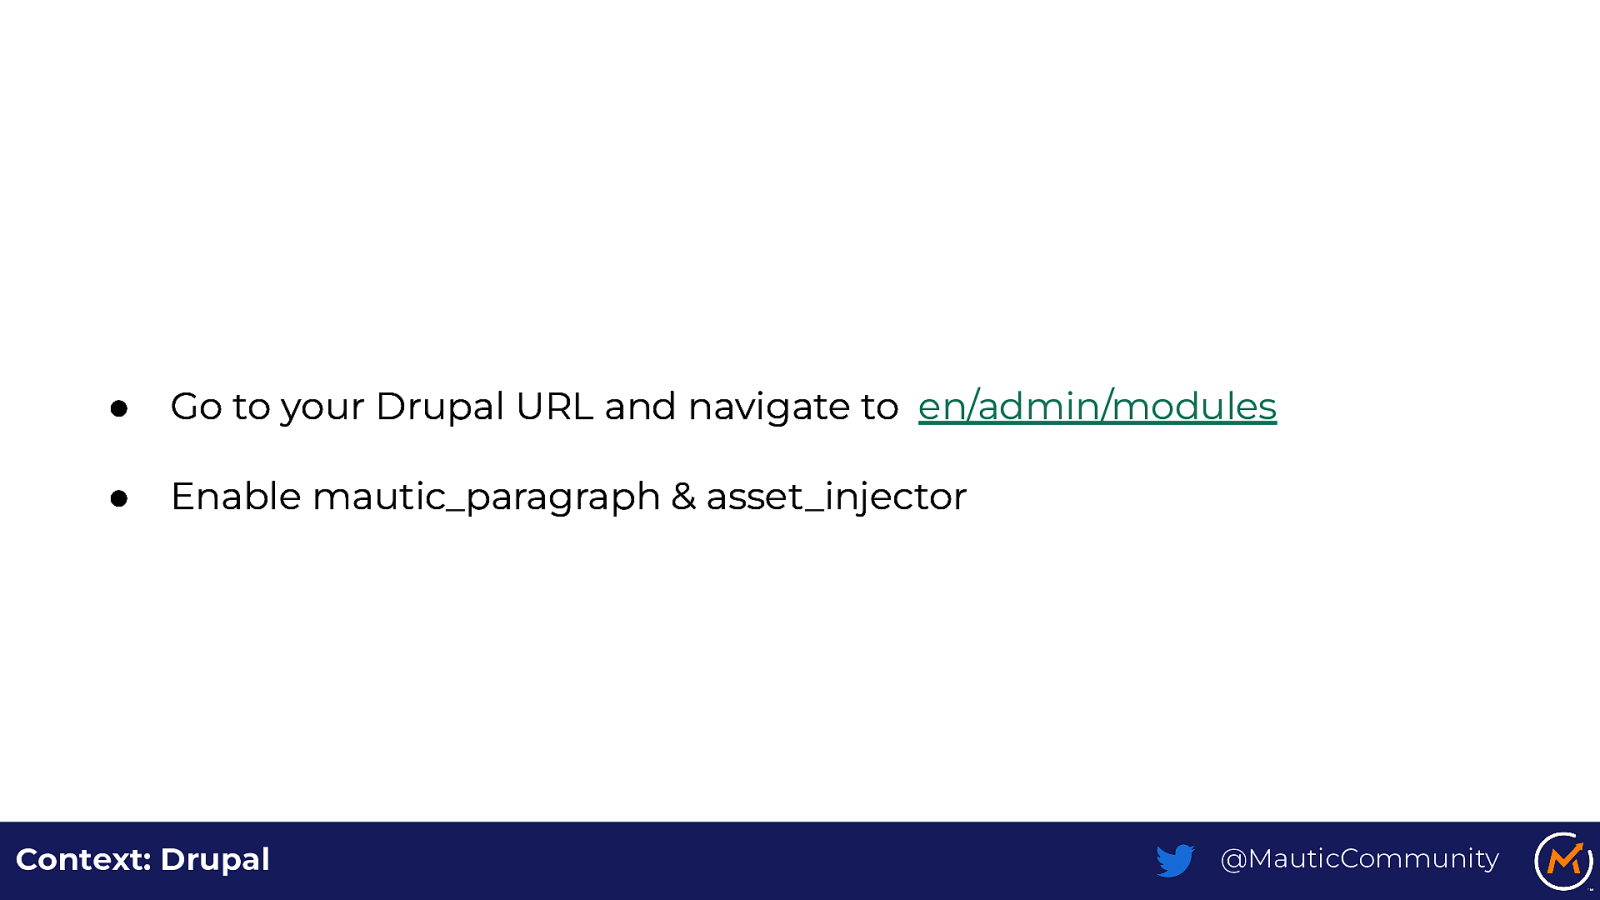
● Go to your Drupal URL and navigate to en/admin/modules ● Enable mautic_paragraph & asset_injector Context: Drupal @MauticCommunity
Slide 25

Context: Drupal @MauticCommunity
Slide 26
Step 4 - Add our tracking scripts @MauticCommunity
Slide 27
Context: Drupal @MauticCommunity
Slide 28
Context: Mautic @MauticCommunity
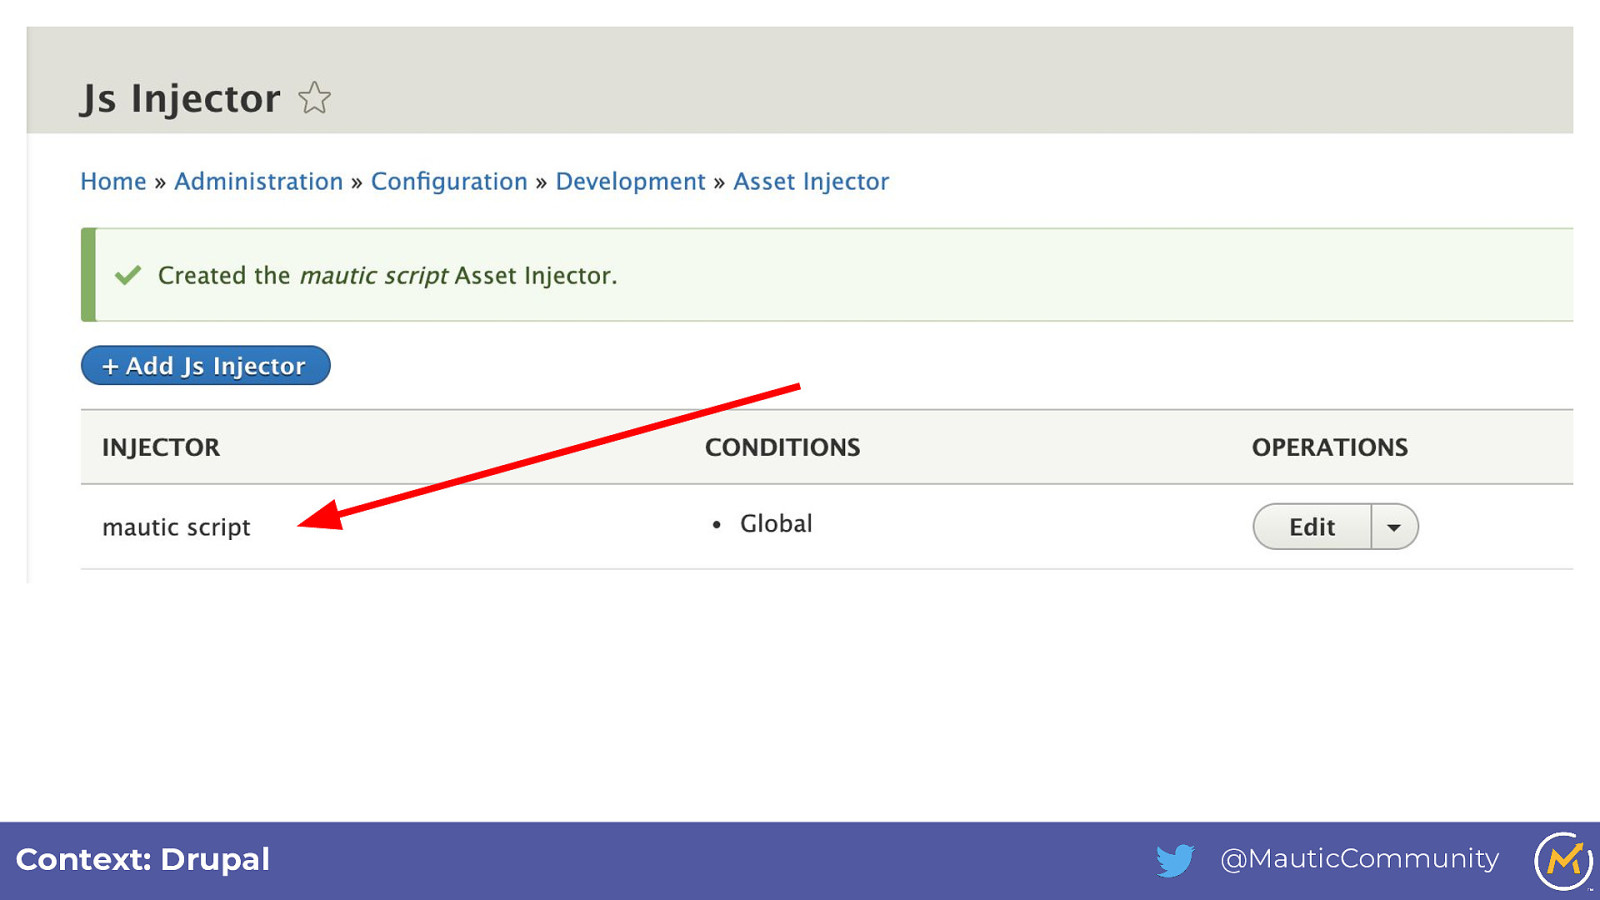
Slide 29
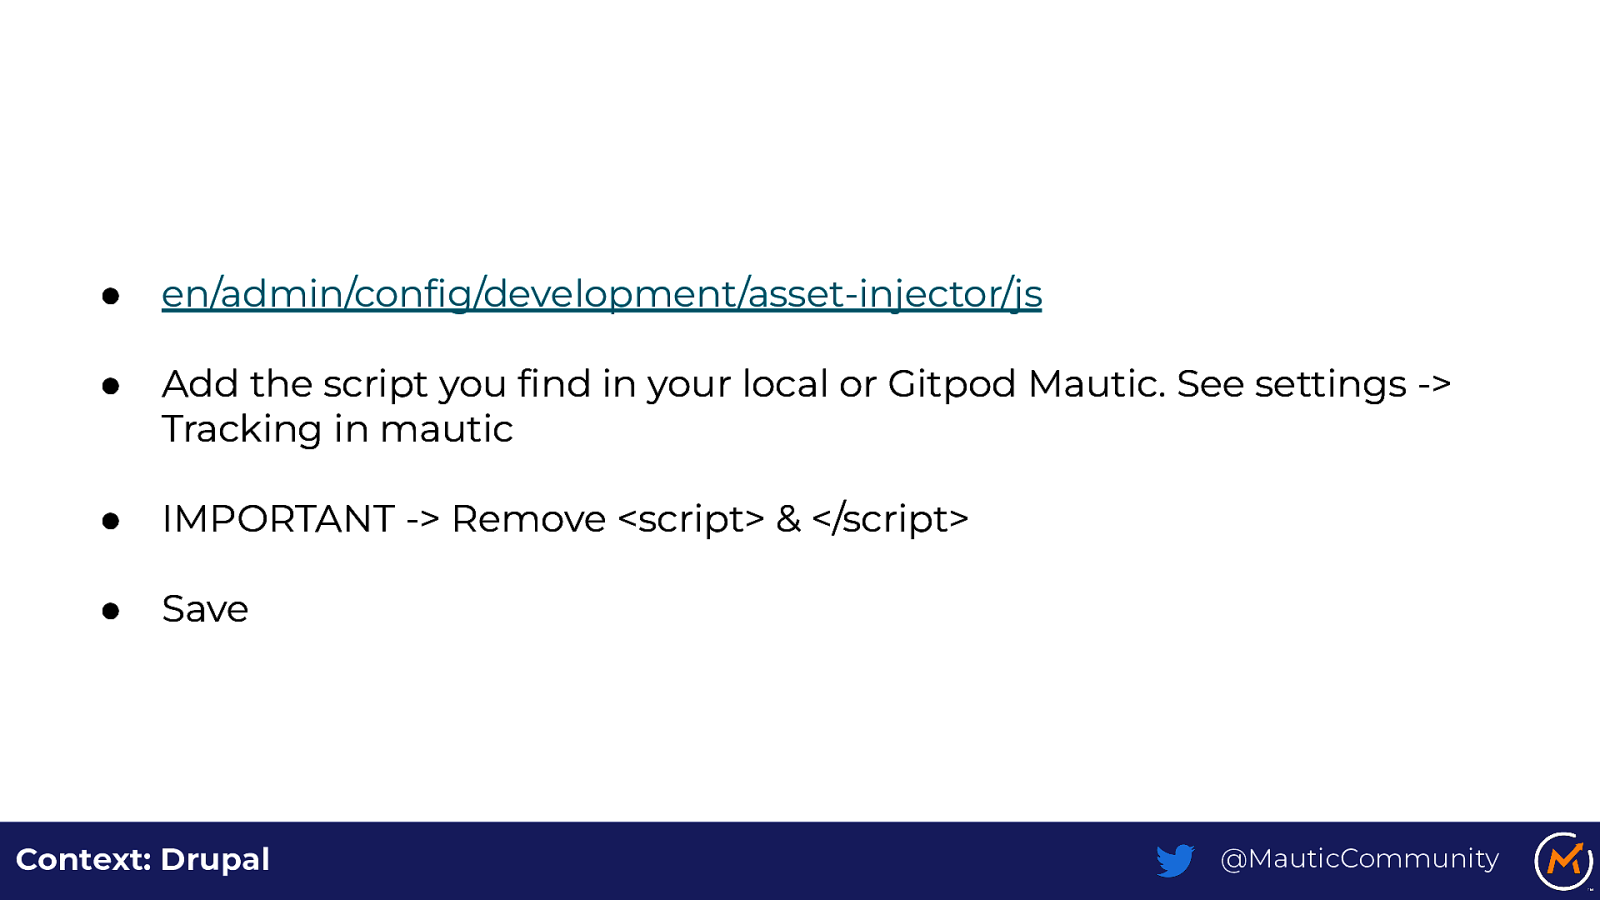
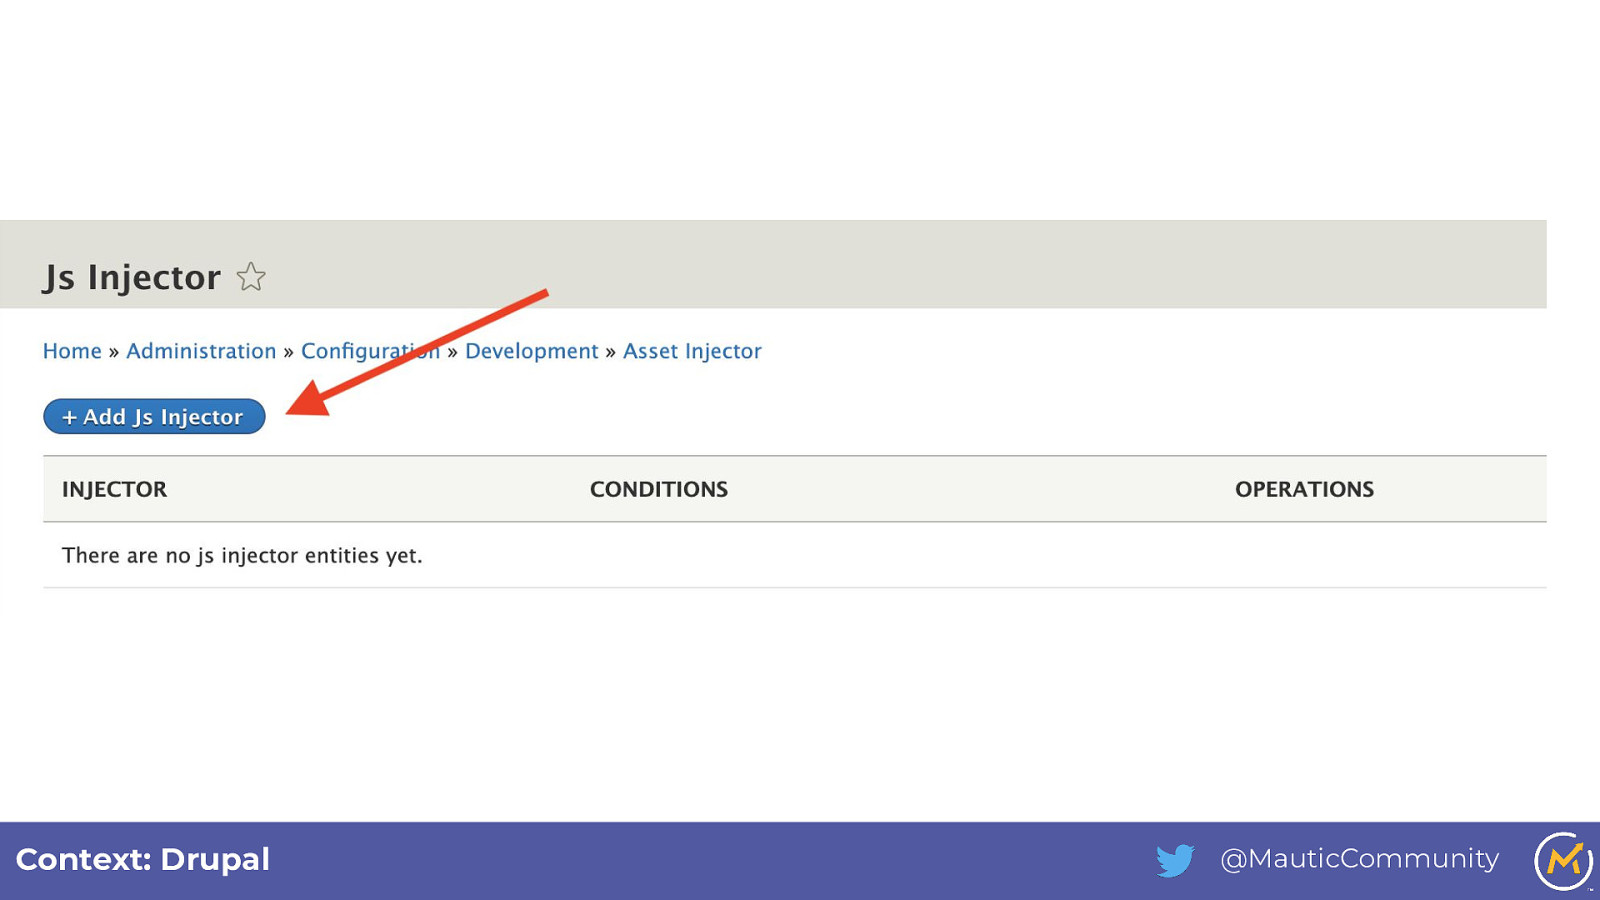
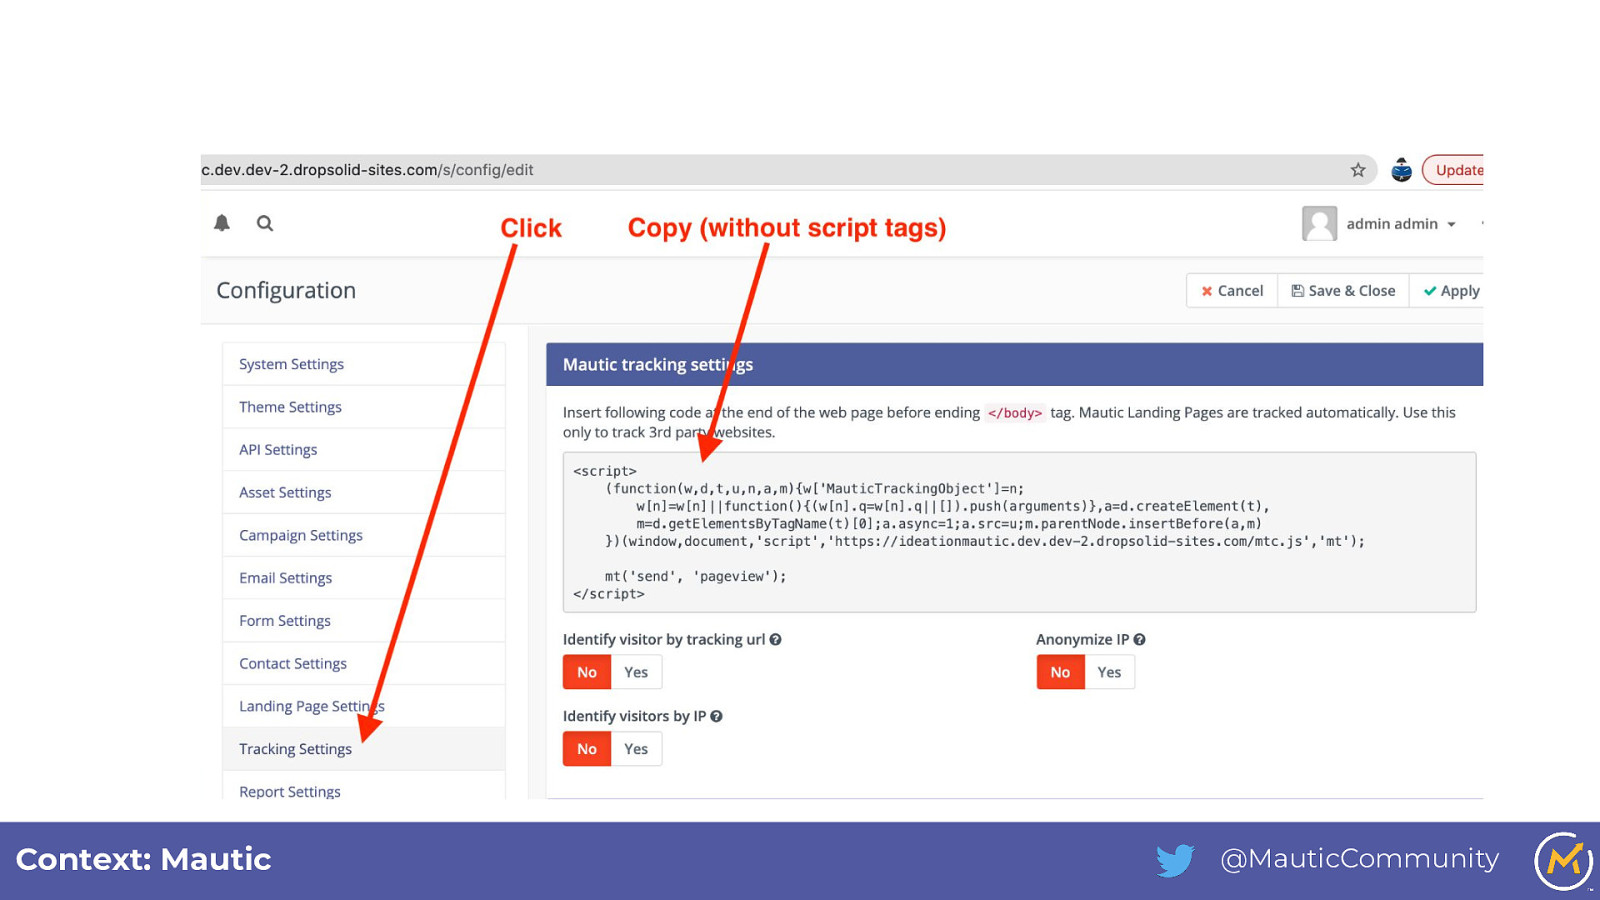
● en/admin/config/development/asset-injector/js ● Add the script you find in your local or Gitpod Mautic. See settings -> Tracking in mautic ● IMPORTANT -> Remove <script> & </script> ● Save Context: Drupal @MauticCommunity
Slide 30
Context: Drupal @MauticCommunity
Slide 31
Step 5 - Configure Mautic integration in Drupal @MauticCommunity
Slide 32
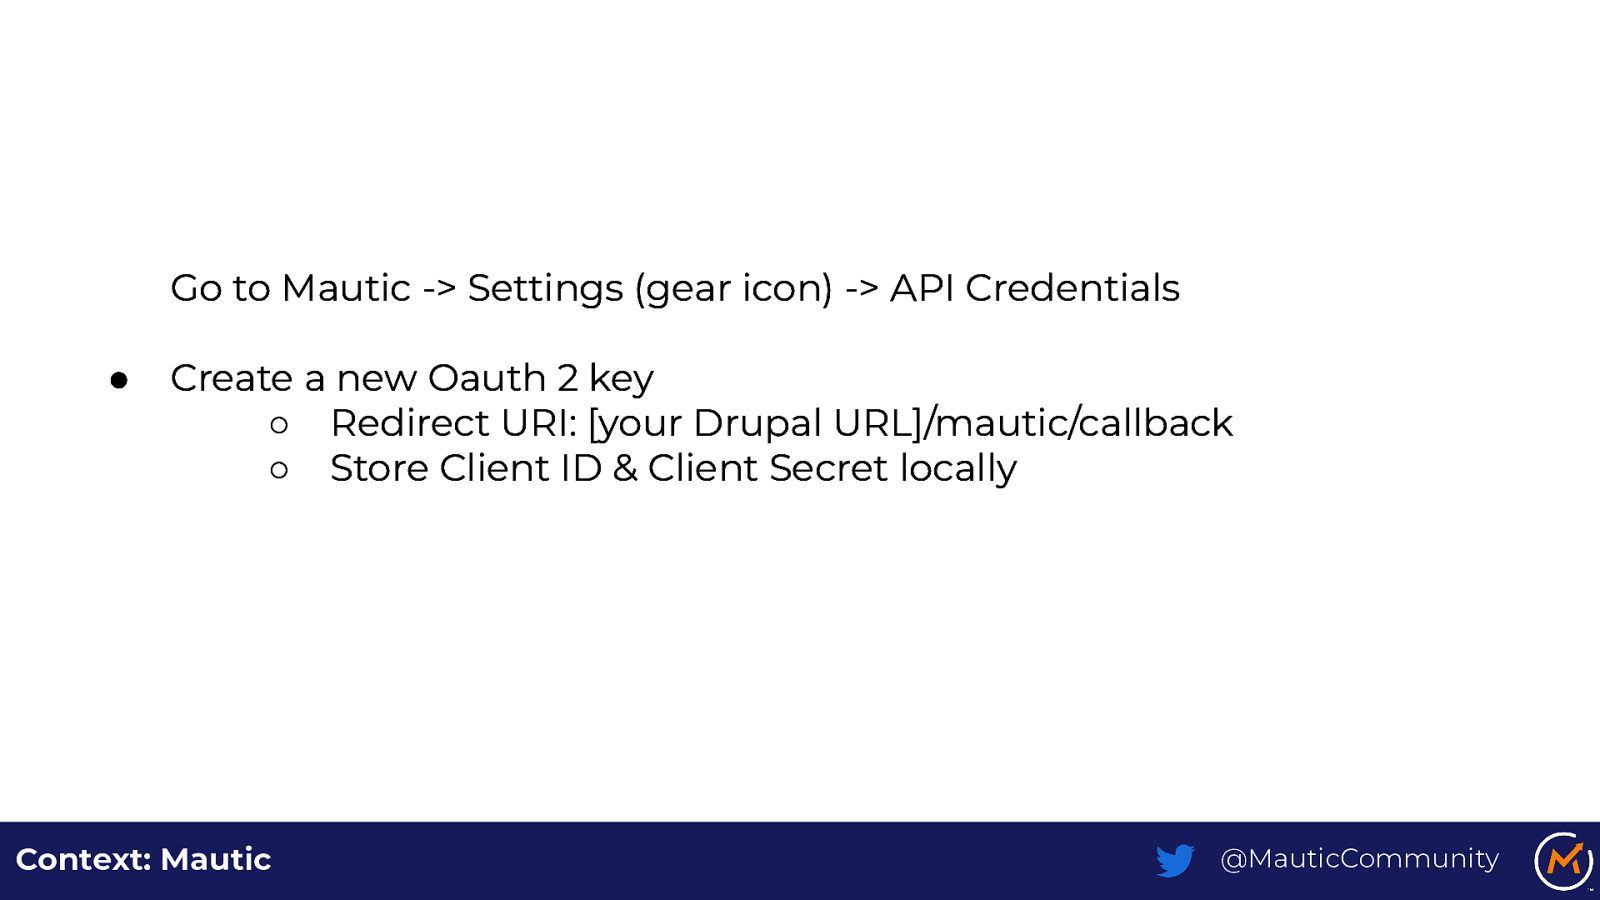
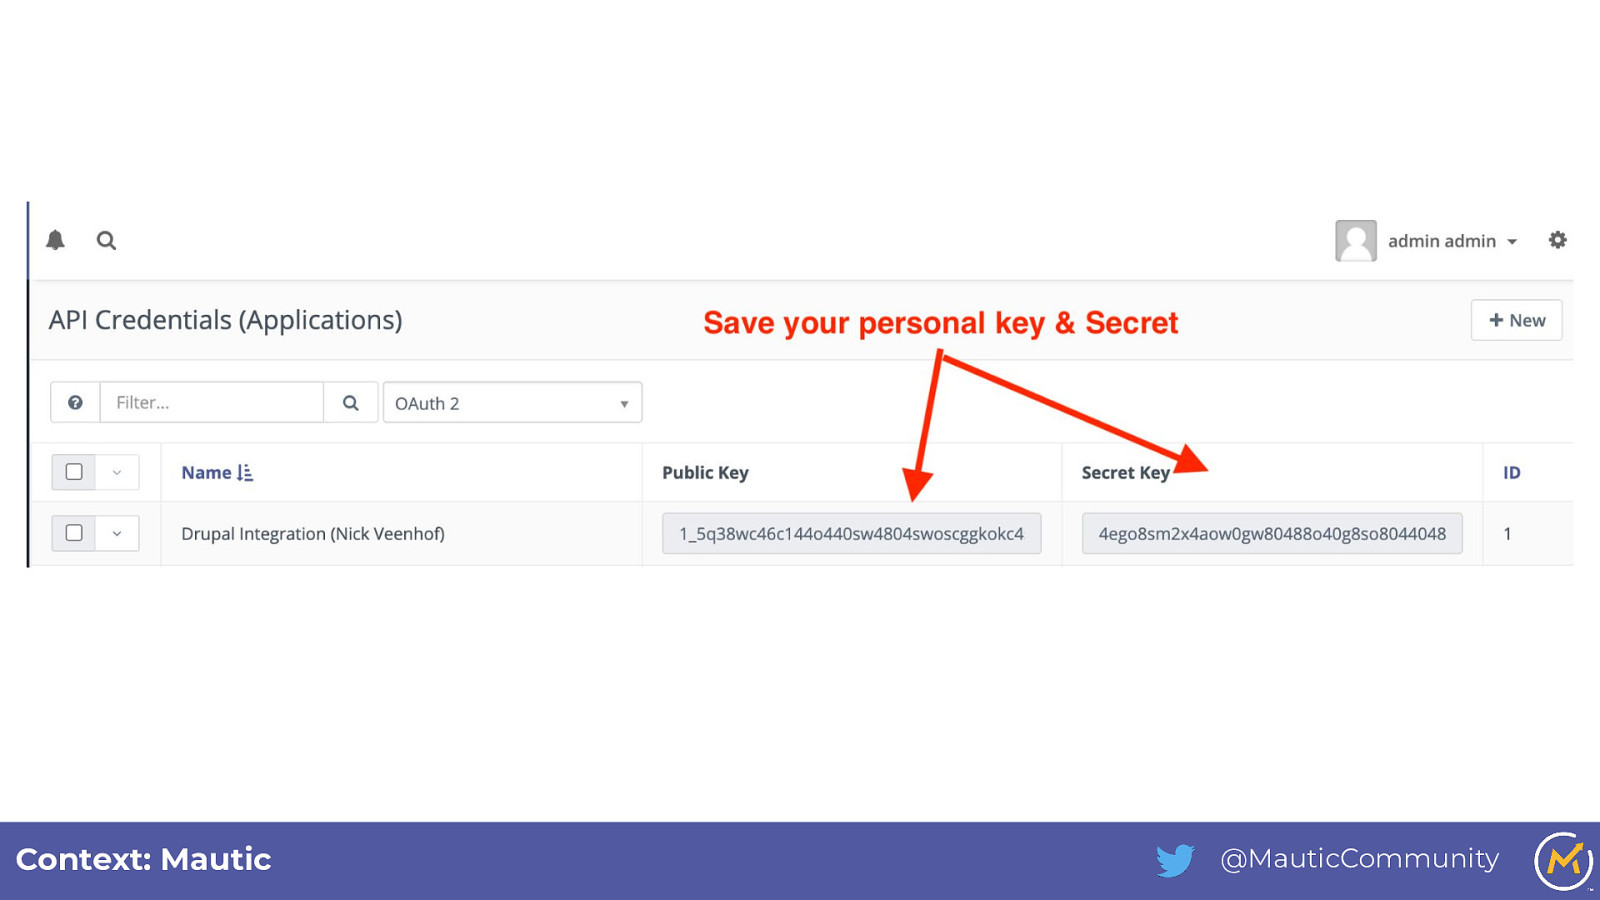
Go to Mautic -> Settings (gear icon) -> API Credentials ● Create a new Oauth 2 key ○ Redirect URI: [your Drupal URL]/mautic/callback ○ Store Client ID & Client Secret locally Context: Mautic @MauticCommunity
Slide 33
Context: Mautic @MauticCommunity
Slide 34
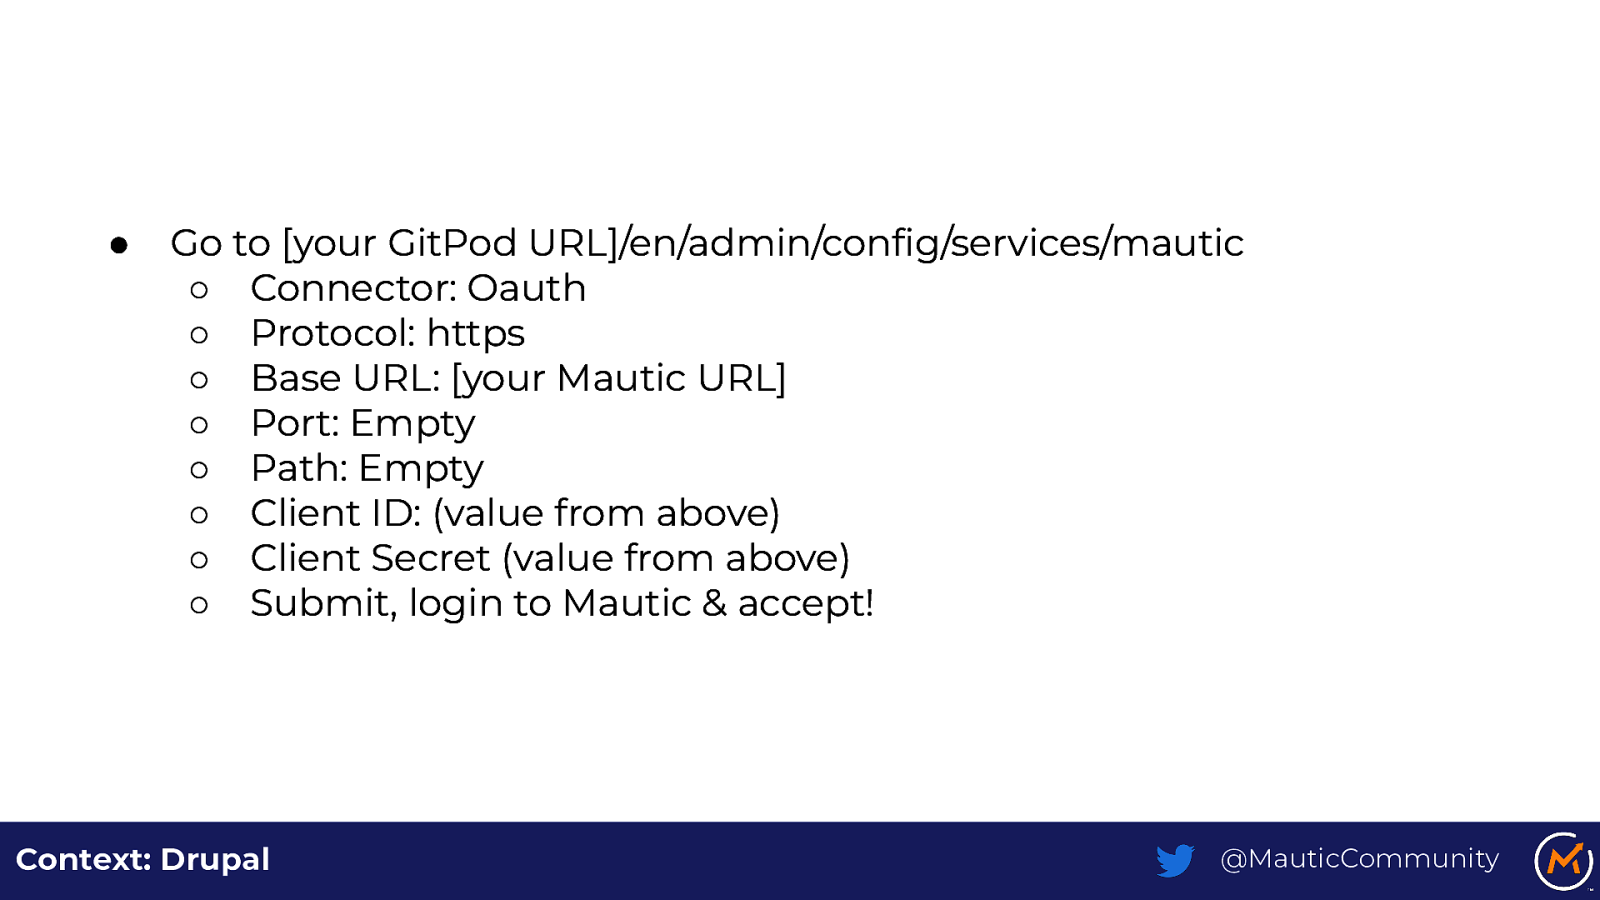
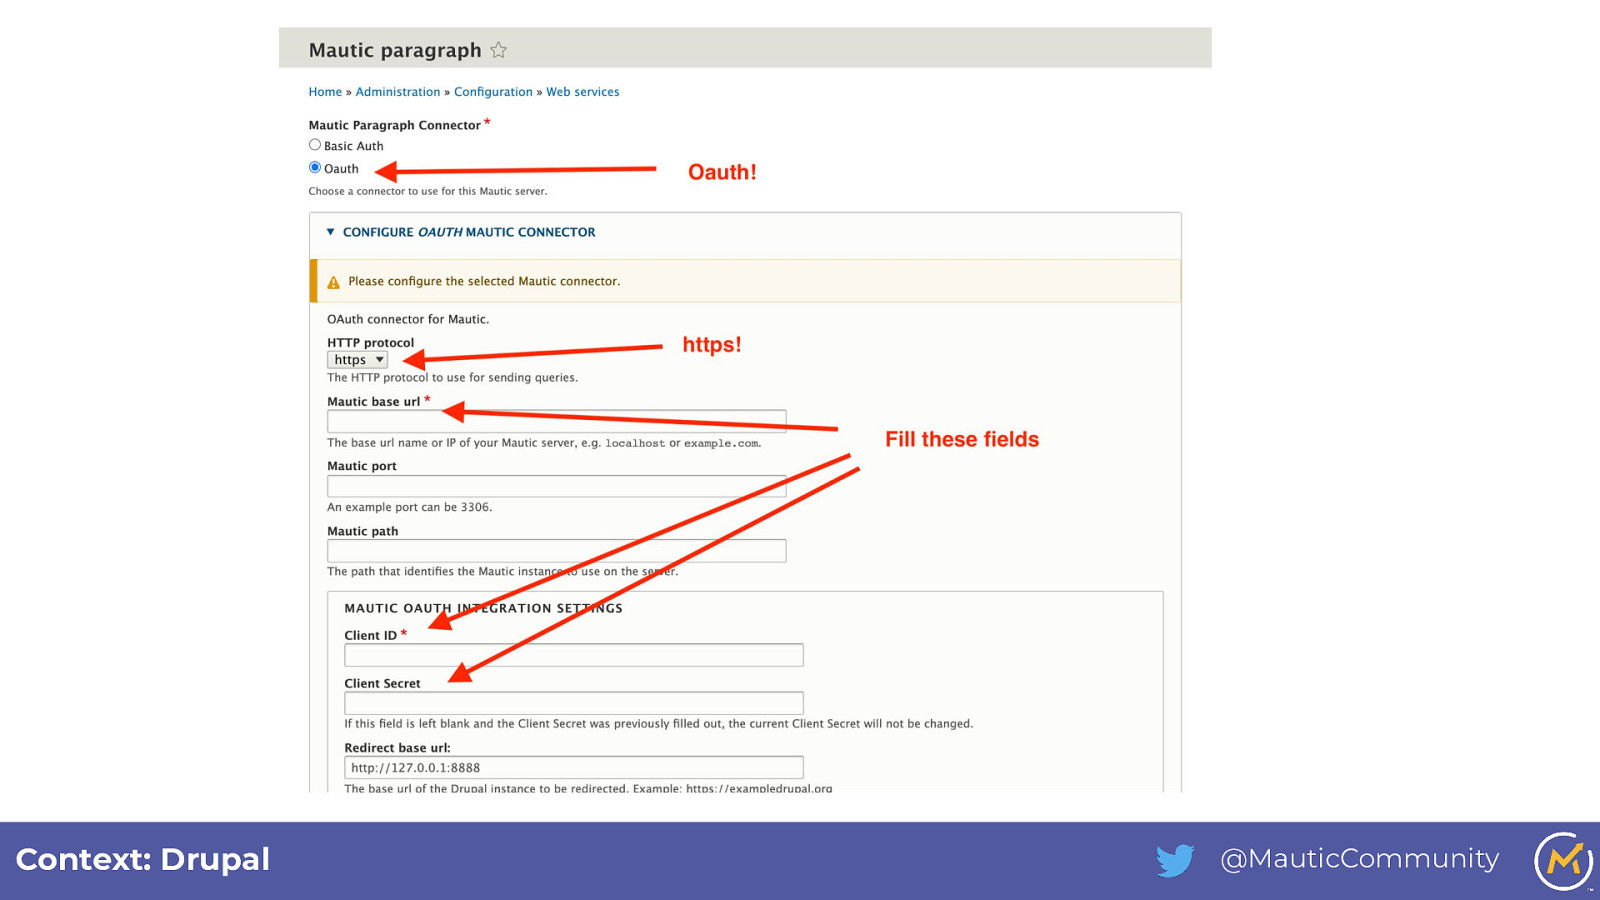
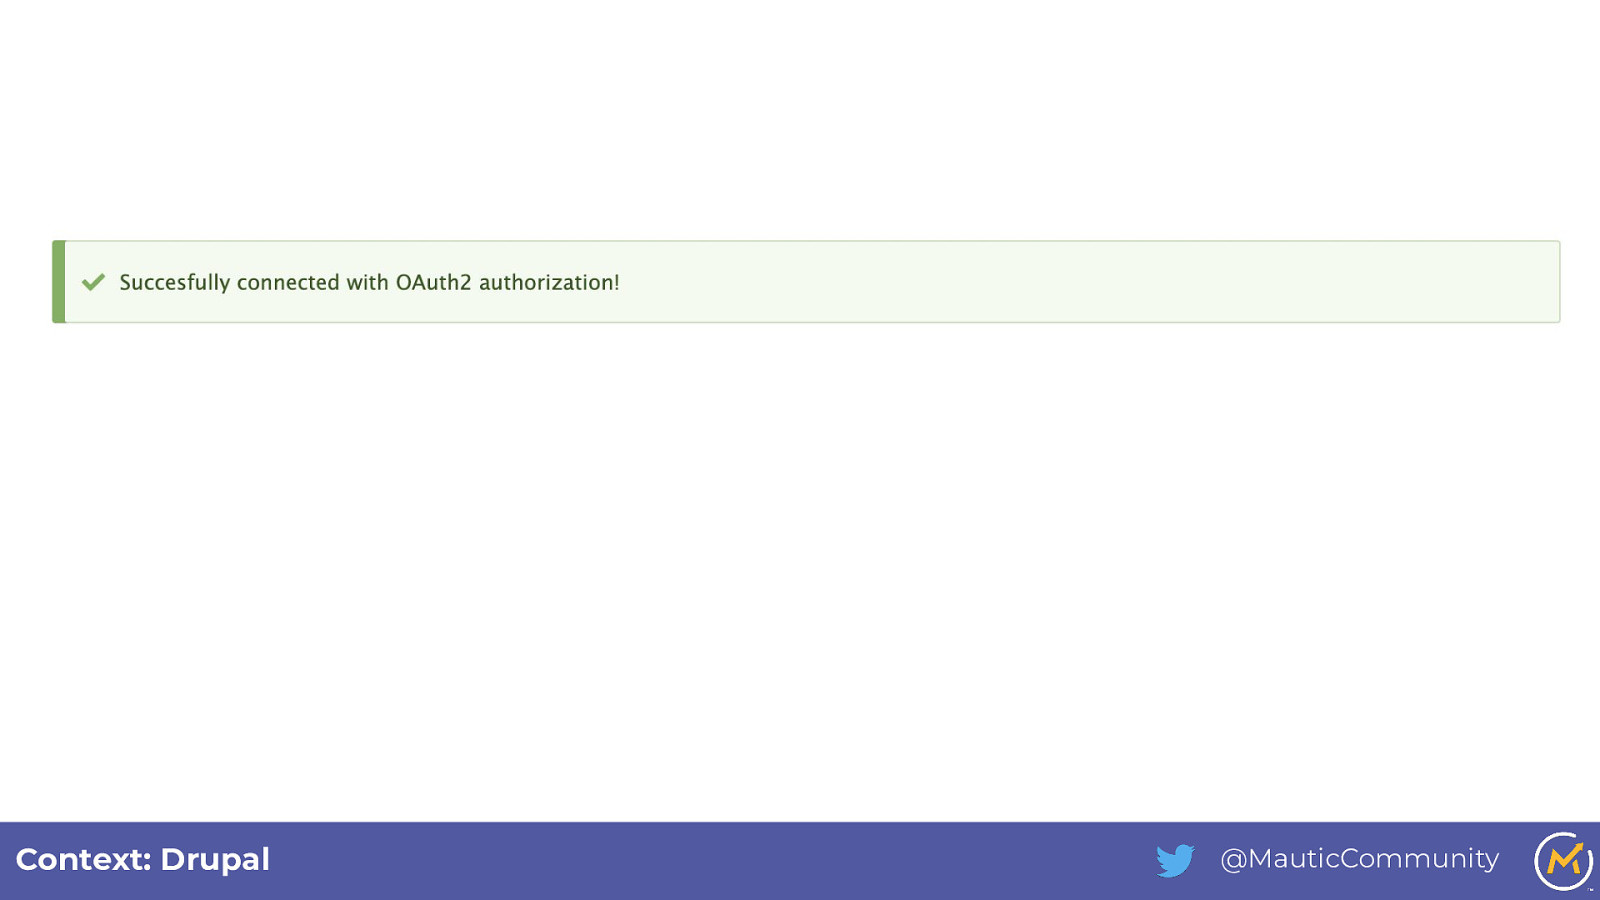
● Go to [your GitPod URL]/en/admin/config/services/mautic ○ Connector: Oauth ○ Protocol: https ○ Base URL: [your Mautic URL] ○ Port: Empty ○ Path: Empty ○ Client ID: (value from above) ○ Client Secret (value from above) ○ Submit, login to Mautic & accept! Context: Drupal @MauticCommunity
Slide 35
Context: Drupal @MauticCommunity
Slide 36
Context: Drupal @MauticCommunity
Slide 37
Step 6 - Add newsletter signup form to Drupal @MauticCommunity
Slide 38
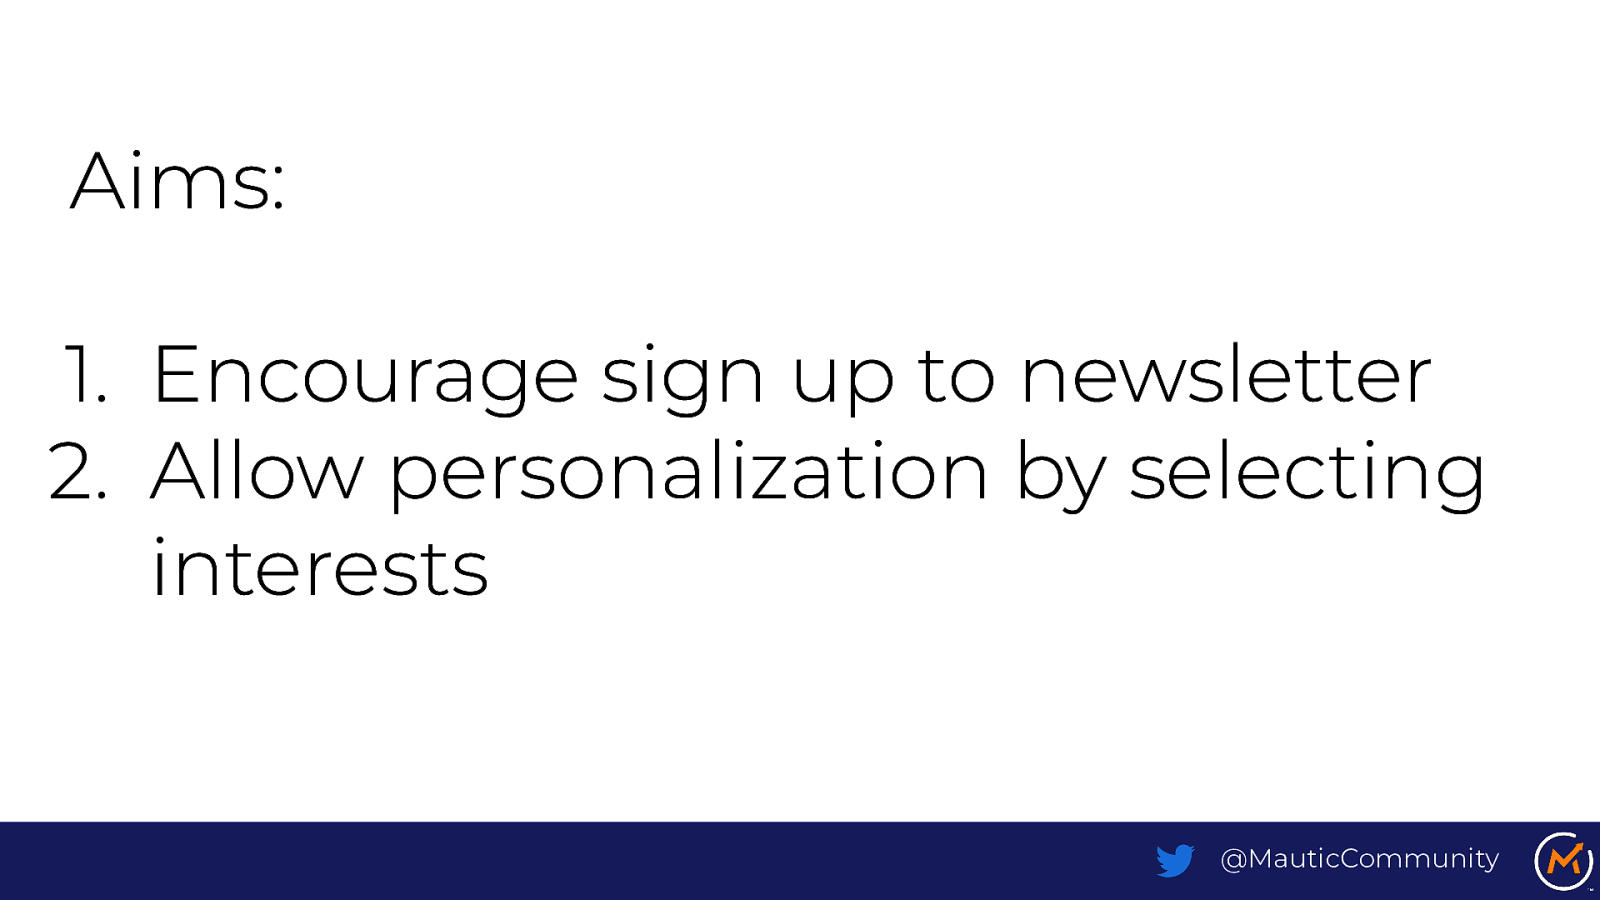
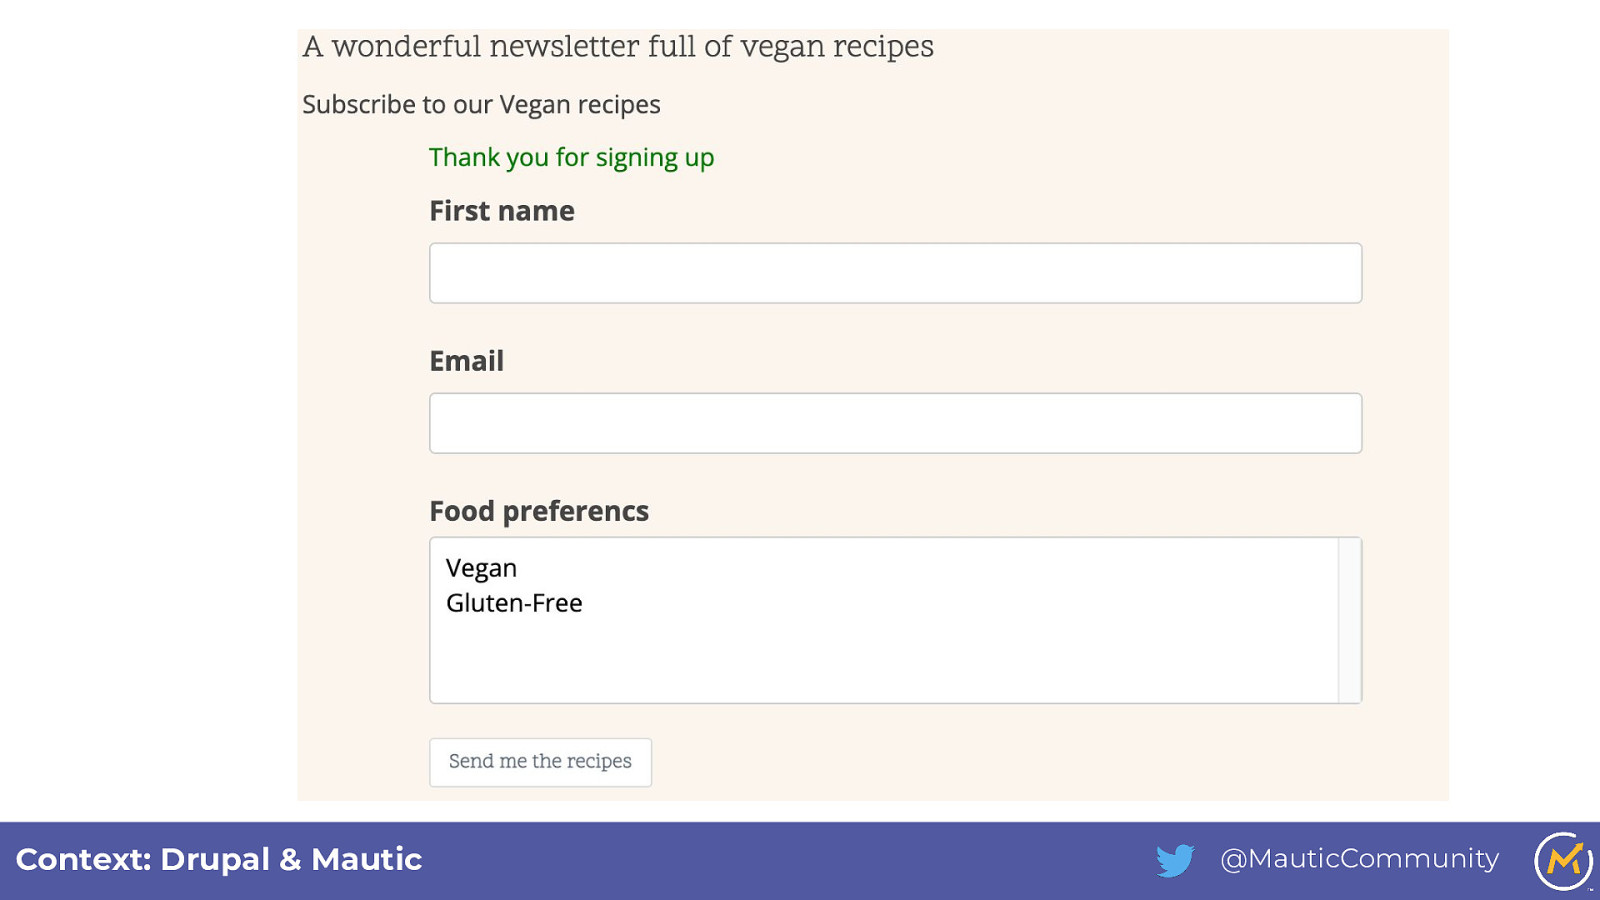
Aims: 1. Encourage sign up to newsletter 2. Allow personalization by selecting interests @MauticCommunity
Slide 39

Create a custom field where we’ll store the types of recipes the contact is interested in. Go to Settings > Custom Fields and create a custom field under the Contact object, using the Select - Multiple type Add “Vegan” & “Gluten-Free” Context: Mautic @MauticCommunity
Slide 40
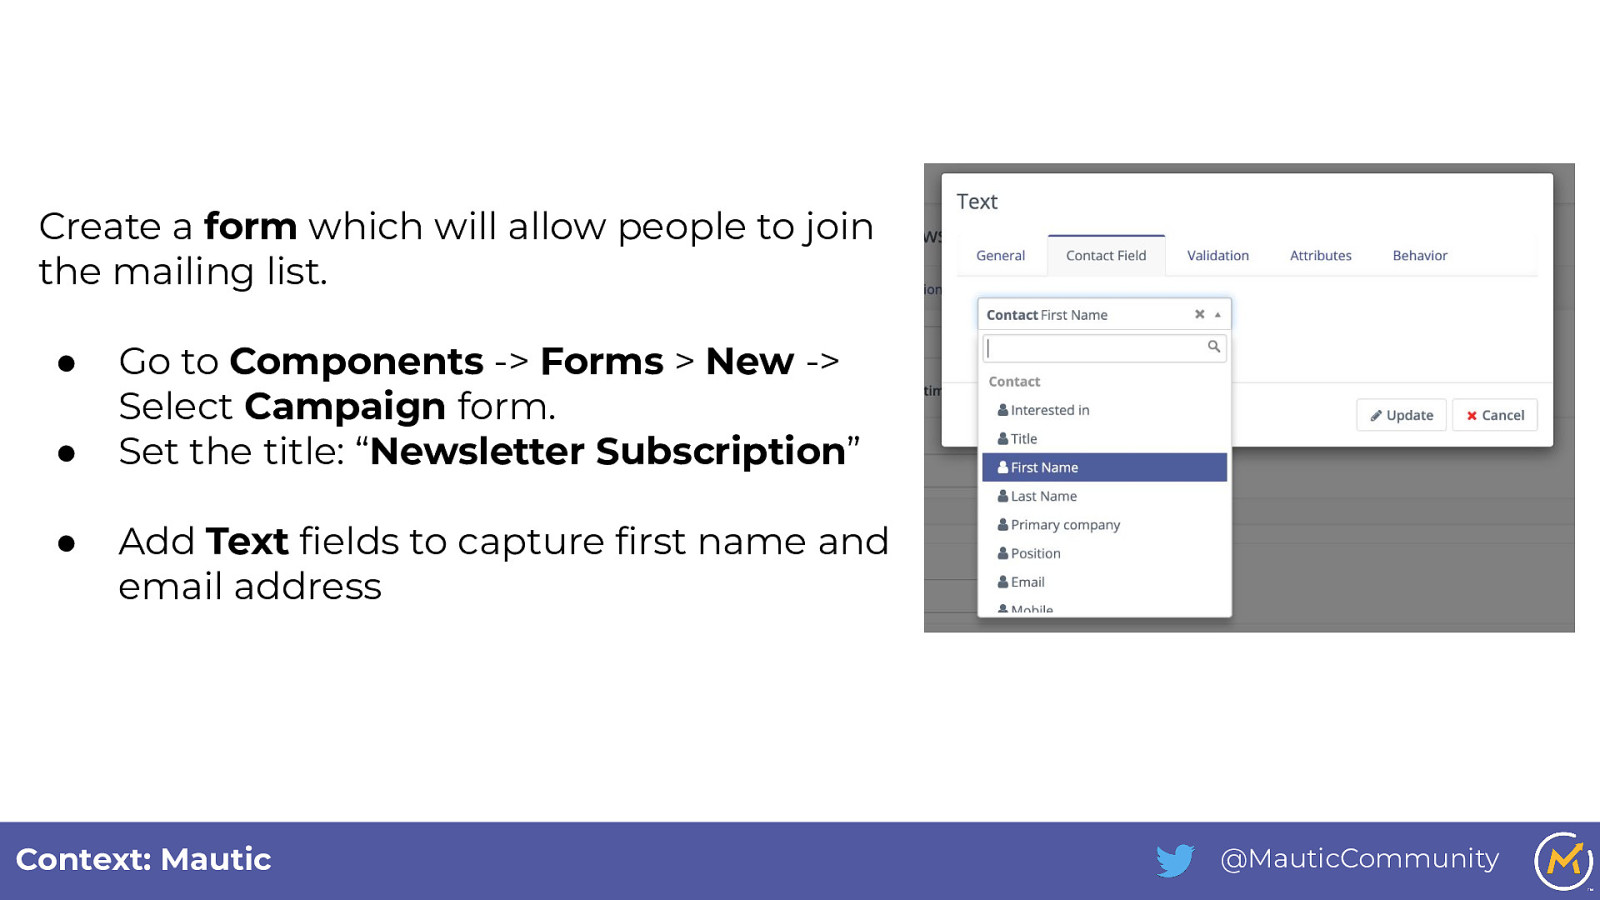
Create a form which will allow people to join the mailing list. ● ● ● Go to Components -> Forms > New -> Select Campaign form. Set the title: “Newsletter Subscription” Add Text fields to capture first name and email address Context: Mautic @MauticCommunity
Slide 41
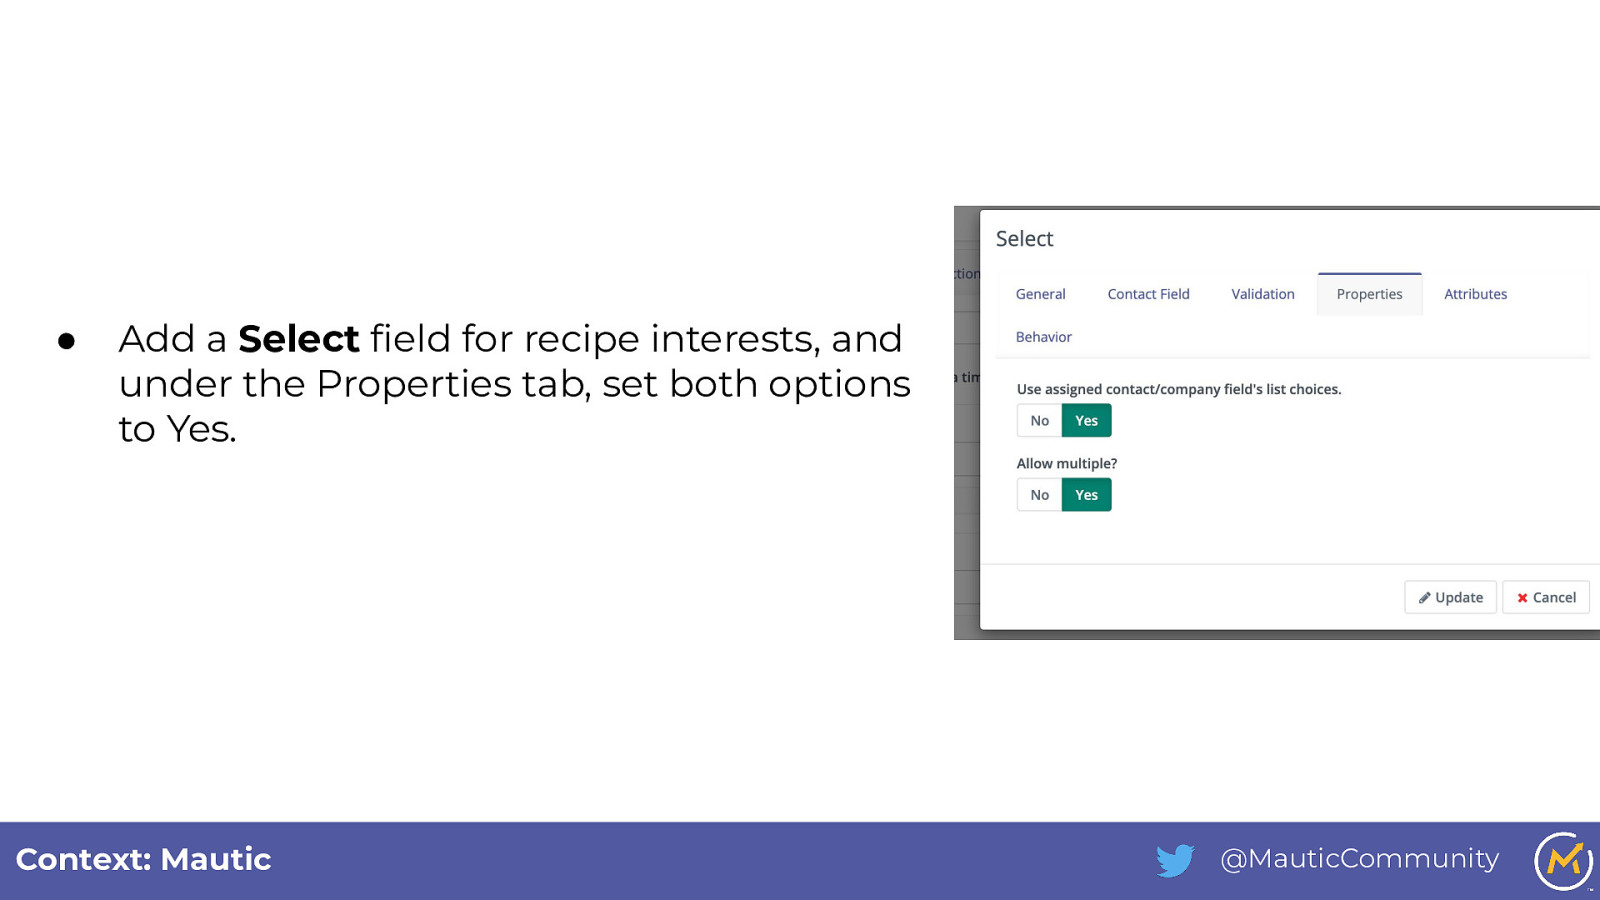
● Add a Select field for recipe interests, and under the Properties tab, set both options to Yes. Context: Mautic @MauticCommunity
Slide 42
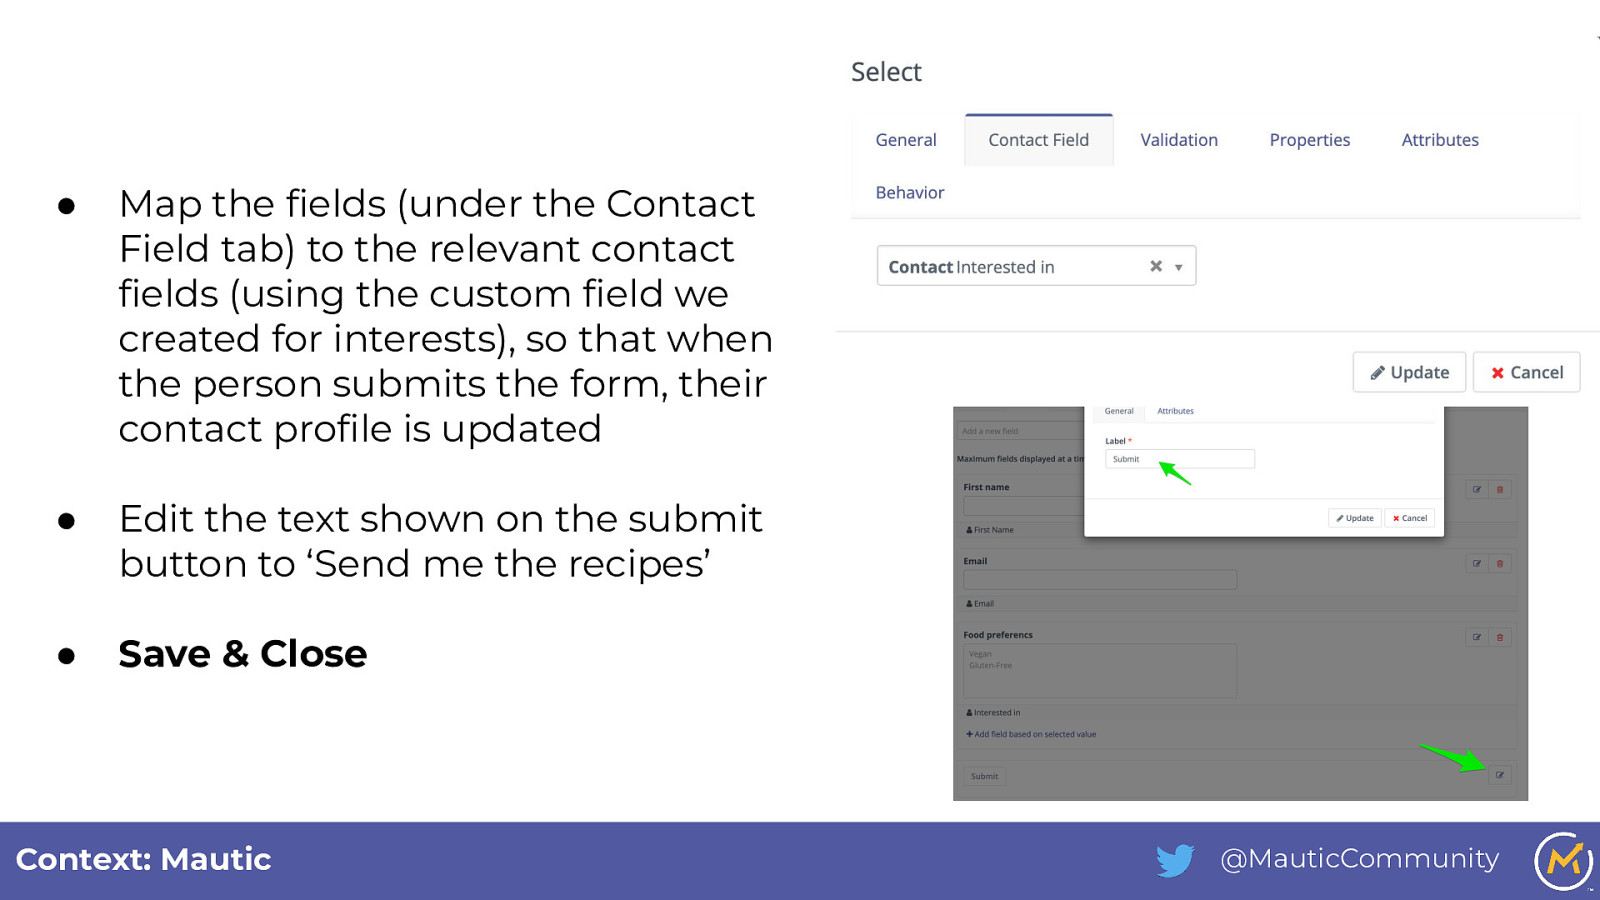
● Map the fields (under the Contact Field tab) to the relevant contact fields (using the custom field we created for interests), so that when the person submits the form, their contact profile is updated ● Edit the text shown on the submit button to ‘Send me the recipes’ ● Save & Close Context: Mautic @MauticCommunity
Slide 43
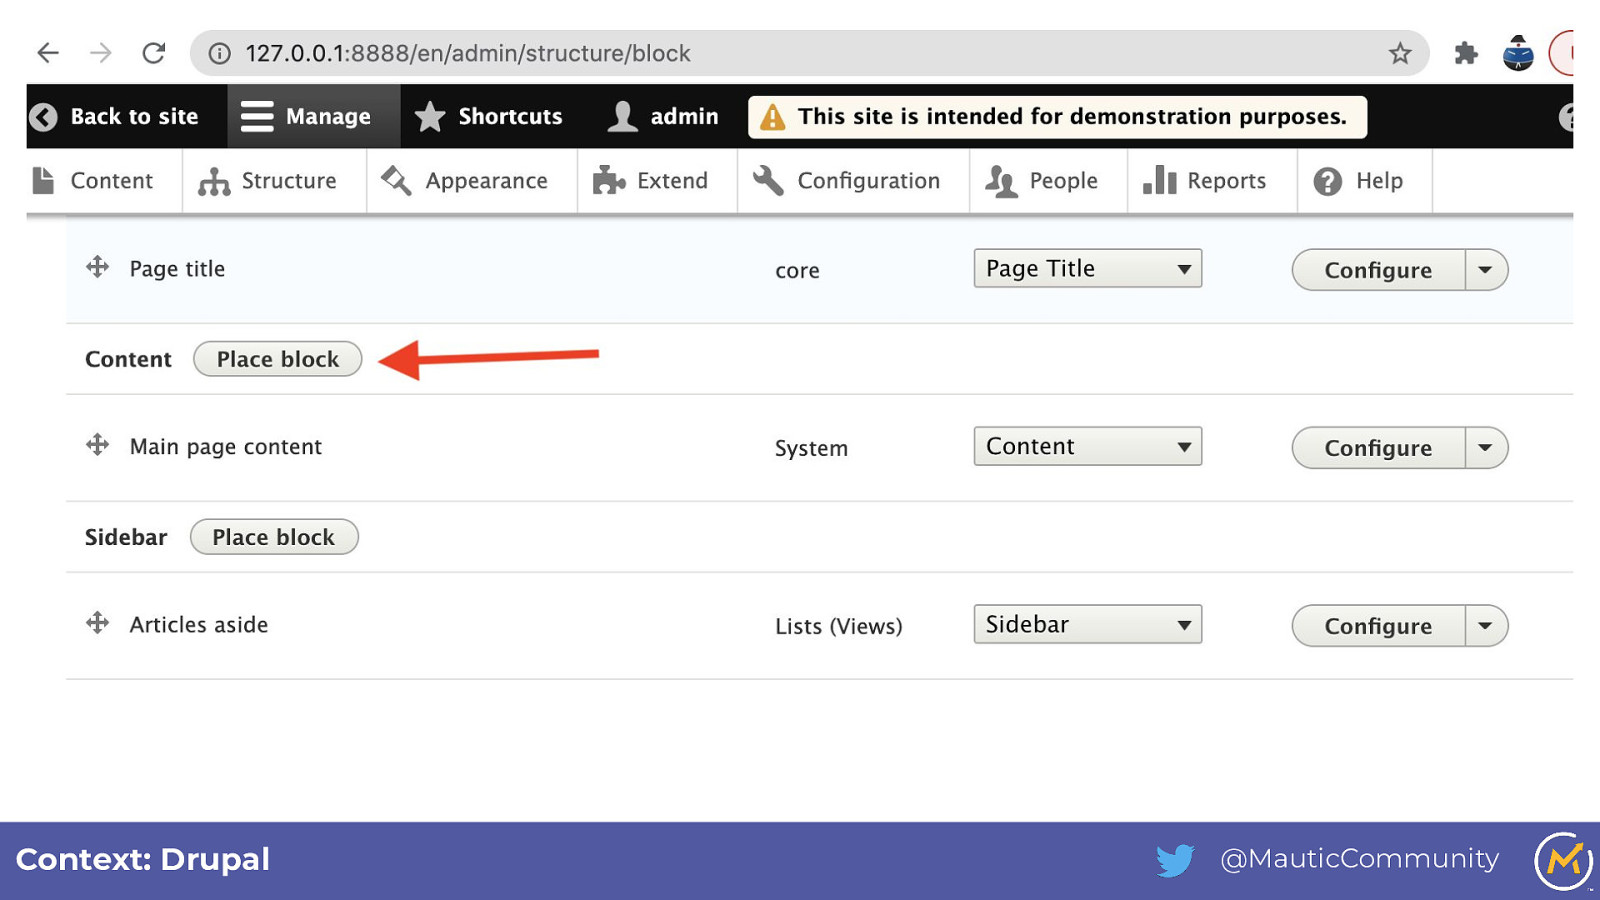
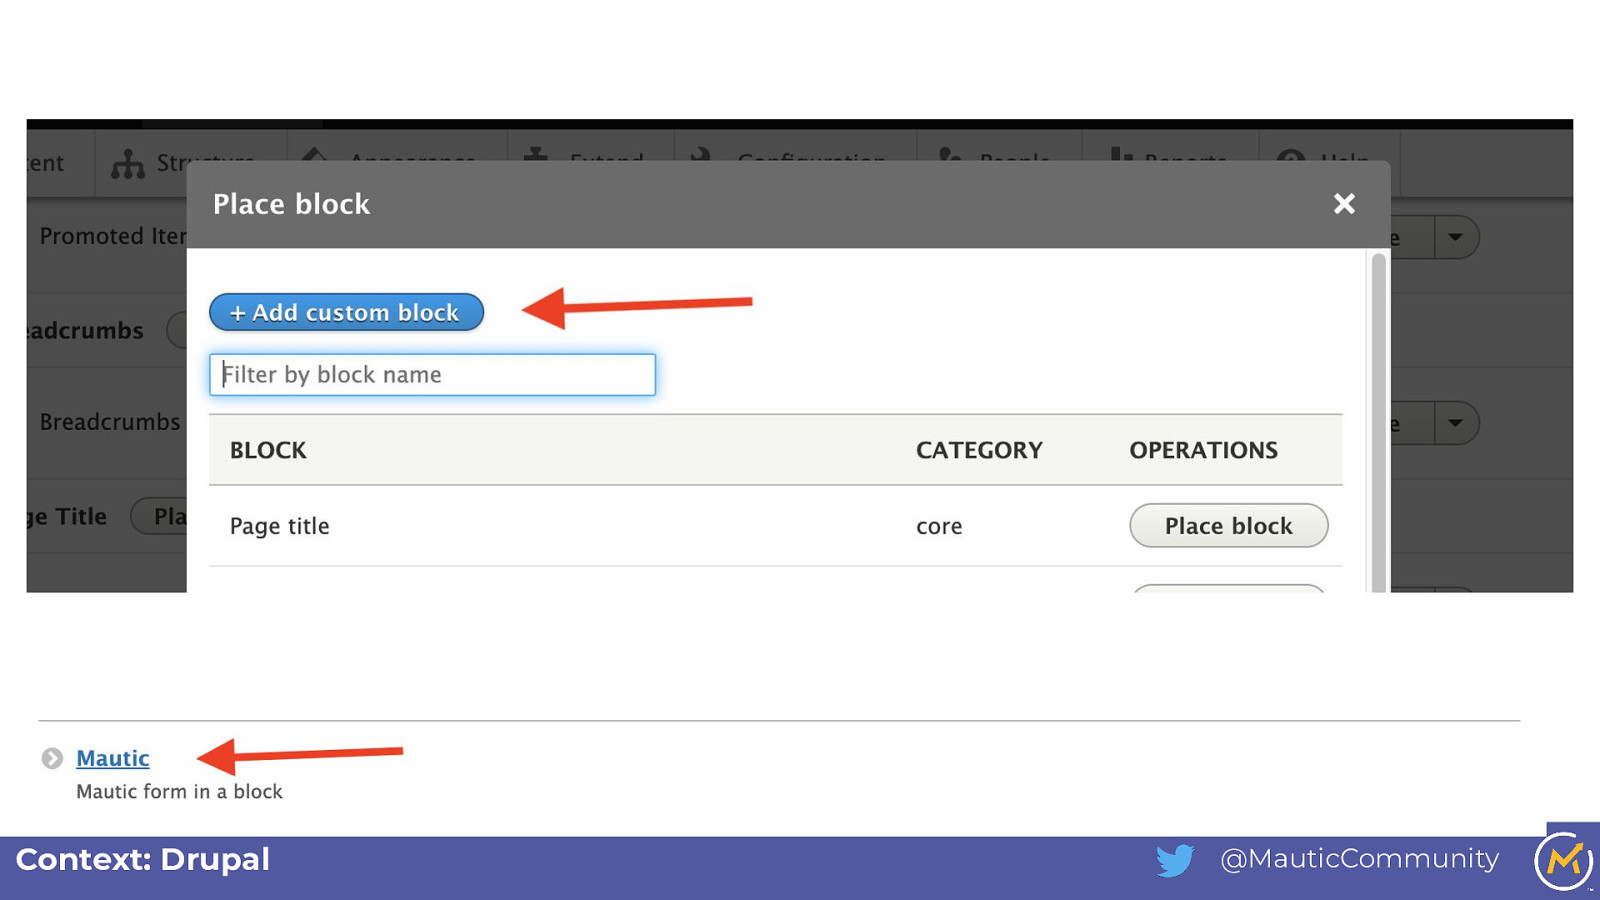
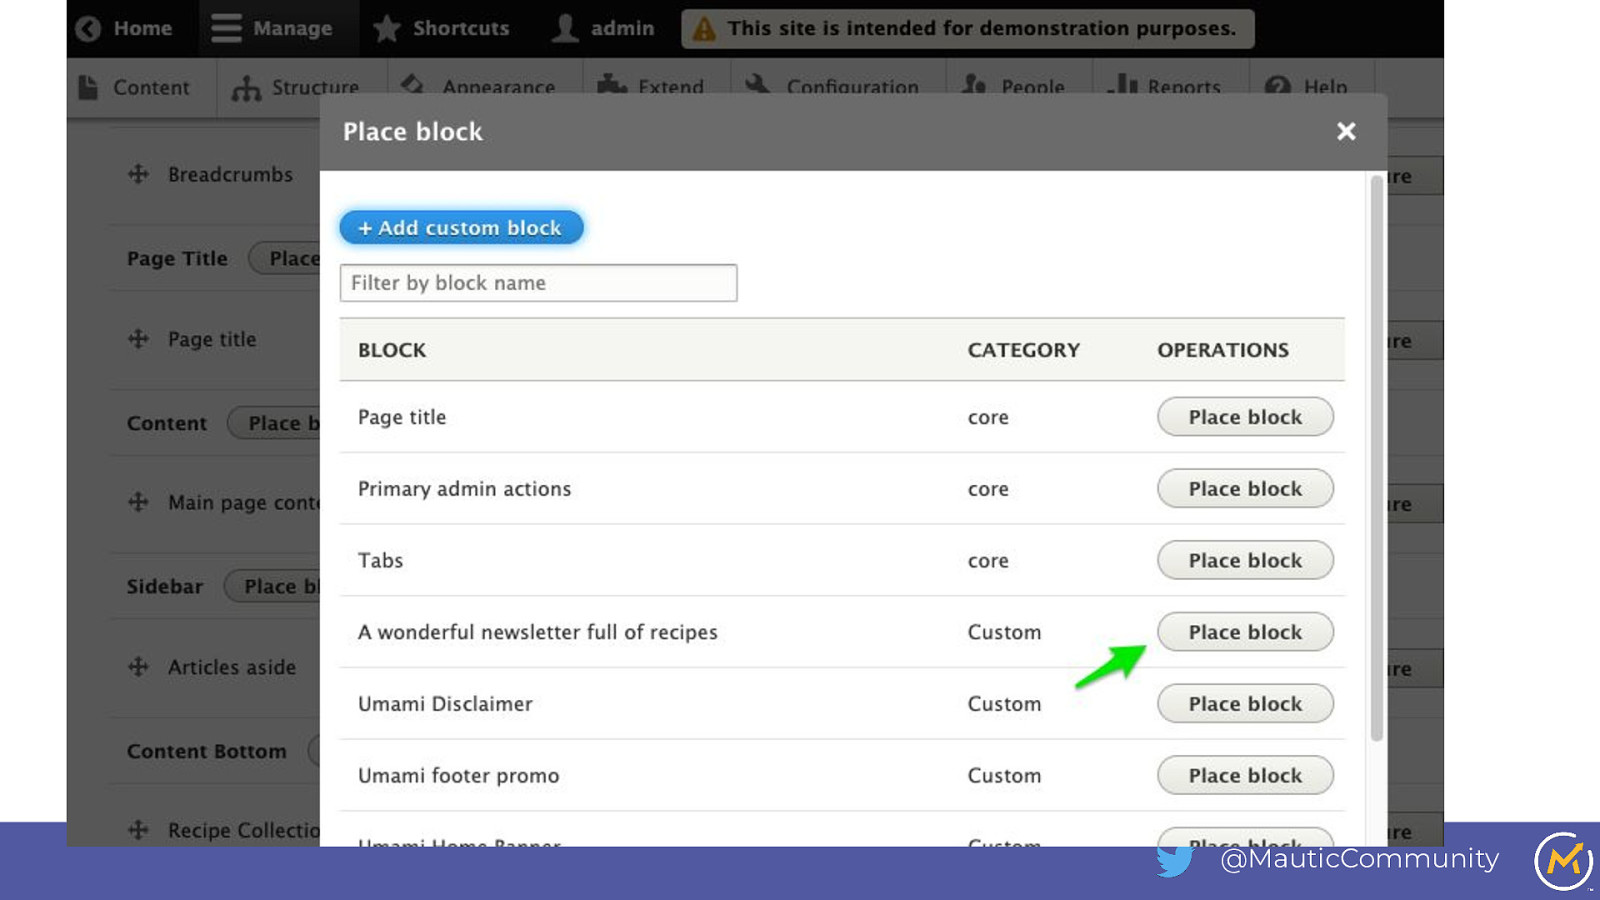
● Go to your Drupal and navigate to Structure > Block Layout ● Go to content section & click Place Block ● Click “Add Custom Block” ● Choose “Mautic” ● Description: A wonderful newsletter full of recipes ● Title: Subscribe to our recipes ● Mautic form: Newsletter Subscription ● Submit Context: Drupal @MauticCommunity
Slide 44
Context: Drupal @MauticCommunity
Slide 45
Context: Drupal @MauticCommunity
Slide 46

Context: Drupal @MauticCommunity
Slide 47
@MauticCommunity
Slide 48
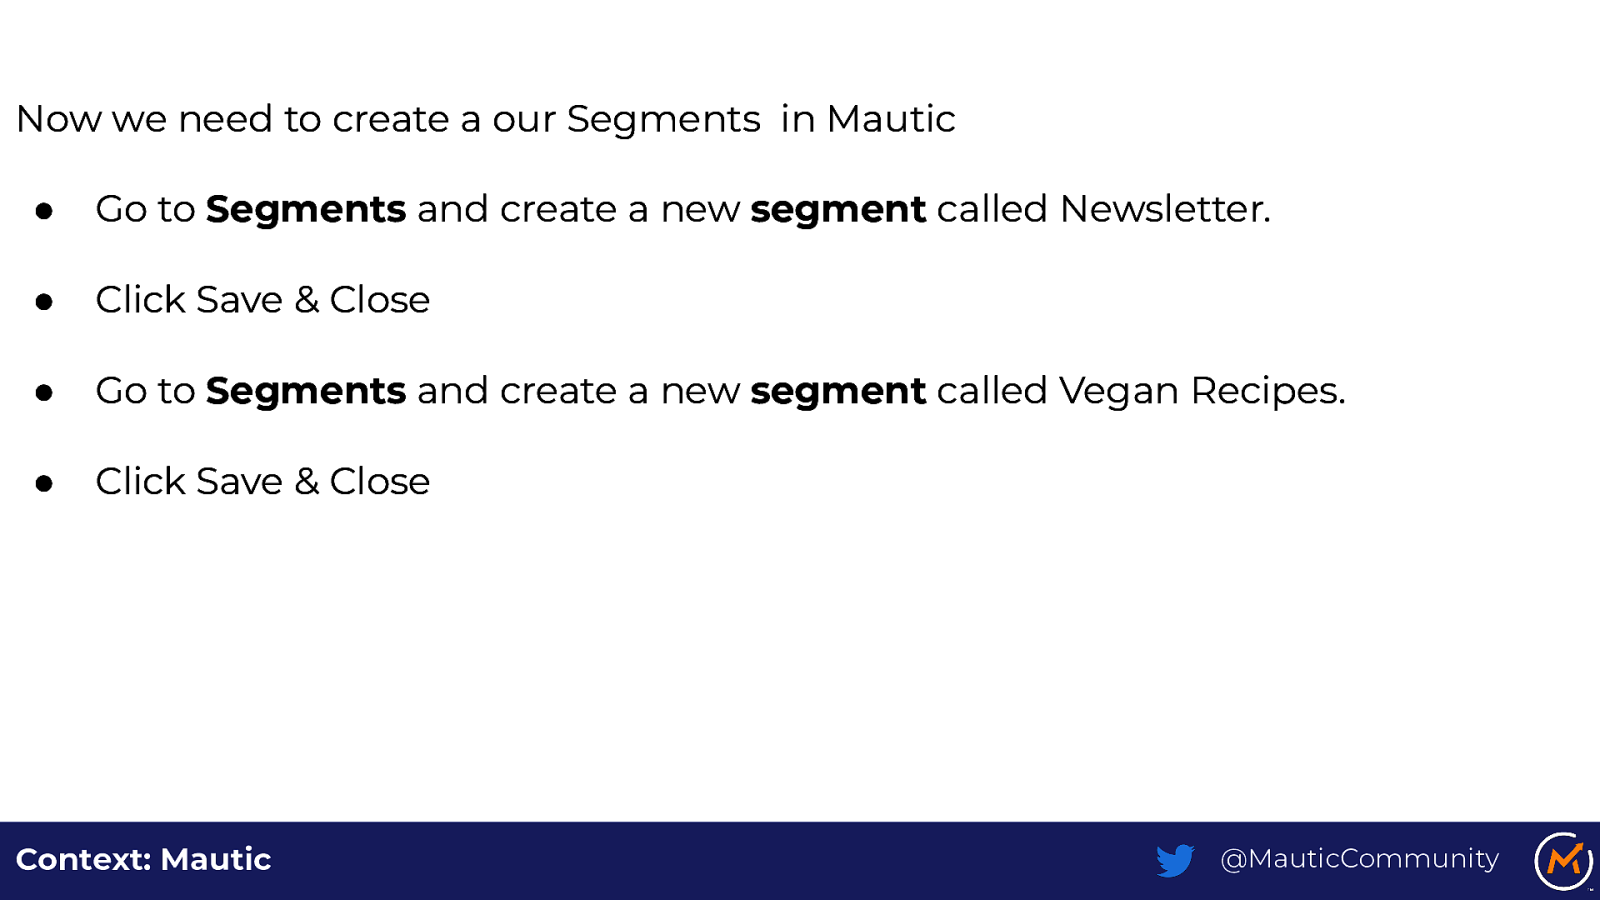
Now we need to create a our Segments in Mautic ● Go to Segments and create a new segment called Newsletter. ● Click Save & Close ● Go to Segments and create a new segment called Vegan Recipes. ● Click Save & Close Context: Mautic @MauticCommunity
Slide 49
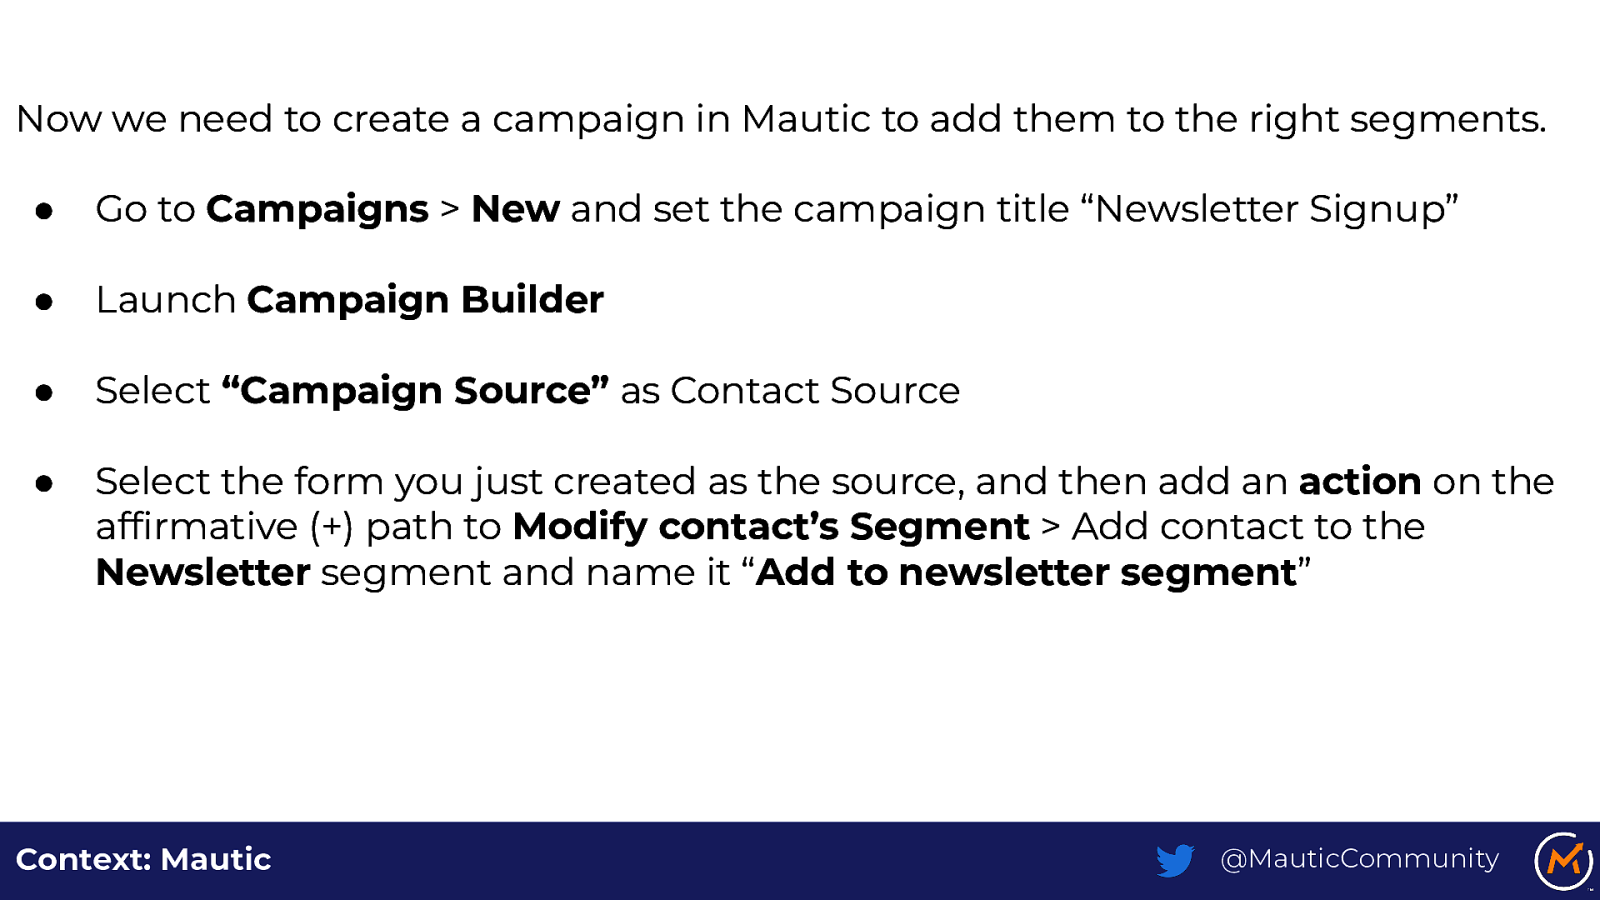
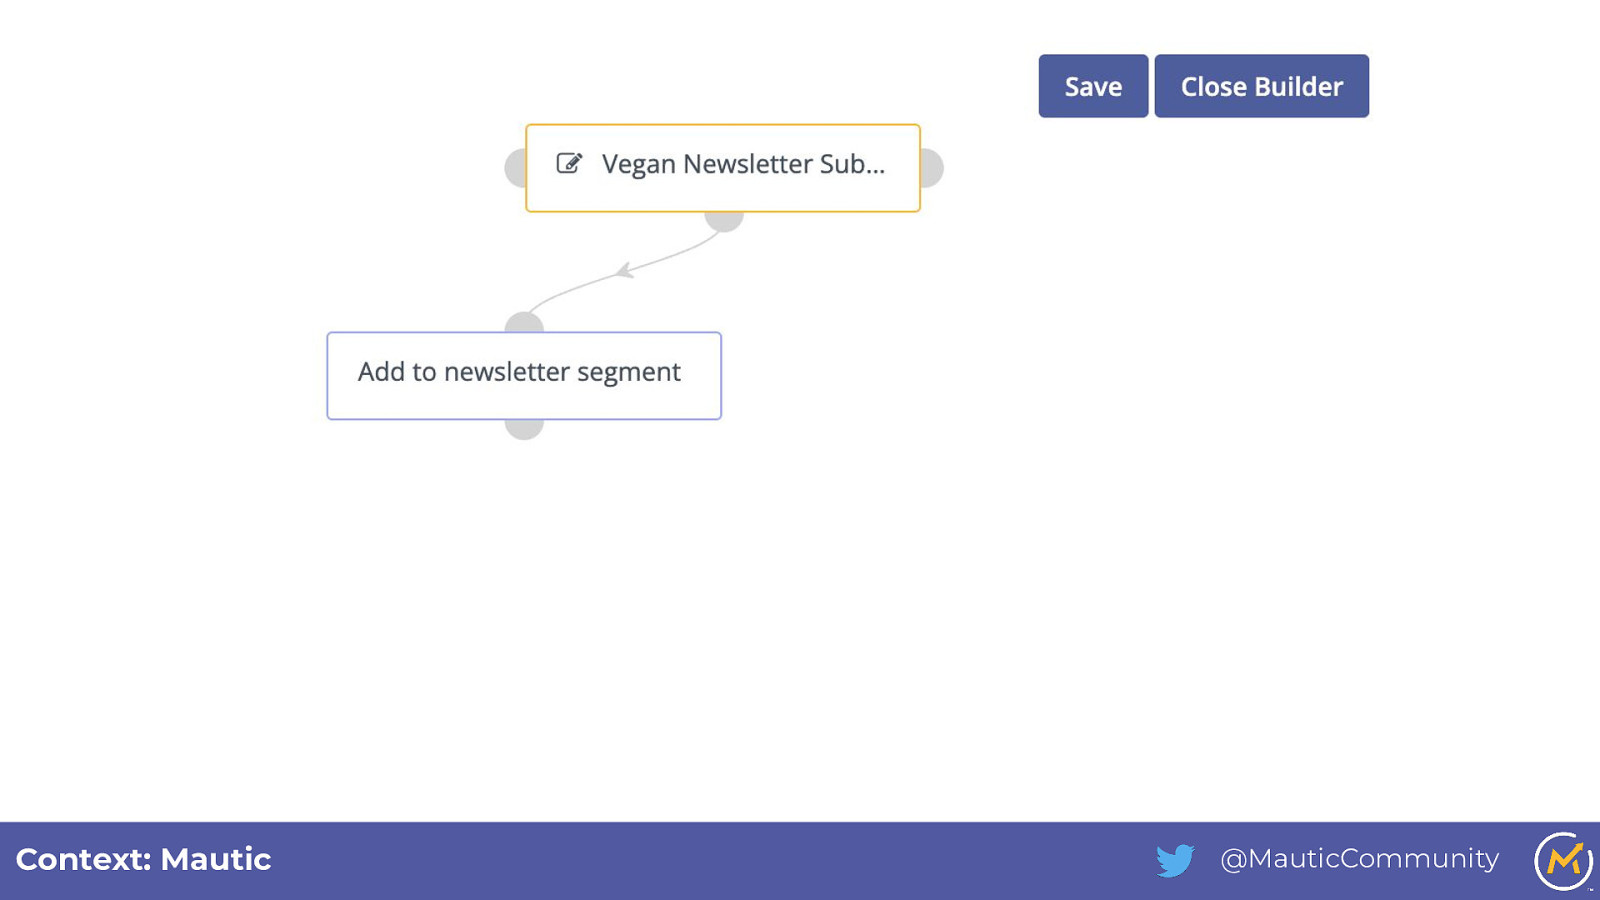
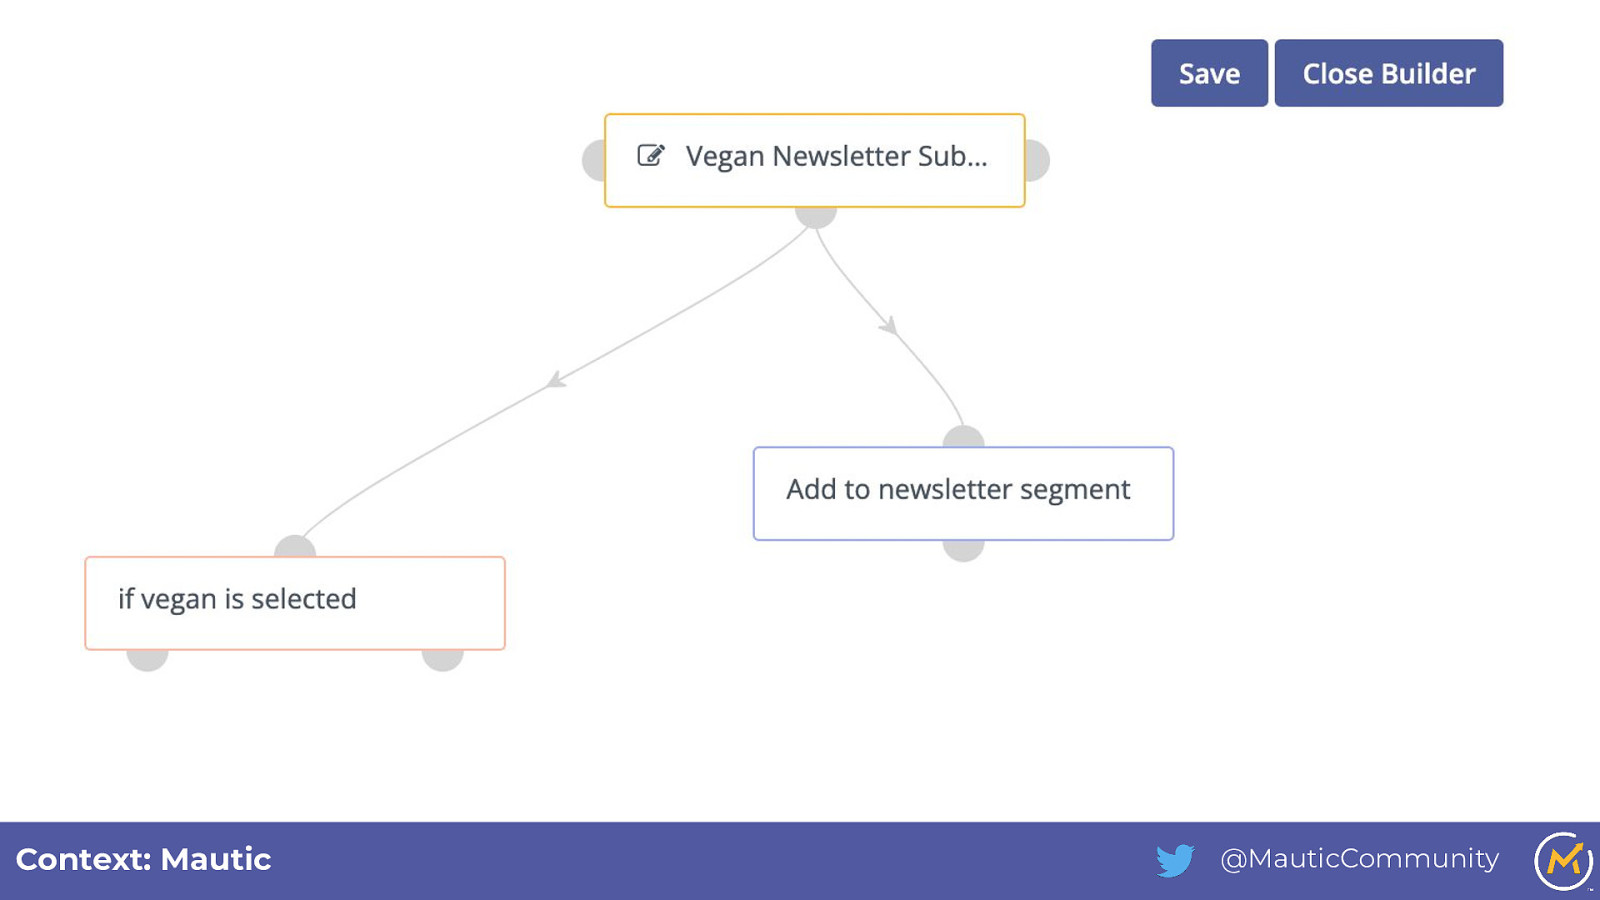
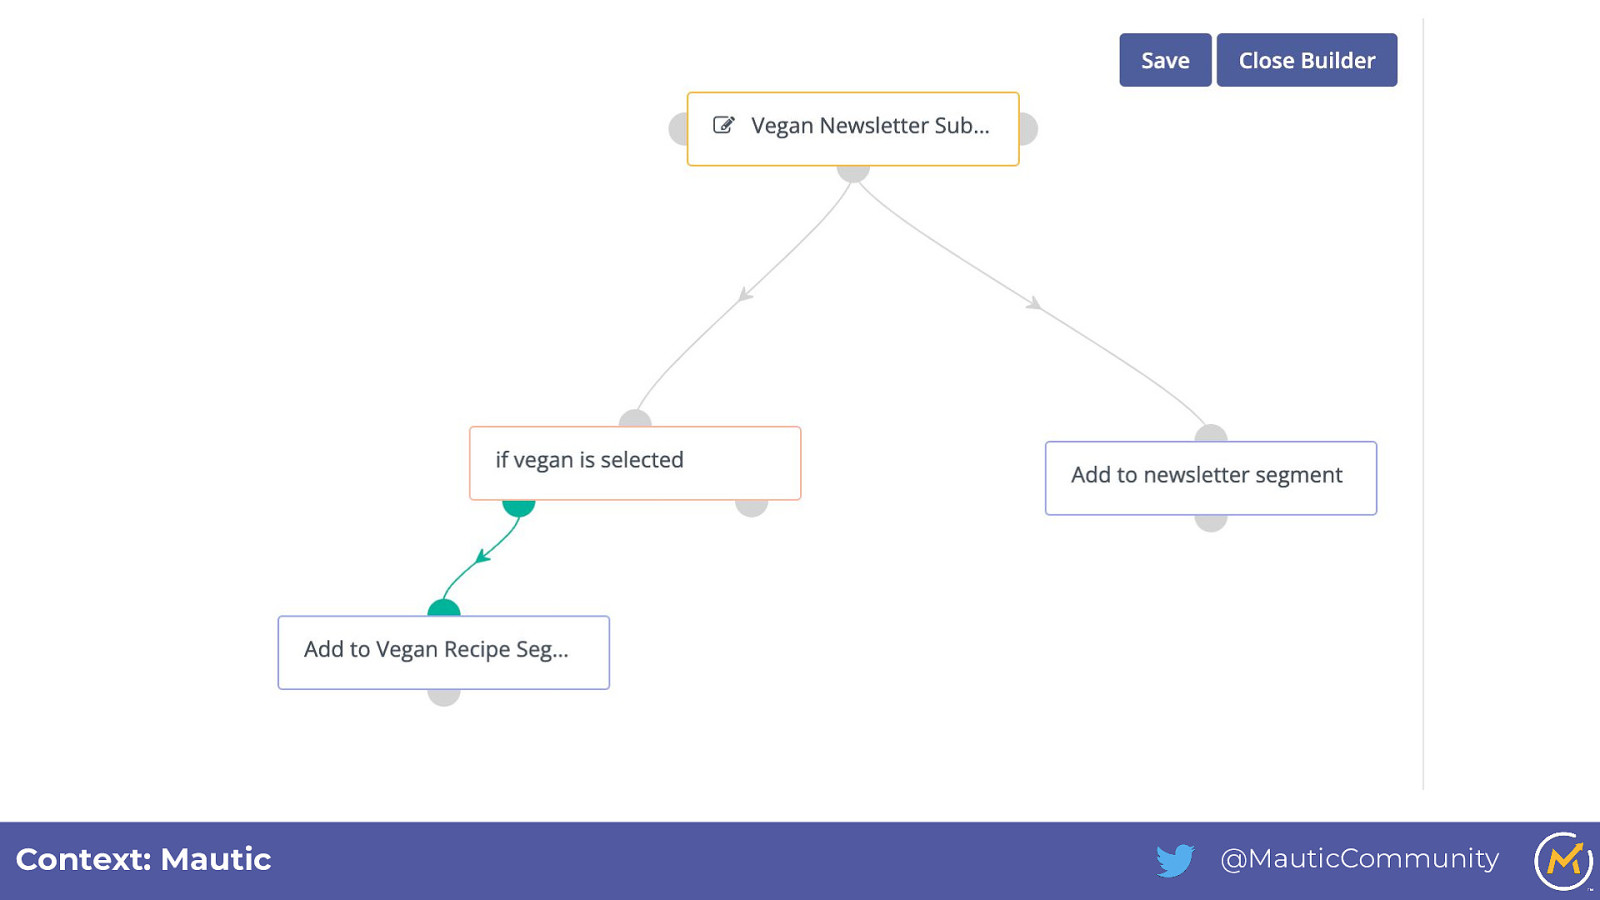
Now we need to create a campaign in Mautic to add them to the right segments. ● Go to Campaigns > New and set the campaign title “Newsletter Signup” ● Launch Campaign Builder ● Select “Campaign Source” as Contact Source ● Select the form you just created as the source, and then add an action on the affirmative (+) path to Modify contact’s Segment > Add contact to the Newsletter segment and name it “Add to newsletter segment” Context: Mautic @MauticCommunity
Slide 50
Context: Mautic @MauticCommunity
Slide 51
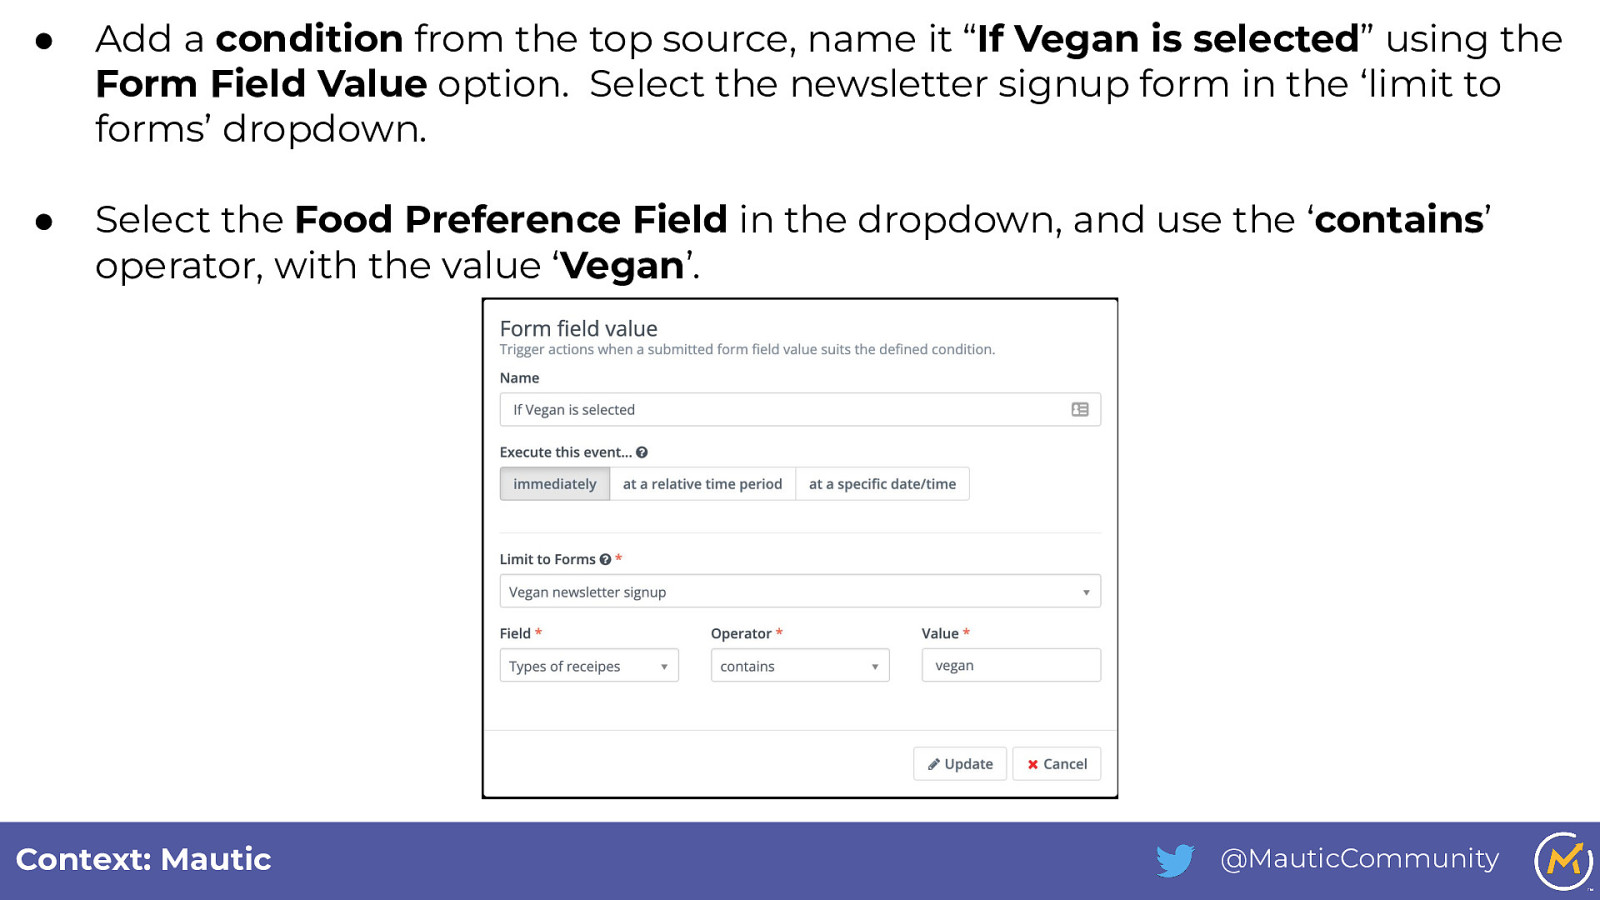
● Add a condition from the top source, name it “If Vegan is selected” using the Form Field Value option. Select the newsletter signup form in the ‘limit to forms’ dropdown. ● Select the Food Preference Field in the dropdown, and use the ‘contains’ operator, with the value ‘Vegan’. Context: Mautic @MauticCommunity
Slide 52
Context: Mautic @MauticCommunity
Slide 53
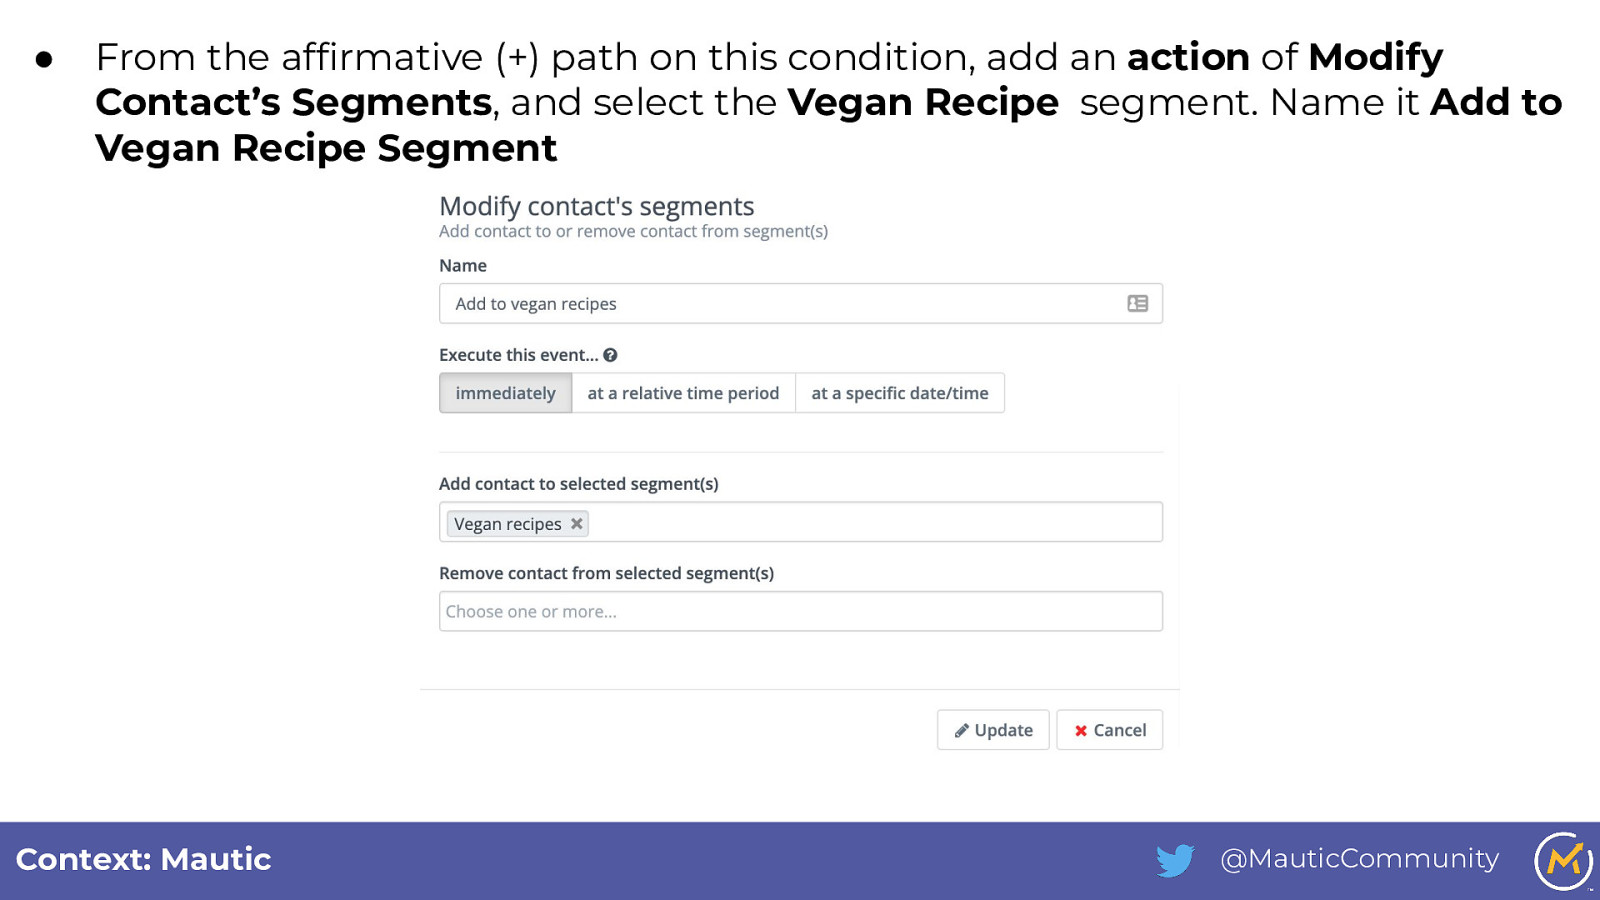
● From the affirmative (+) path on this condition, add an action of Modify Contact’s Segments, and select the Vegan Recipe segment. Name it Add to Vegan Recipe Segment Context: Mautic @MauticCommunity
Slide 54
Context: Mautic @MauticCommunity
Slide 55
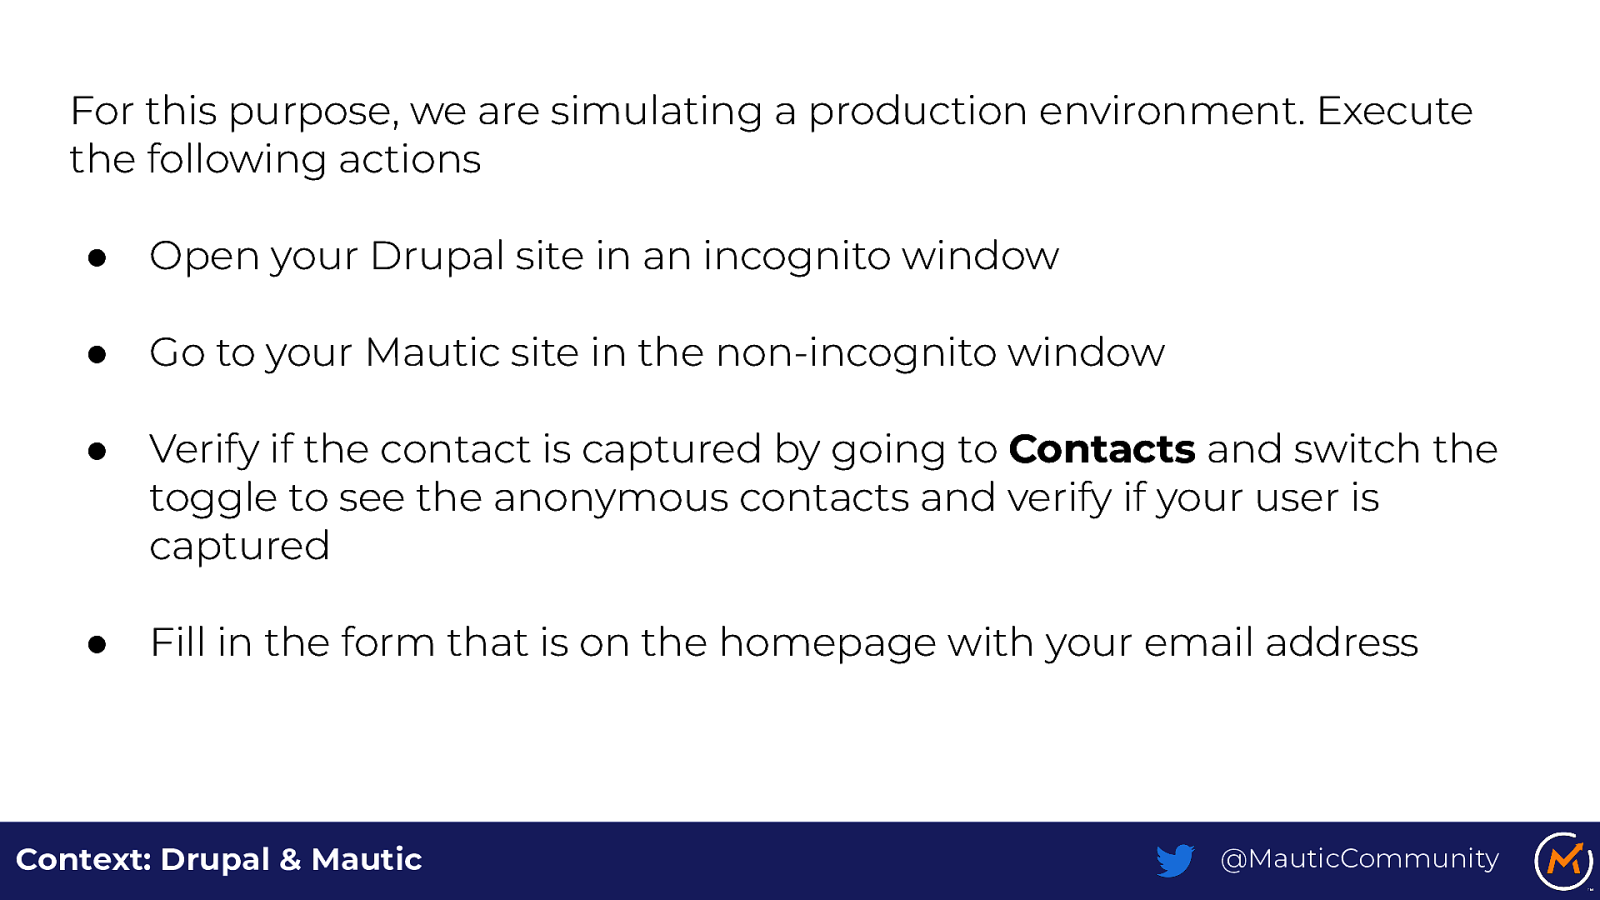
For this purpose, we are simulating a production environment. Execute the following actions ● Open your Drupal site in an incognito window ● Go to your Mautic site in the non-incognito window ● Verify if the contact is captured by going to Contacts and switch the toggle to see the anonymous contacts and verify if your user is captured ● Fill in the form that is on the homepage with your email address Context: Drupal & Mautic @MauticCommunity
Slide 56
Context: Drupal & Mautic @MauticCommunity
Slide 57
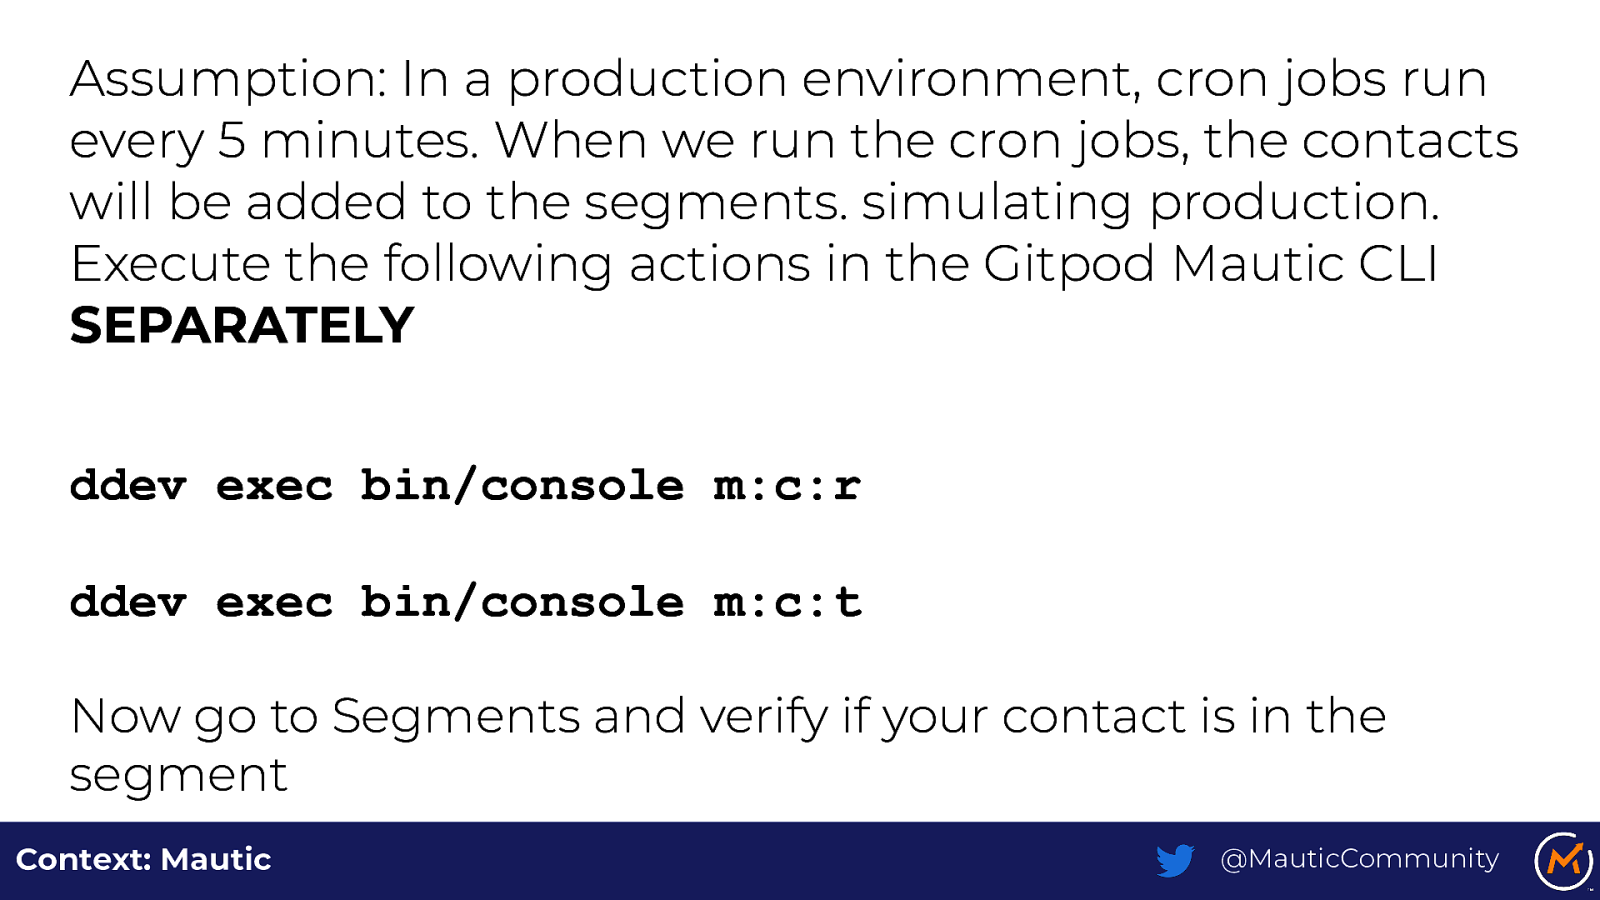
Assumption: In a production environment, cron jobs run every 5 minutes. When we run the cron jobs, the contacts will be added to the segments. simulating production. Execute the following actions in the Gitpod Mautic CLI SEPARATELY ddev exec bin/console m:c:r ddev exec bin/console m:c:t Now go to Segments and verify if your contact is in the segment Context: Mautic @MauticCommunity
Slide 58
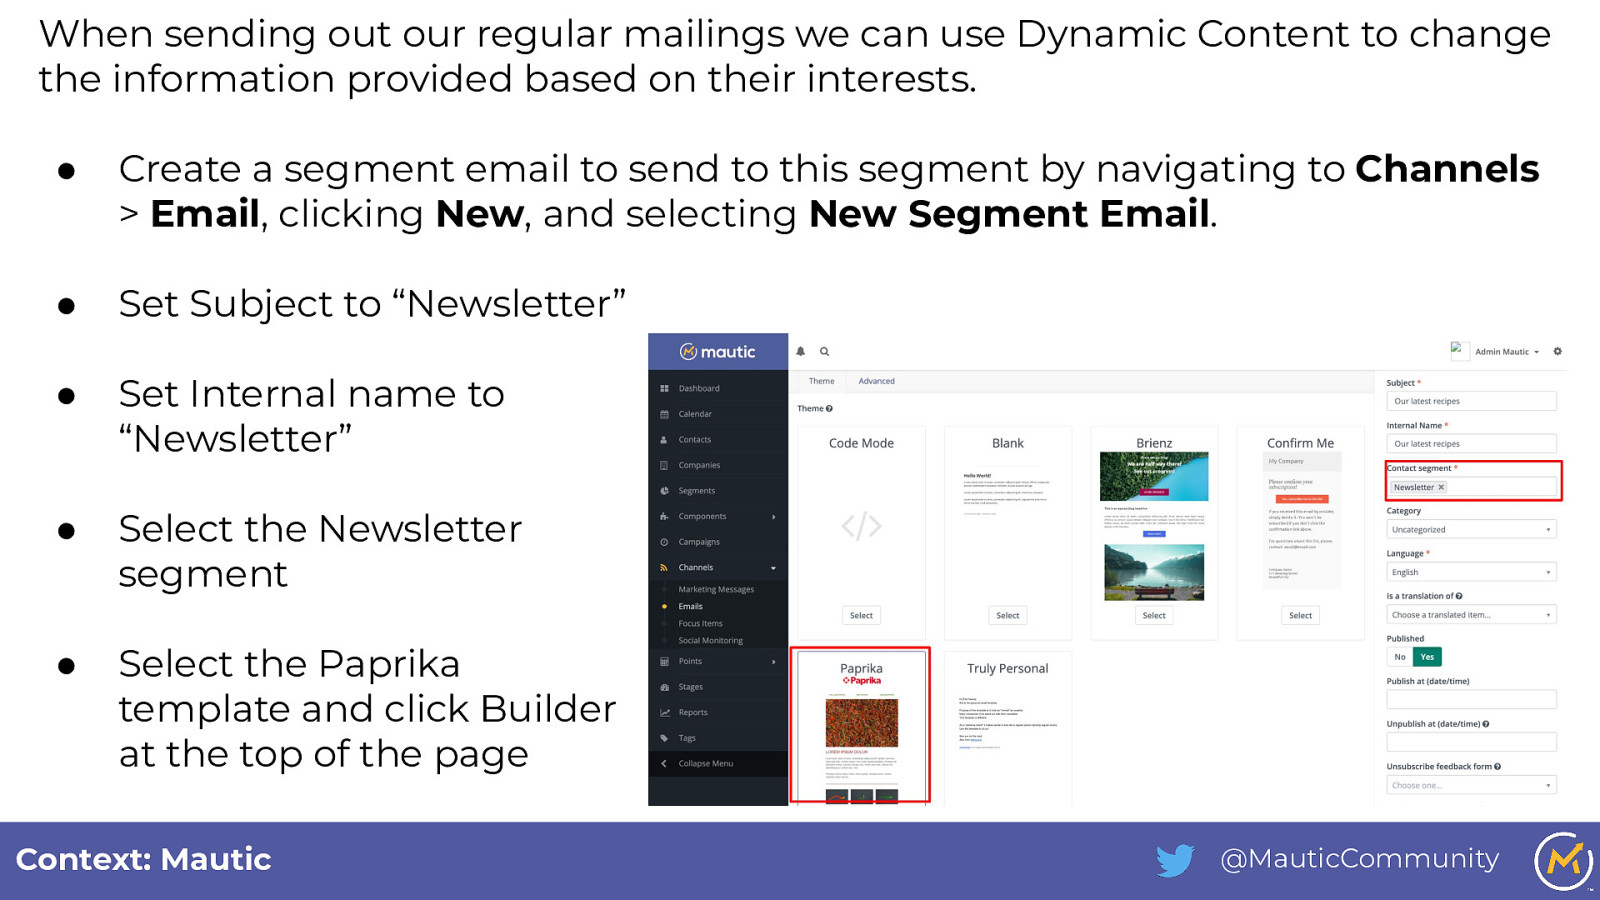
When sending out our regular mailings we can use Dynamic Content to change the information provided based on their interests. ● Create a segment email to send to this segment by navigating to Channels > Email, clicking New, and selecting New Segment Email. ● Set Subject to “Newsletter” ● Set Internal name to “Newsletter” ● Select the Newsletter segment ● Select the Paprika template and click Builder at the top of the page Context: Mautic @MauticCommunity
Slide 59
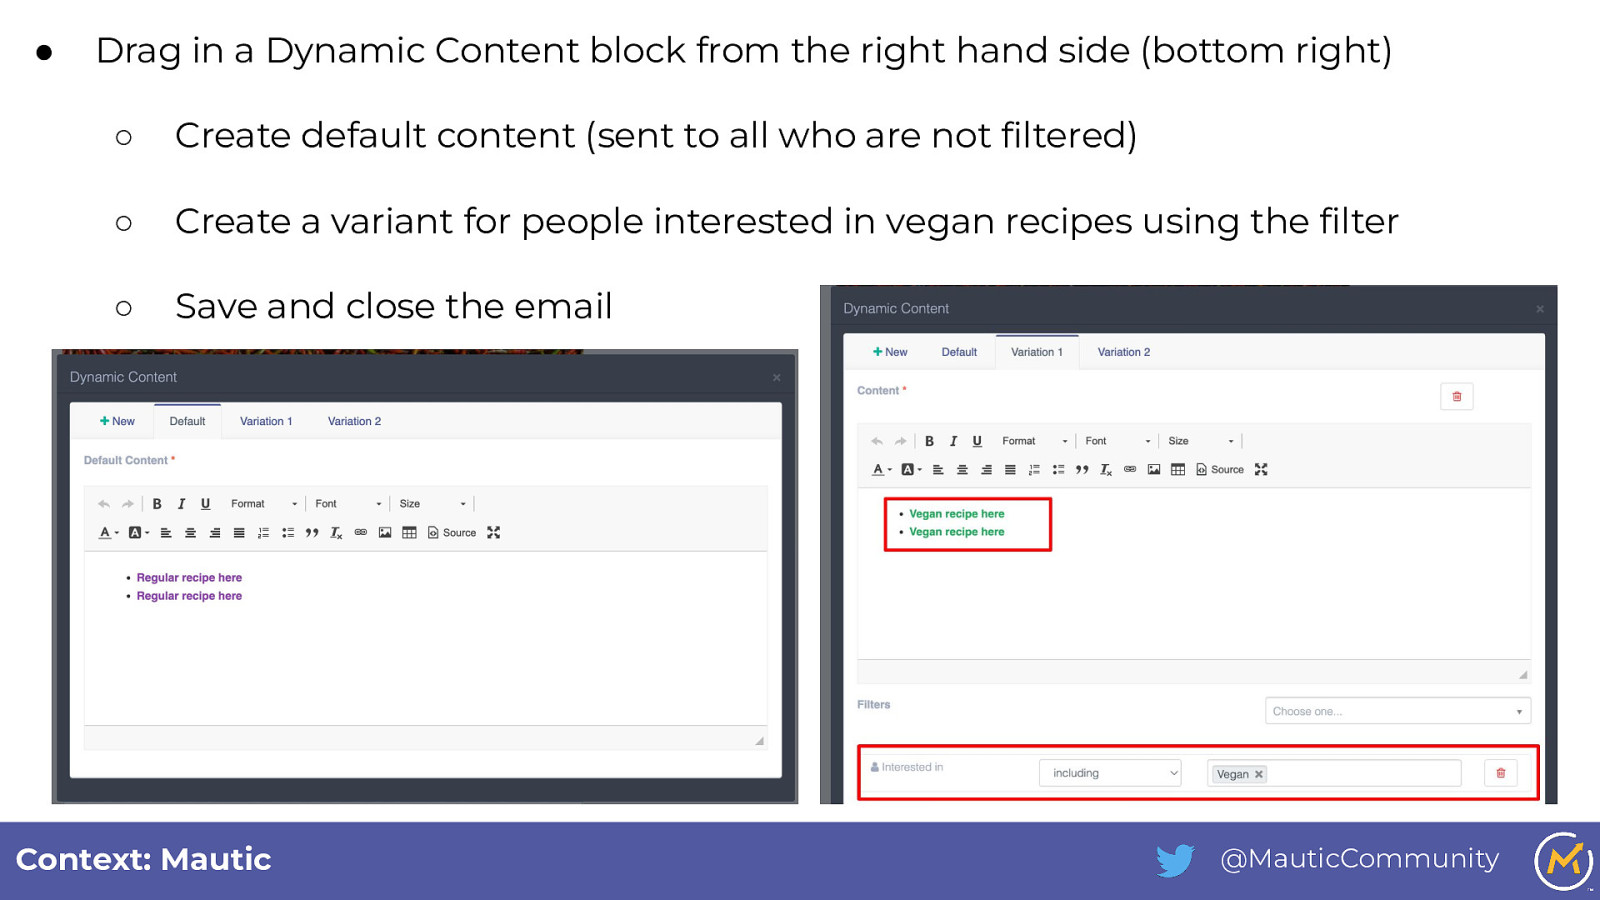
● Drag in a Dynamic Content block from the right hand side (bottom right) ○ Create default content (sent to all who are not filtered) ○ Create a variant for people interested in vegan recipes using the filter ○ Save and close the email Context: Mautic @MauticCommunity
Slide 60
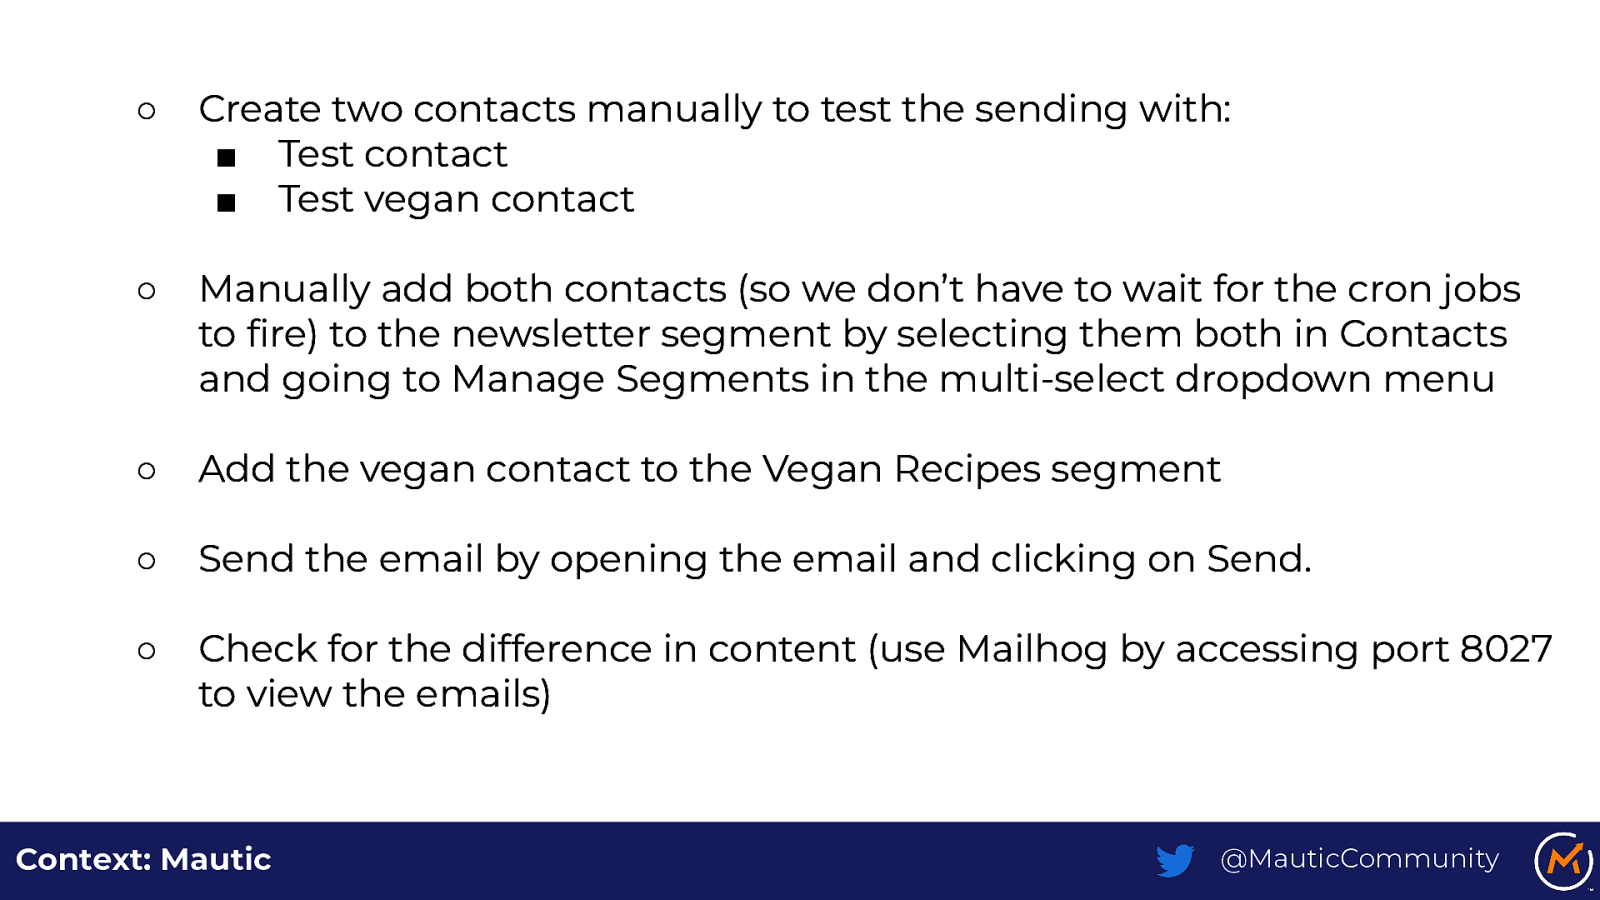
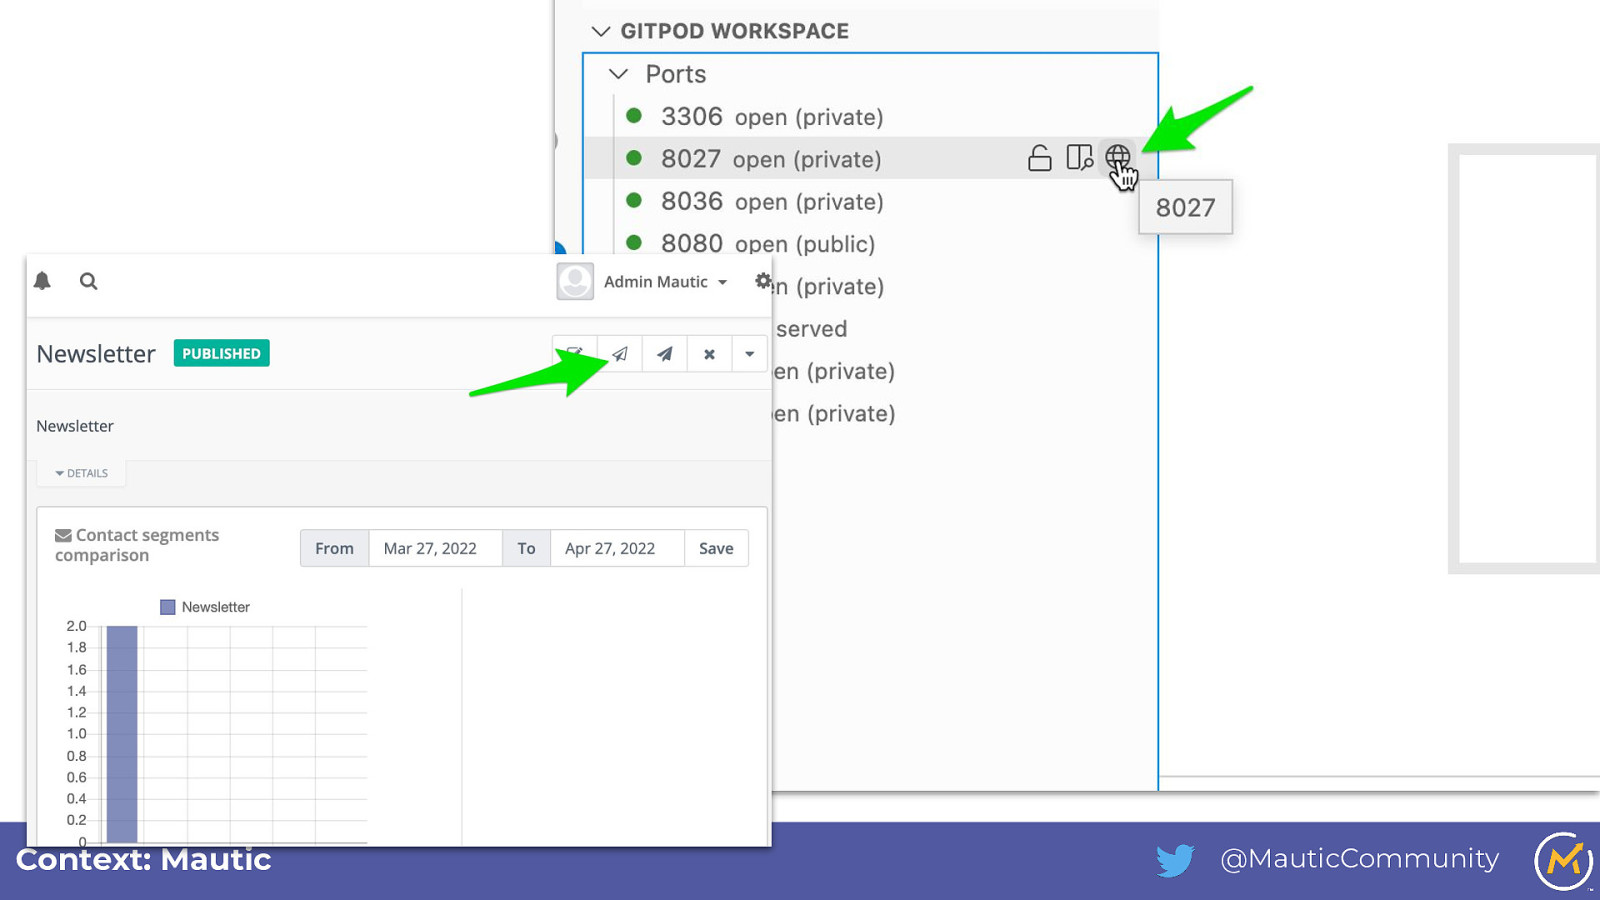
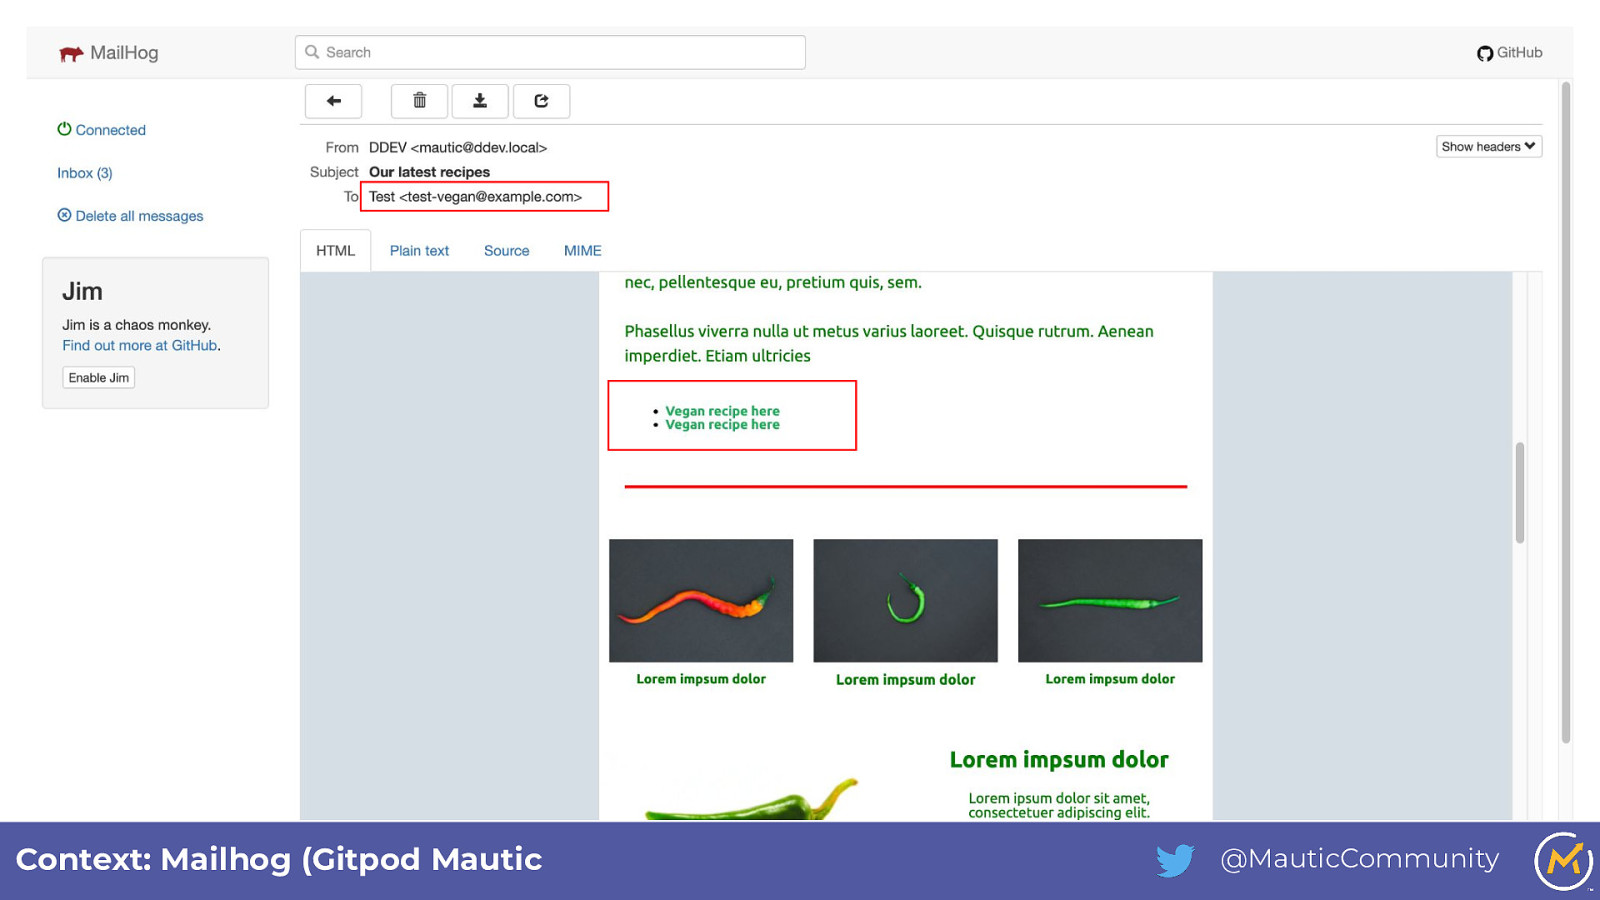
○ Create two contacts manually to test the sending with: ■ Test contact ■ Test vegan contact ○ Manually add both contacts (so we don’t have to wait for the cron jobs to fire) to the newsletter segment by selecting them both in Contacts and going to Manage Segments in the multi-select dropdown menu ○ Add the vegan contact to the Vegan Recipes segment ○ Send the email by opening the email and clicking on Send. ○ Check for the difference in content (use Mailhog by accessing port 8027 to view the emails) Context: Mautic @MauticCommunity
Slide 61
Context: Mautic @MauticCommunity
Slide 62
Context: Mailhog (Gitpod Mautic @MauticCommunity
Slide 63

Context: Mailhog (Gitpod Mautic @MauticCommunity
Slide 64
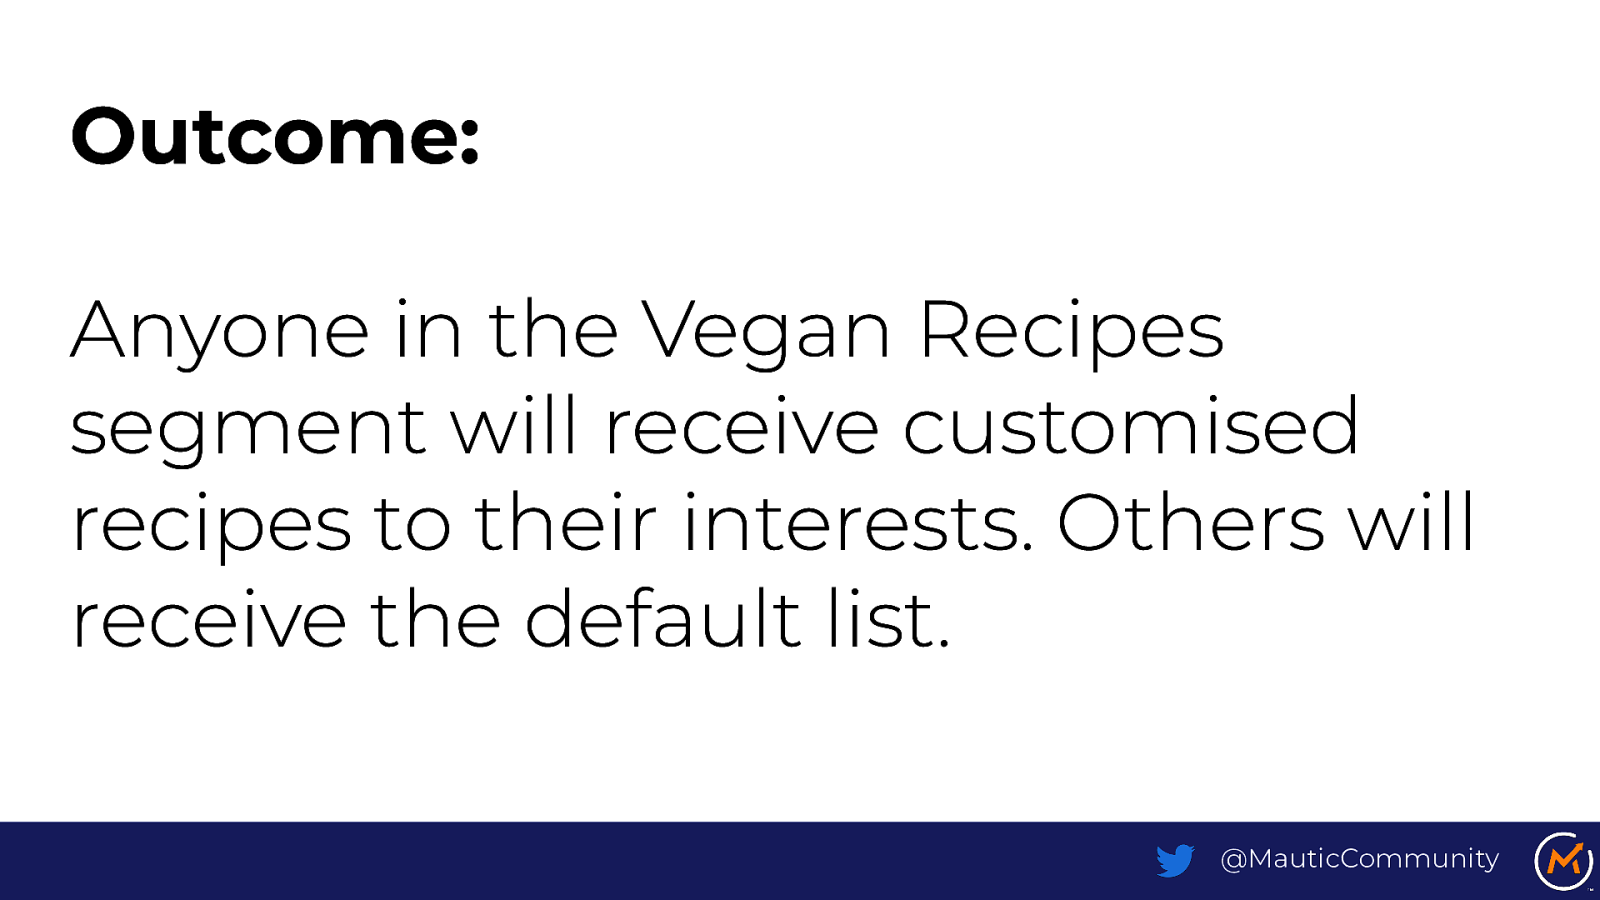
Outcome: Anyone in the Vegan Recipes segment will receive customised recipes to their interests. Others will receive the default list. @MauticCommunity
Slide 65

Done! @MauticCommunity
Slide 66
- Workshop Closing @MauticCommunity
Slide 67
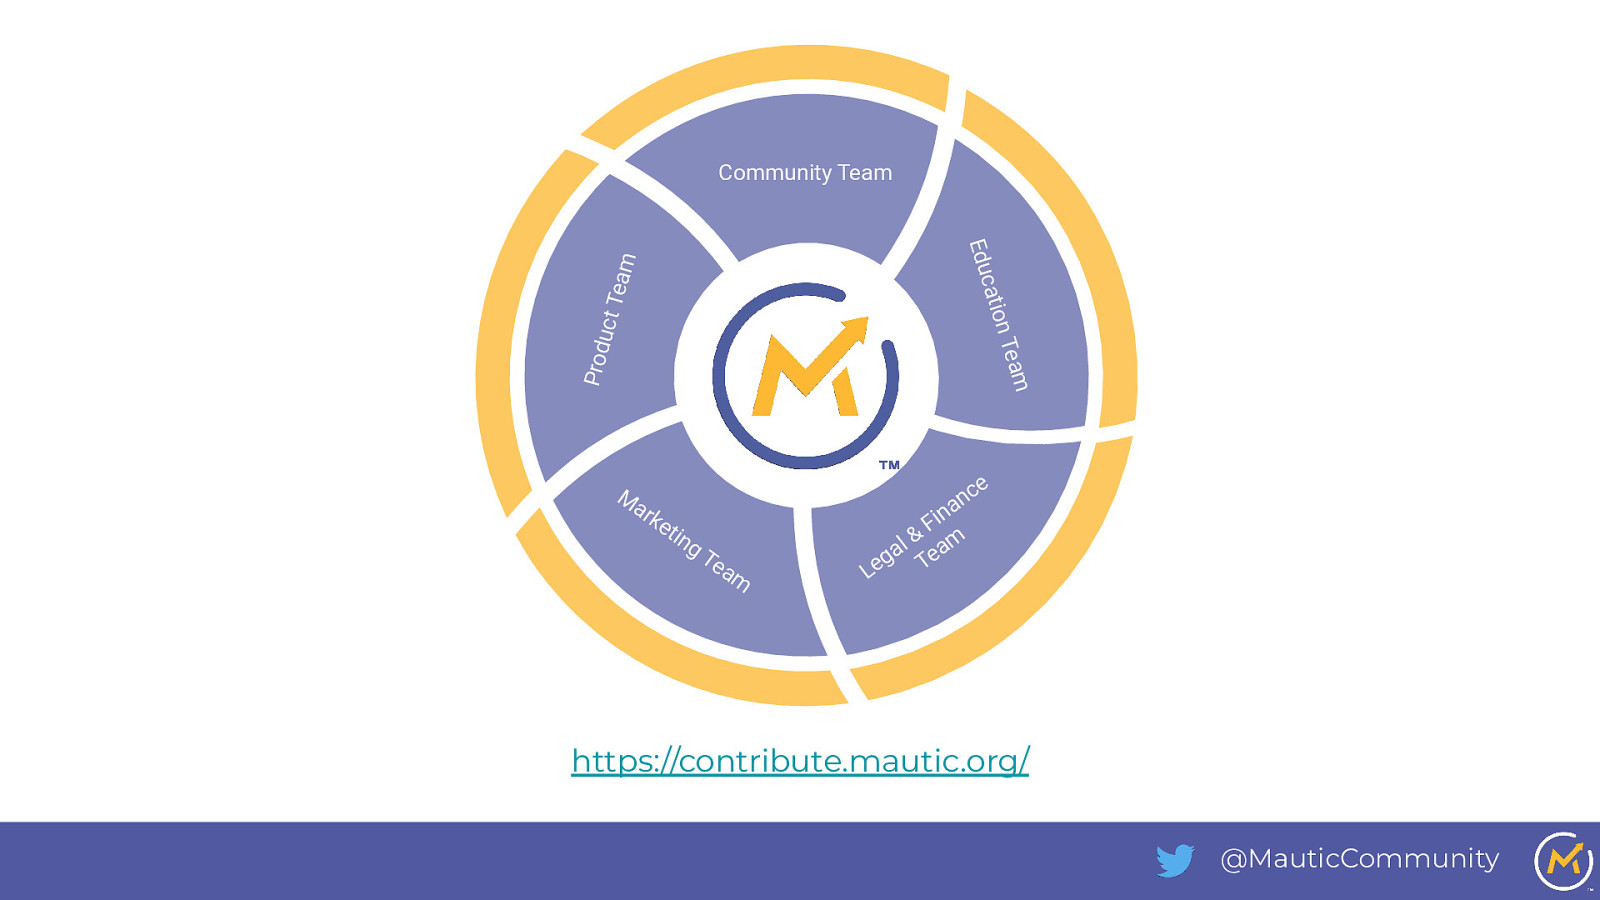
Community Team Prod eam ion T uct T e am cat Edu e M ar ke t ing Te a m c an Fin l& m ga Tea e L https://contribute.mautic.org/ @MauticCommunity
Slide 68
Are there any… Questions? ruth.cheesley@mautic.org / nick.veenhof@gmail.com Find us on Slack, the Acquia Booth or Twitter (@RCheesley / @Nick_vh) for more Q&A! @MauticCommunity
Slide 69
Homework: Learn > Convert > Personalize @MauticCommunity
Slide 70
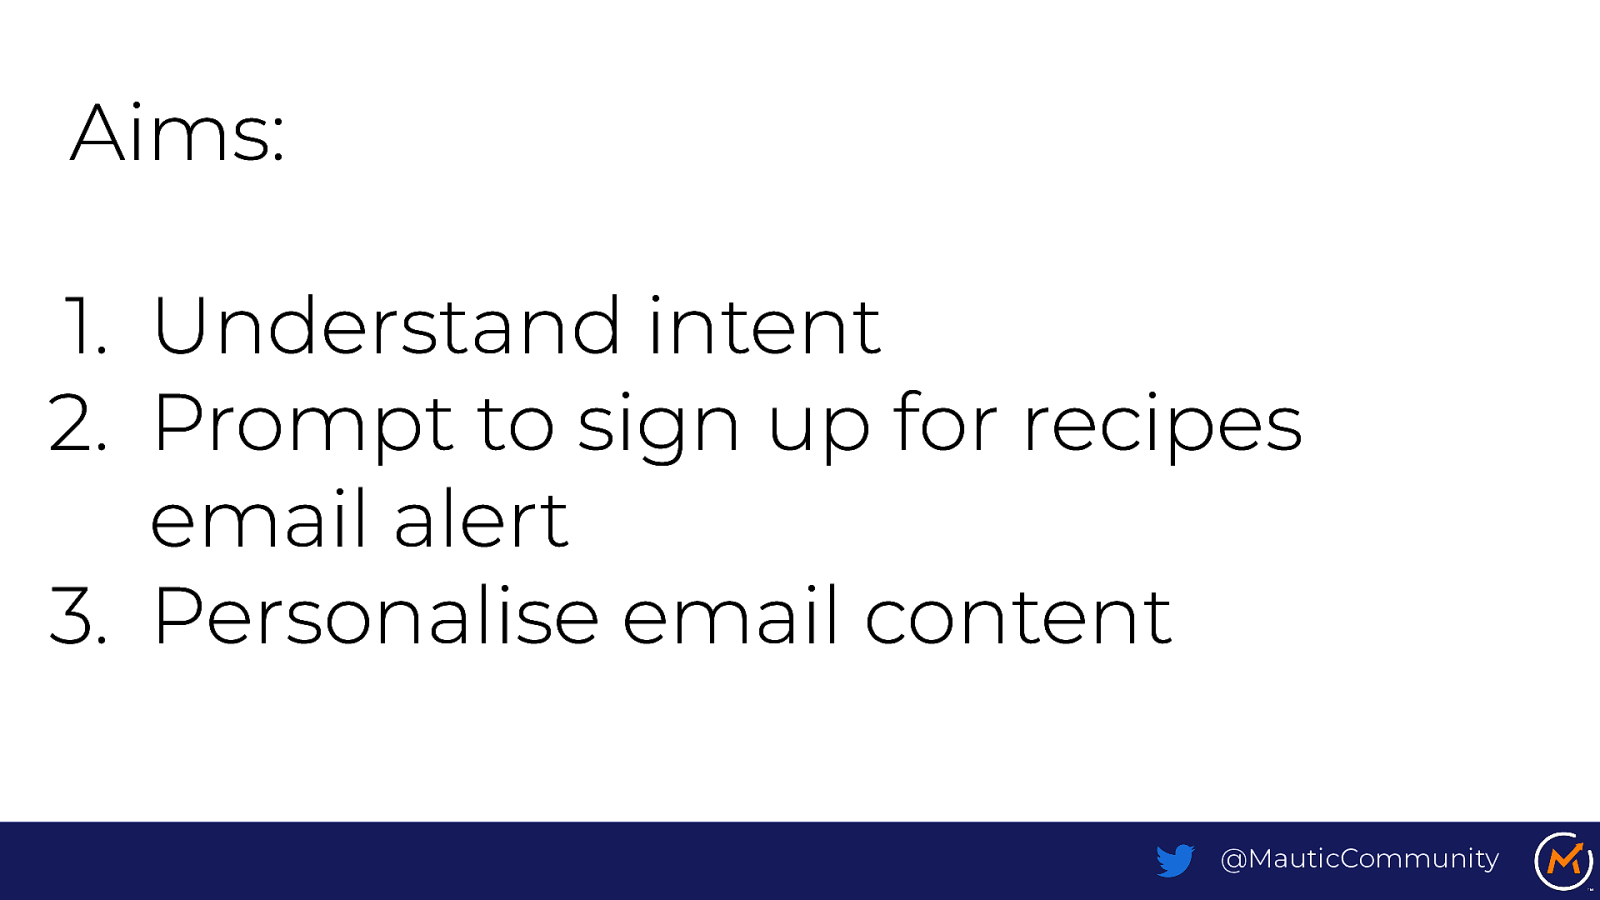
Aims: 1. Understand intent 2. Prompt to sign up for recipes email alert 3. Personalise email content @MauticCommunity
Slide 71
Understanding intent @MauticCommunity
Slide 72
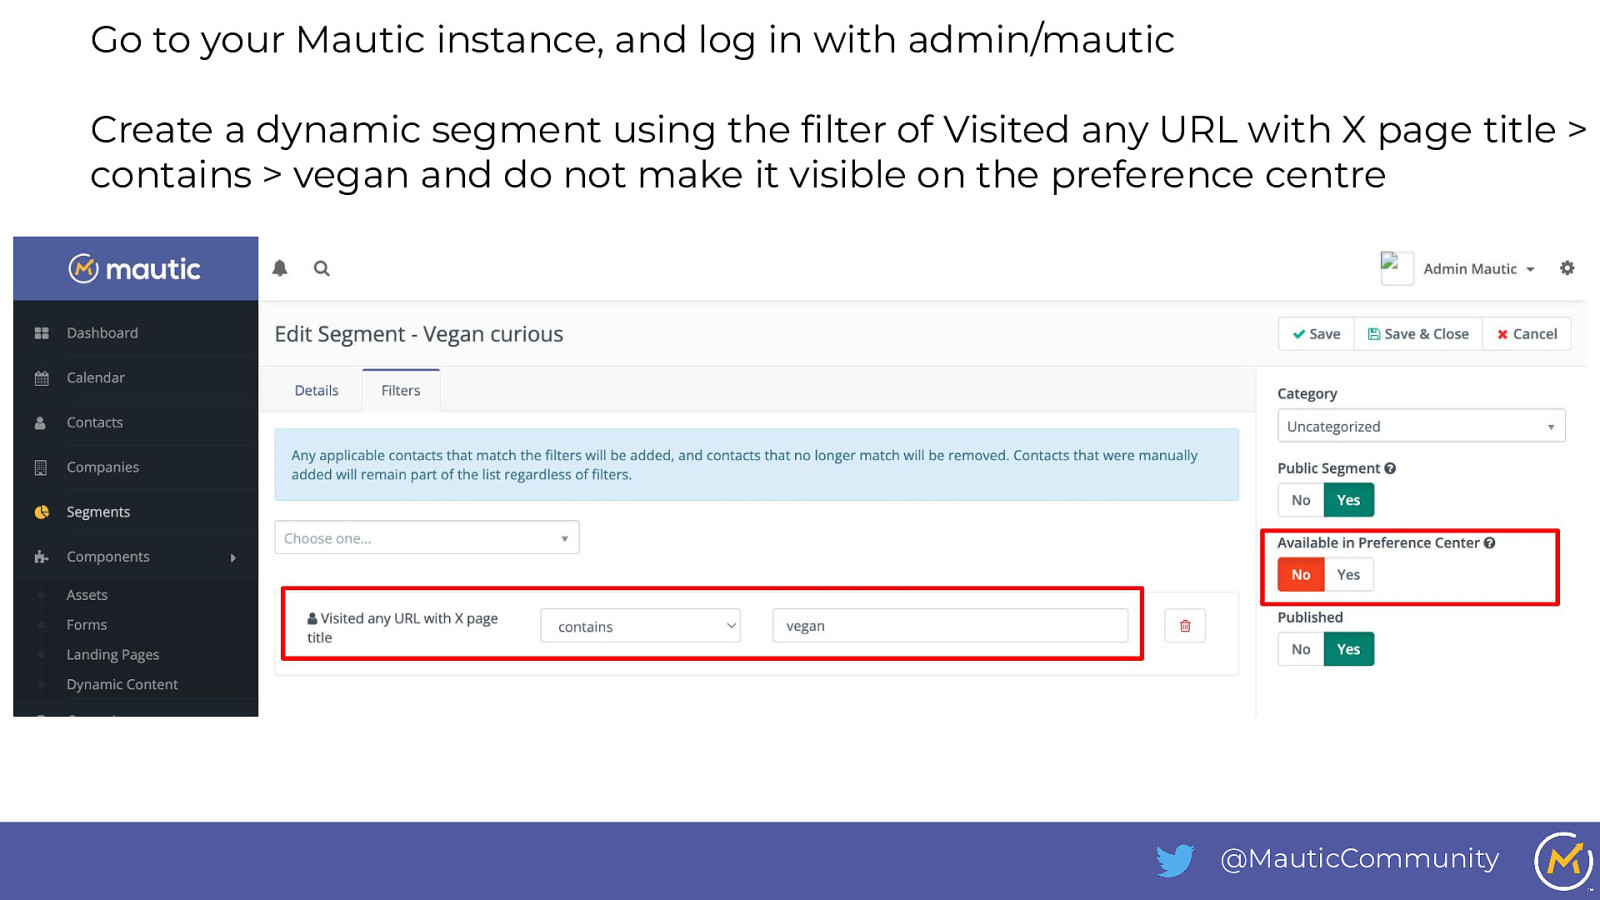
Go to your Mautic instance, and log in with admin/mautic Create a dynamic segment using the filter of Visited any URL with X page title > contains > vegan and do not make it visible on the preference centre @MauticCommunity
Slide 73
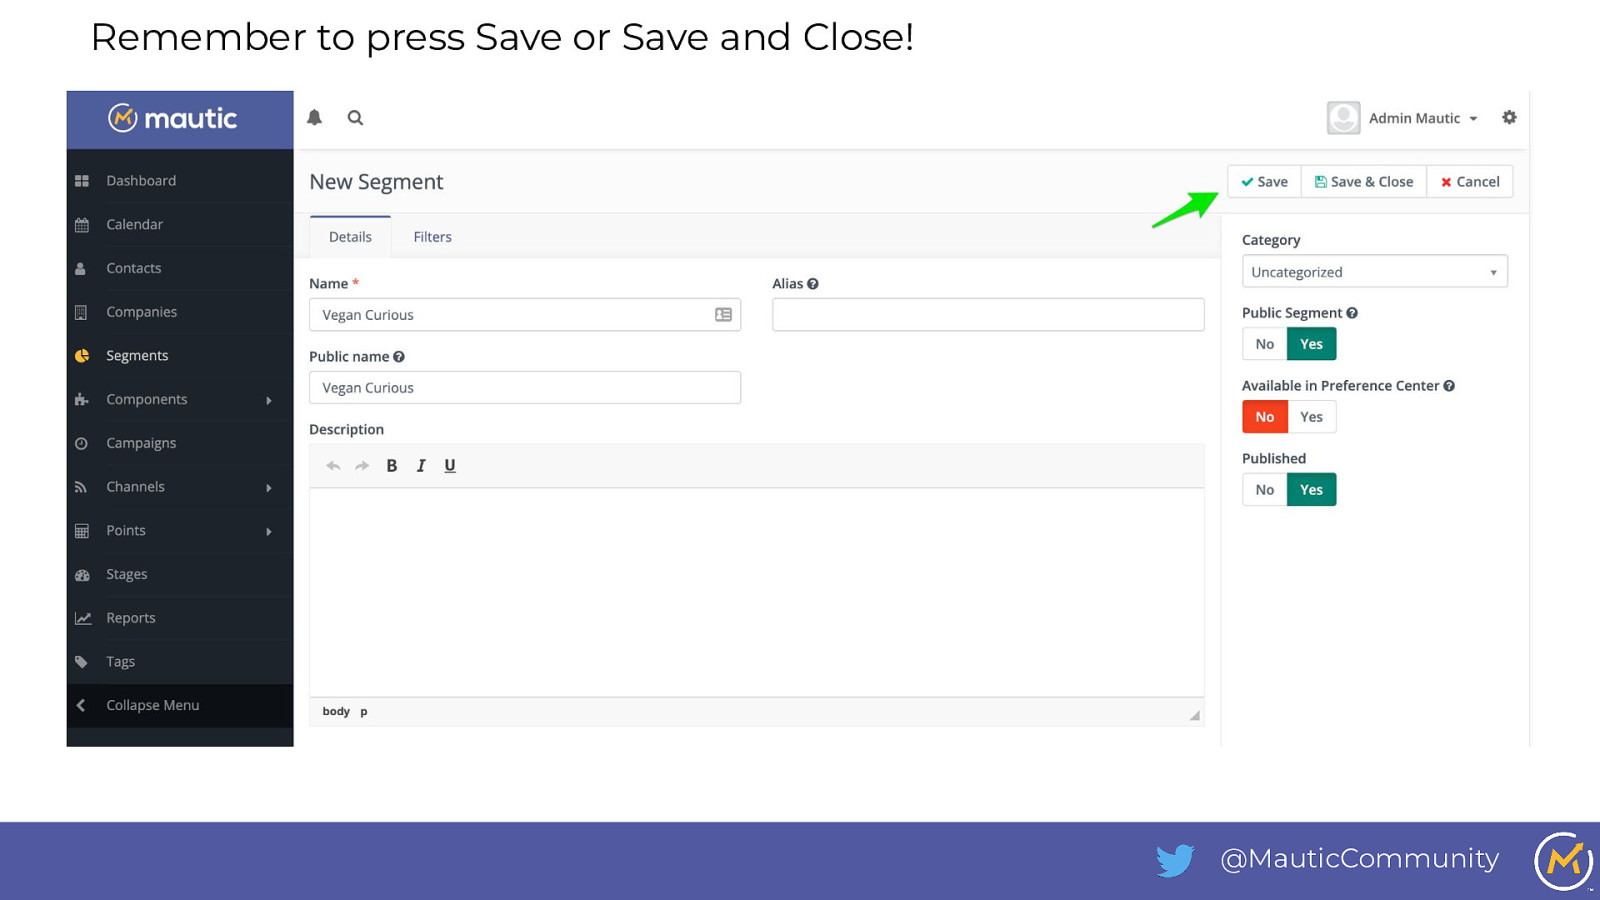
Remember to press Save or Save and Close! @MauticCommunity
Slide 74
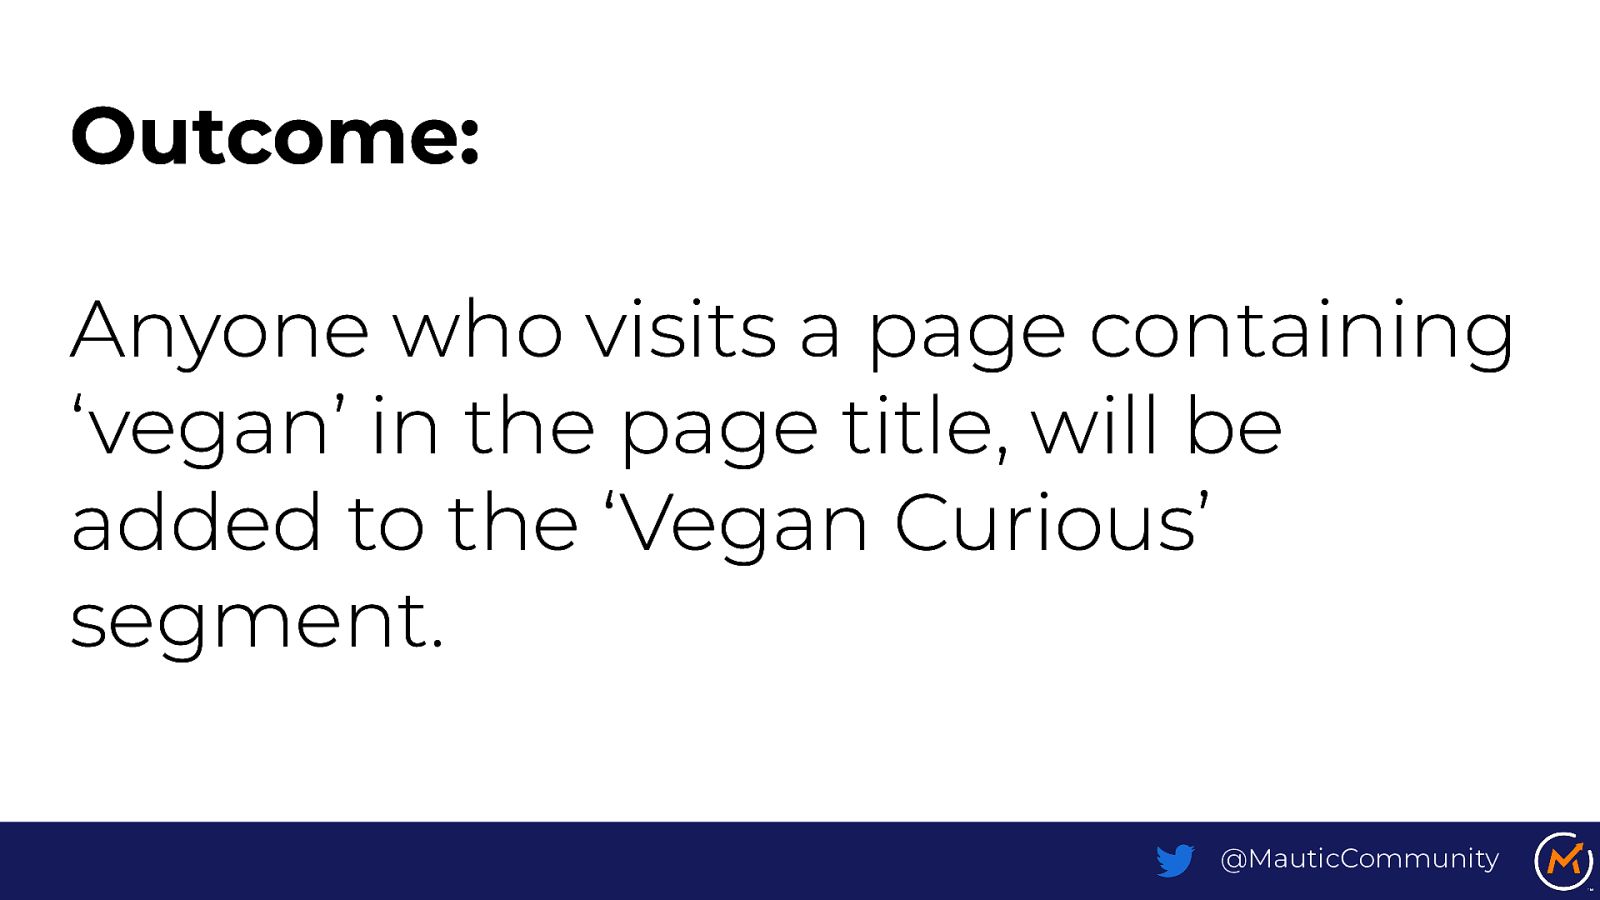
Outcome: Anyone who visits a page containing ‘vegan’ in the page title, will be added to the ‘Vegan Curious’ segment. @MauticCommunity
Slide 75

Interest-based newsletter prompt @MauticCommunity
Slide 76
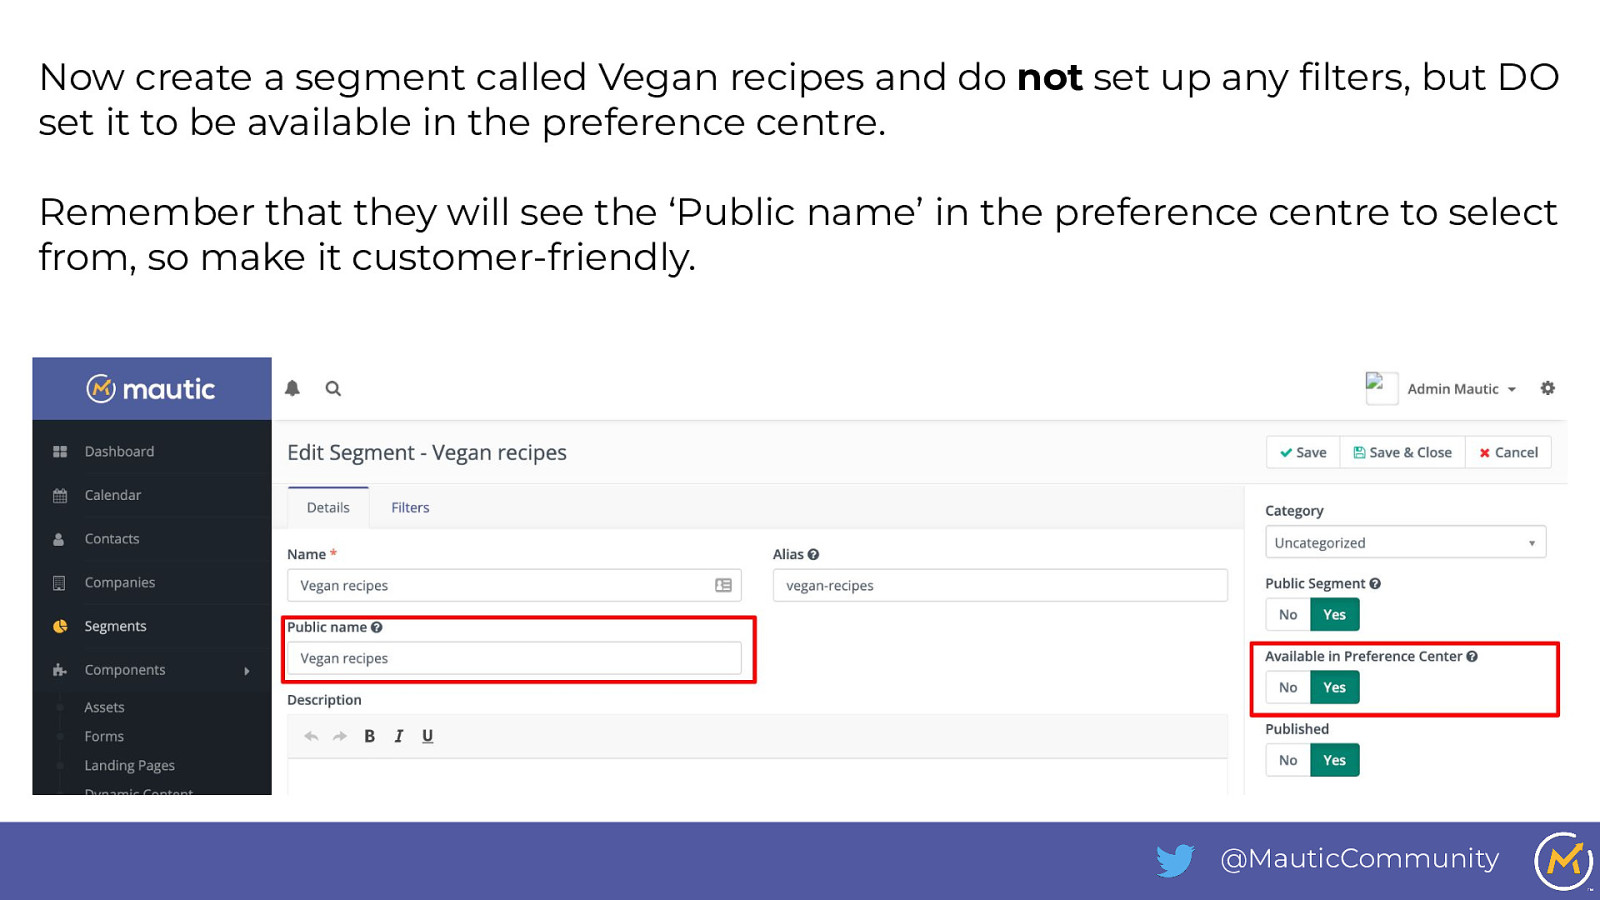
Now create a segment called Vegan recipes and do not set up any filters, but DO set it to be available in the preference centre. Remember that they will see the ‘Public name’ in the preference centre to select from, so make it customer-friendly. @MauticCommunity
Slide 77
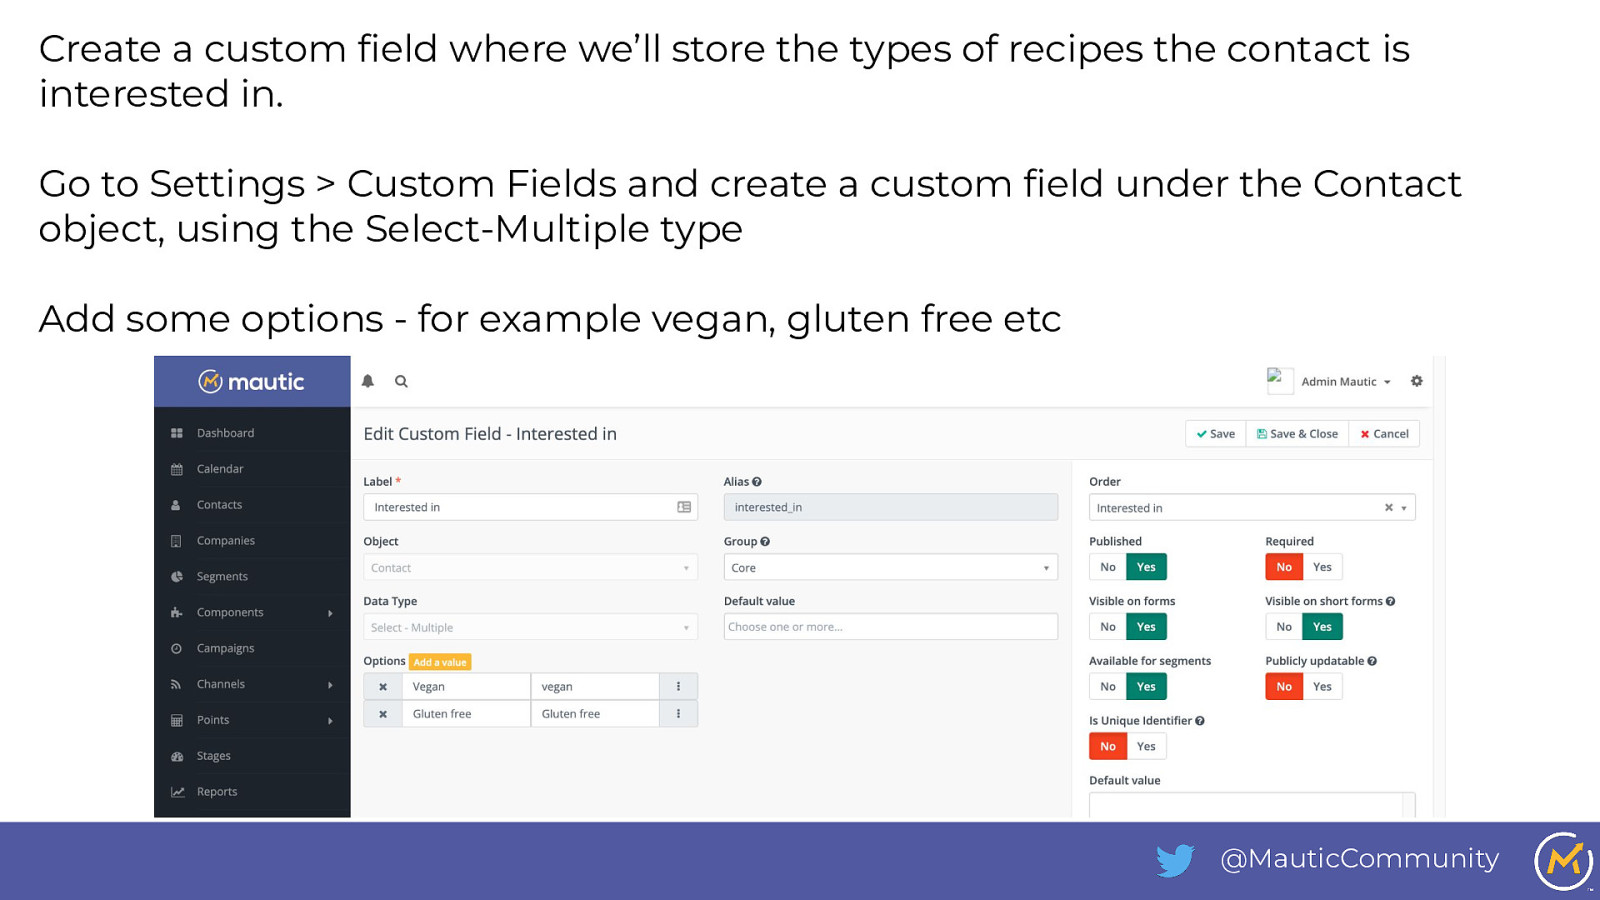
Create a custom field where we’ll store the types of recipes the contact is interested in. Go to Settings > Custom Fields and create a custom field under the Contact object, using the Select-Multiple type Add some options - for example vegan, gluten free etc @MauticCommunity
Slide 78
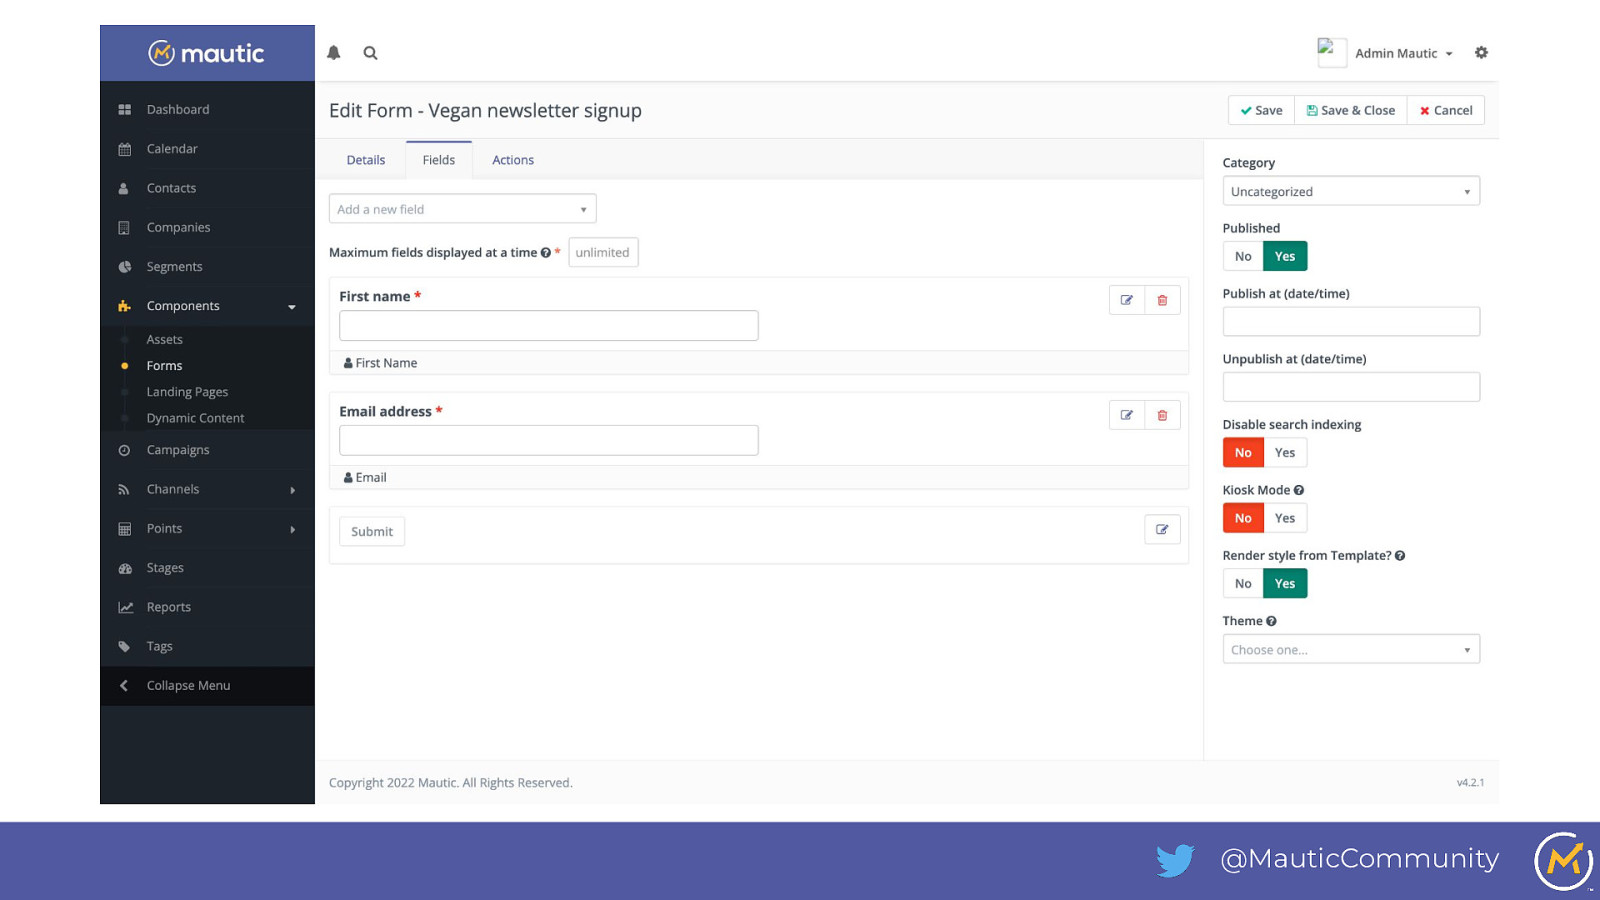
Now let’s create a form which will show to people in this segment, prompting them to join our vegan recipes mailing list. ● Go to Components > Forms > Create and select Standalone form ● Add fields to capture first name and email address ● Map the fields to the relevant contact fields, so that when the person submits the form, their contact profile is updated @MauticCommunity
Slide 79
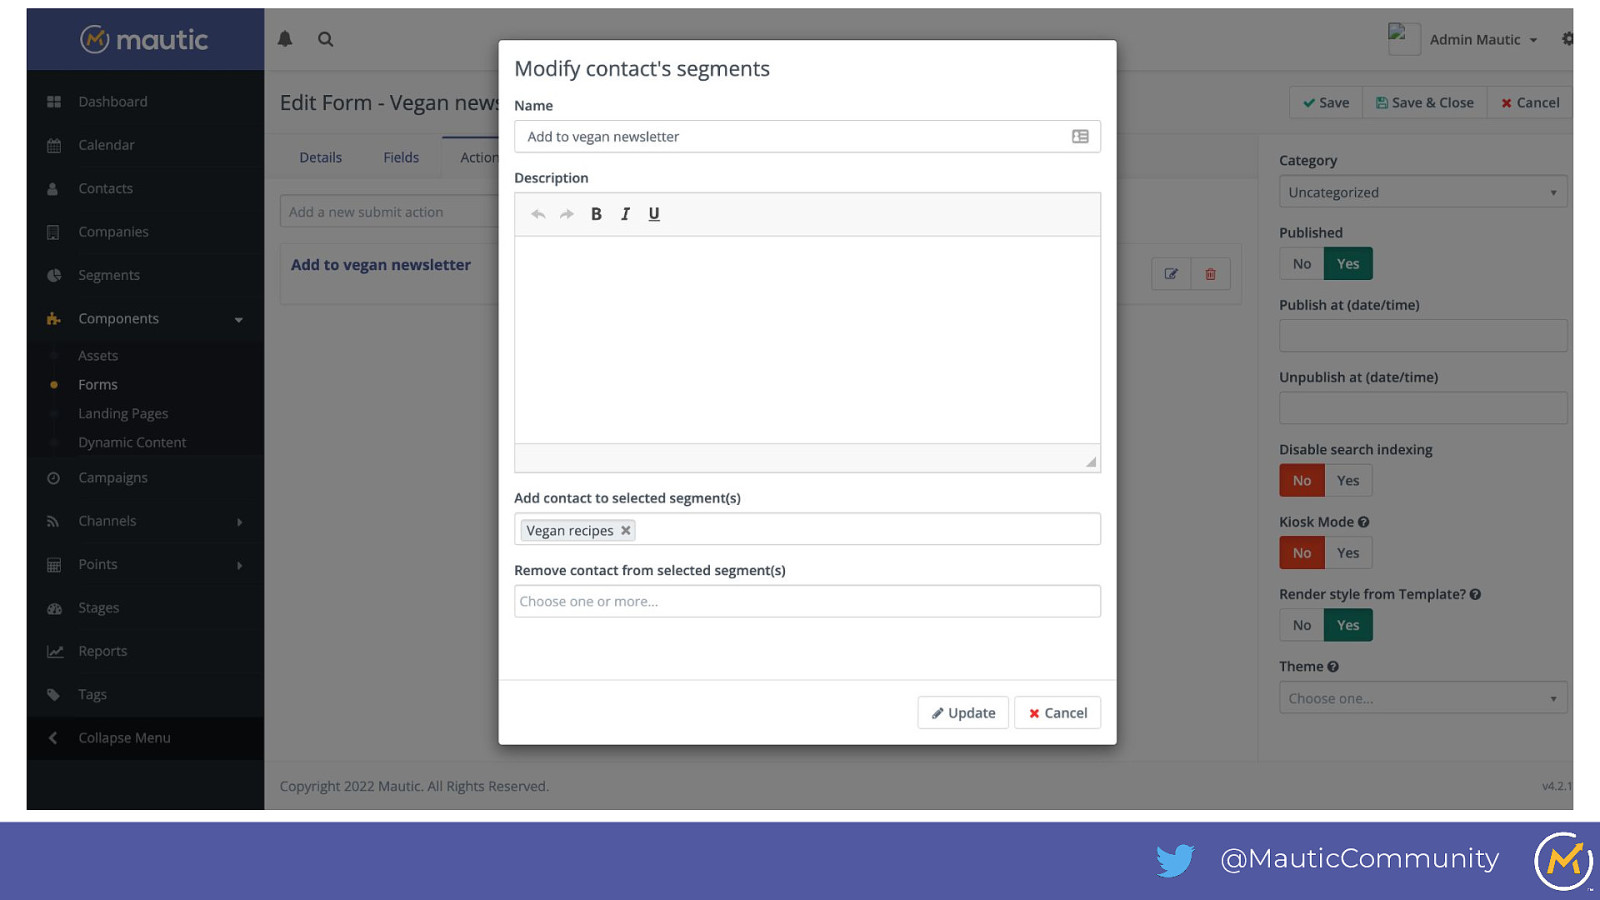
● Add a hidden field using the custom field we just created, setting the default value to vegan ● Edit the text shown on the submit button to ‘Send me the recipes’ ● Add a form action to Modify contact’s segments, and add them to the Vegan recipes segment we just created. ● Click Save & Close @MauticCommunity
Slide 80
@MauticCommunity
Slide 81
@MauticCommunity
Slide 82
Now create a Focus Item notification to show the form when people are in the vegan curious group. Go to Channels > Focus Items and create new. ● Name: Interested In Vegan Click Builder (top right), and set the following options: ● Type: Collect data ● Style: Notification; ○ Placement: Bottom right ● Colors: As you choose, to match the demo site use #da3c13 for primary and #78bd8f for button color, with #827a7a for text color @MauticCommunity
Slide 83
● Content: ○ Headline: Want to be the first to hear when we publish new Vegan recipes? ○ Tagline: Join our Vegan recipes mailing list ○ Form: Select the form created above ○ Custom CSS: ■ Add some styling to give a gap between the text entry fields: ○ .mauticform-row {margin-bottom: 10px;} Close the builder & publish & save & close the focus item @MauticCommunity
Slide 84
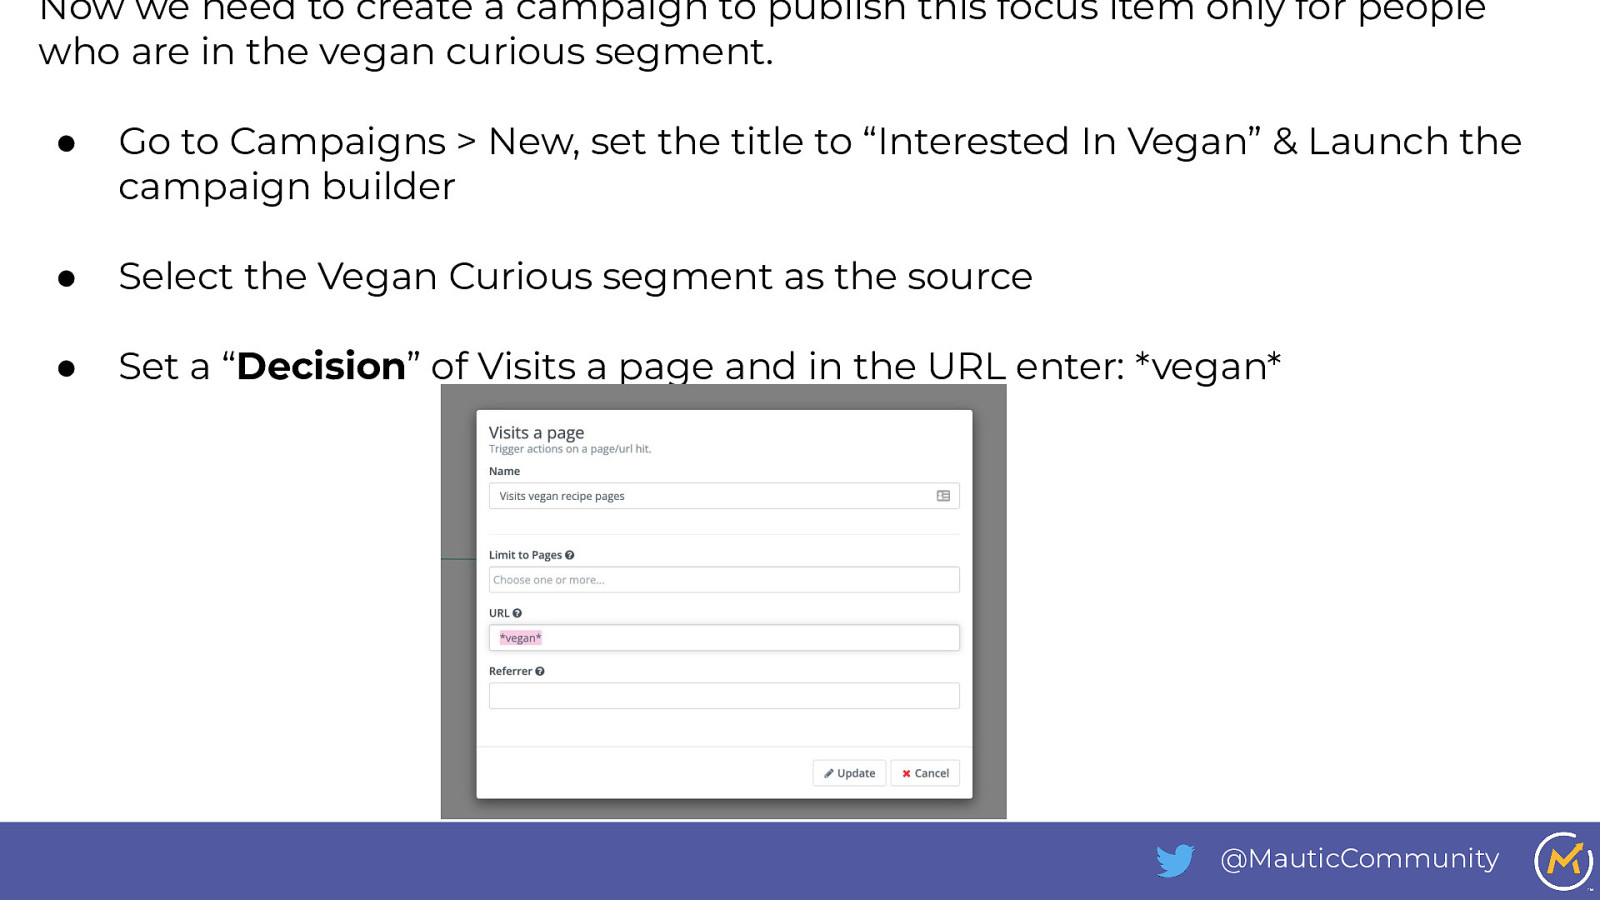
Now we need to create a campaign to publish this focus item only for people who are in the vegan curious segment. ● Go to Campaigns > New, set the title to “Interested In Vegan” & Launch the campaign builder ● Select the Vegan Curious segment as the source ● Set a “Decision” of Visits a page and in the URL enter: vegan @MauticCommunity
Slide 85
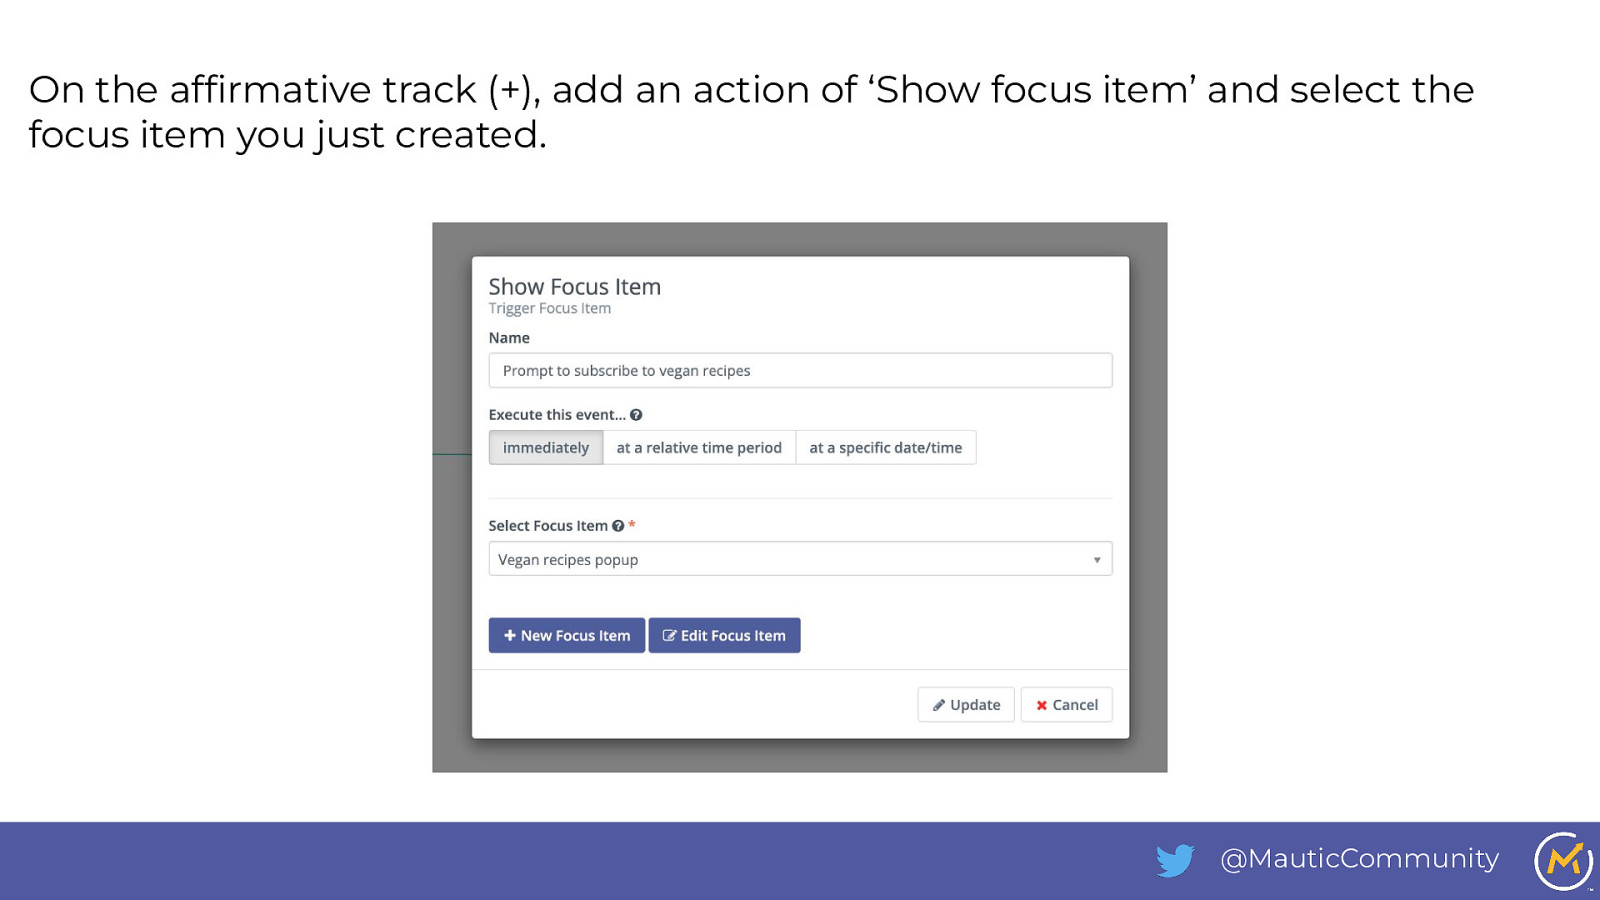
On the affirmative track (+), add an action of ‘Show focus item’ and select the focus item you just created. @MauticCommunity
Slide 86
Outcome: Anyone in the ‘vegan curious’ segment will see a notification prompting them to join the vegan recipes newsletter if they access a page with vegan in the url. @MauticCommunity
Slide 87
Personalize email content @MauticCommunity